Journey with Confidence RV GPS App RV Trip Planner RV LIFE Campground Reviews RV Maintenance Take a Speed Test Free 7 Day Trial ×


Reply
 
Thread Tools Display Modes
Old 11-04-2013, 05:28 PM   #1
Always Learning
 
ependydad's Avatar
 
Join Date: Nov 2011
Location: Four Corners, FL
Posts: 21,891
Winterization instructions - can you verify?

My sister and her friends emailed me the other day - it seems my sister claimed that I knew how they could save them money and give them instructions on how to winterize their campers. I do a lot of reading and even 1/2-winterized mine last year. But I'm FAR from an expert (I haven't even stayed in a Holiday Inn recently).

Their campers are both 5-6 year old used units and they're both fairly newbies, but have husbands who are fairly handy. Here's what I sent- does anyone have any critiques/comments?

---

This sounds like a lot, but basically Mandie and I are able to winterize our big camper in 30-45 minutes.

To winterize your camper, you'll need a couple of things:

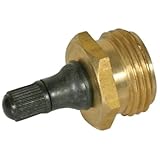
1) A "RV Blowout Plug" - this screws into your city water connection and lets you push air into the RV lines.


2) A small air compressor - preferably one that you can control the air pressure. You generally don't want more than 30 or 40psi blowing into the system. I spent $100 on one at Home Depot. But you can get a smaller one from Harbor Freight or Sears or something. I wanted a bigger one so that I could also use it for airing up my truck and camper tires. (You are checking tire pressure before each trip and make sure both are inflated to the max- aren't you?)

3) A couple of gallons of RV Antifreeze - the pink stuff; not what you put in your car!!! The pink stuff is safe for drinking water lines; the stuff that you put in your car will kill you, seriously. Preferably something that is propylene glycol based (vs. alcohol based) like this from Home Depot.

4) A socket wrench, a 1 1/16" socket and a 3" socket extension - for getting the water heater drain off
(Note, depending on how this was last put back in, this is either going to be "pretty easy" or "holy eff that's hard". You might need a "breaker bar", too.)

5) For re-installing the drain for the water heater, using a little bit of plumbers tape or plumbers putty will make you much happier next year.

6) You *may* need an anode rod, depending on if you have one and how it looks when you take it out of the water heater. (see this link)

---

So now- here's what you have to do:

1) If your black and gray tanks aren't empty, they should be emptied.

2) For this step, the water heater should be off and the water should be cold. Find the exterior panel for your water heater and find the drain plug. It'll match in socket from #4 above. Use the socket wrench, socket and extension- remove the drain (which has an anode rod attached). This is a thick rod that gets eaten away as it lives and eventually needs to be replaced. This page has a good chart that shows when an anode rod should be replaced.

When you remove the anode rod, the water will glug down the side of your camper to the ground. It's likely about 6 gallons (but can be up to 10 gallons). Some people will get some paper towels, twist them and push part of into the camper to wick away the remaining water.

Optional: some people will use a water heater flushing wand to clear out bits of crud from the water heater.

3) Use plumbers tape or putty on the threads of the anode rod and re-install it into the camper. It needs to be a touch snug, but you don't really have to put much pressure on it. In fact, too little pressure is OK. Just in spring- when you go to fill it, remember that it isn't very snug and just tighten it up if it leaks a little.

4) Look under your camper for what are called "low point drains". There are usually 2 of them together. They either have caps on them or maybe have an "on/off" valve that you turn to let water out. You want to open these and let the water drain to the ground. It may help to open/close each water fixture (sink, toilet, shower) to encourage the water to drain out. These drains can be tricky to find sometimes. If you can't find them, it's not awful. Let the water out and re-cap/close the lines.

5) If you use your fresh water tank, it too will have a drain coming out of the bottom of your camper- you want to empty it as much as possible. The drain can be tricky to find sometimes. If you can't find it, turn on your water pump and just run the outside shower to drain off as much water as possible. Let the water out and re-cap/close the line.

6) Now, here's where things get a little tricky as all campers are different. If your camper has a water heater bypass, you want to bypass it. Sometimes this is as easy as looking in a compartment and there is a clearly labeled switch in your control center where your water hookups are. Other times, you have to look at the back of the water heater and see what kind of valves there are. Or, you might not have one. If you don't have one, this is likely worthwhile adding (either now, if you're up for the extra DIY or next year during the season).

If you have one, you want the water heater bypassed so that no water goes into it. If you don't, we'll just re-empty it at the end.


This next part is generally a 2 person job, unless you have a locking air chuck. Wife and I will be on our phones to each other:

7) Start up the air compressor to let it build up pressure. Adjust it so that it regulates the air to between 30 and 40 psi.

8) Screw in the blowout plug from #1 to your city water connection (aka hose hookup).

9) Now, in order of faucets, toilets and showers from closes to the water inlet to furtherest:
a) you want to open the cold faucet.
b) put the air pressure onto the blowout plug and blow air into the lines. The faucet will push out some water and then will spit and then will be just air.
c) open the hot, close the cold and wait for it to be just water.

Don't forget the toilets! We did and ended up with a leak this spring. For the toilets, you'll hold the flusher down. Remember, you need to do:
- all faucets
- all shower heads (including outside shower)
- all toilets
- all outside hose hookups that are fed from the onboard water system
- washer hookup (ok, maybe this is just a reminder for me )

10) If you didn't find a bypass for the water heater, go ahead and open that drain again and see if water comes out. Maybe do the paper towel trick. (shrugs)

11) If you have a water filter, open the canister and dump out the water. Throw away the filter (record size/shape/model # if you need to. If you are going to do step #13 below and plan on pumping antifreeze into the lines, you want to fill up this canister with something that takes up space so that you don't waste a bunch of antifreeze. Capped soda bottles work well for this.

12) Take some RV antifreeze and pour a couple of cups down each sink (kitchen, bathroom, outside kitchen), shower drains and toilet (just enough to cover the seal on the bottom).

----

Now, that's all that I did for the pop-up for one year and the new camper for last year. It's usually sufficient because it doesn't get grossly cold here. However, when you pay to have a camper winterized, they'll also push pink stuff into all of the lines. I'll likely do that this year- I just didn't do it last year because I got confused . The concern is that while blowing out the lines seems like it gets all of the water out, there may be some residual in low points or dips in the lines.

---

13) Pushing antifreeze into the lines is tricky again because all campers are different. I have a second winterization bypass valve that switches my water pump from pulling water from the fresh water tank to pulling water from an outside hose hookup. I'm able to connect a hose to my freshwater tank fill and have the end of it in a jug of the pink antifreeze stuff and when I run the pump, it'll actually suck antifreeze from the jug.

In other cases, you can use a pump to push the antifreeze in from the city water connection. This is a little more vague to me as I haven't had to do this. Looks like Camping World has the hand pump and a video (love the guy's camo).

Some people will recommend that you dump a bunch of gallons into your fresh water tank- I really dislike this idea as I feel like this would be hard to undo and get all of the antifreeze out.

Final note- in step 6, if you didn't have a water heater bypass, you'll likely end up pushing a bunch of antifreeze into the water heater. There are differing opinions on if you want to leave this in your water heater or not over the winter. Personally, I wouldn't do it. I'd attempt to drain it out.

In either case, you want to follow the same basic procedure as blowing out the lines. In order of faucets, toilets and showers from closes to the water inlet to farthest:
a) you want to open the cold faucet
b) wait for pink to come out (it'll likely push some water out ahead of it at first)
c) close the cold and open the hot water
d) wait for pink to come out (it'll likely push some water out ahead of it at first)

Again, remember all of your water fixtures- sinks, shower heads (inside and out), toilets, washer/dryer hookups and any water hose hookup that feeds from the camper's water system.

If you use the hand pump, you can also push RV antifreeze into a black tank flush (if you have one).

-----------------

To unwinterize- you basically just hookup a hose and run water at every tap until just water comes out (same order, nearest to farthest). Many folks will cut the water, dump a little bit of bleach into the end of the hose and then reconnect it to sanitize the lines. Same with the fresh water tank- there are a bunch of ways of sanitizing it, but basically it's a little bit of bleach into the tank, let it set, drain and flush it out a couple of times.
__________________
Officially a SOB with a 2022 Jayco Precept 36C
Checkout my site for RVing tips, tricks, and info | Was a Fulltime Family for 5 years, now we're part-timing on long trips
ependydad is offline   Reply With Quote
Old 11-04-2013, 06:56 PM   #2
Senior Member
 
Join Date: Jun 2011
Location: Milford, MA
Posts: 445
If you are using antifreeze you can generally skip the blow-out method and save $ from not having to buy a compressor and all the parts.


A water pump bypass is really the only investment needed.....
Set hot water heater to bypass mode, empty HW heater. Replace anode
Open the low point drains then open all faucets to release any vacuum
Close faucets
Hook up water pump bypass
Insert hose into pink stuff and turn on water pump
Open faucets one by one (incl ext shower if applicable) until pink stuff runs out (you can collect the pink stuff as it exits the outside drain if you like and you don't have a gray/black tank)

That's the method I use for a small a frame camper with no gray or black tank - tts and larger rigs with bath facilities will be slightly more complicated but this process literally takes me about 3min to do start to finish.
__________________
2011 A-122
rawlus is offline   Reply With Quote
Old 11-04-2013, 06:56 PM   #3
Senior Member
 
Join Date: Feb 2012
Location: Wisconsin
Posts: 13,738
I think you covered it great! Only thing I add to my procedure is to stand back (found this out the hard way) and open the pressure relief valve before removing anode rod. IMHO your sister owes you a 12er.
Wiscampsin is offline   Reply With Quote
Old 11-04-2013, 07:23 PM   #4
Always Learning
 
ependydad's Avatar
 
Join Date: Nov 2011
Location: Four Corners, FL
Posts: 21,891
Thanks guys. The water heater bypass- I wanted to tell them about it, but didn't encourage the installation one too strongly (though, I feel it would be a huge benefit to have one).

Wiscampin, you're right about the anode/water heater spitting at you. I've been splashed each time!
__________________
Officially a SOB with a 2022 Jayco Precept 36C
Checkout my site for RVing tips, tricks, and info | Was a Fulltime Family for 5 years, now we're part-timing on long trips
ependydad is offline   Reply With Quote
Old 11-04-2013, 07:25 PM   #5
Jack of All Trades
 
RJHuser's Avatar
 
Join Date: Oct 2010
Location: Williston, Florida
Posts: 317
Blow Out Plug

I made my own blow out plug that works much better than any you can buy pre made

Most compressor today come with a quick coupler on the hose. If you have a spare male end, use it, or buy a male end to match your quick coupler. Also, while you're at your favorite big box store or hardware store, buy a male hose to NPT adapter and, if needed, a reducing bushing to go from your quick coupler male end to the male hose to NPT adapter (typically the quick coupler male end will be 3/8" NPT male, and the male hose to NPT adapter will be 1/2" NPT female, so you would need a 1/2" to 3/8" NPT reducing bushing). Assemble the pieces together with Teflon pipe tape on the threads, and you have a blow out plug that doesn't require someone to hold the air chuck on the blow out plug.

Another advantage of this plug is that you get a much higher air flow (not pressure - flow). It is the flow or velocity of the air through the water lines that clears the water out.

To use, empty your water filter canister (water and used filter), screw the blow out plug you made onto the city water inlet, set your compressor to 40 to 50 psig (if your compressor doesn't have a pressure regulator, buy one and use it!) and connect the quick coupler on the hose from the compressor to the blow out plug. Now you have a one person operation.

By the way, you should start at the faucet furthest from the water inlet, and let it blow until there is no trace of water coming out. Then go to the next faucet and repeat the process.

After I do this, I go back and blow out the lines to the water heater by opening the bypass valves one at a time to the inlet and outlet to insure all the water is out of those lines (this is done with the water heater drain plug/anode rod out). After about 10 minutes, I go back through and blow all the lines out again, but this time I'll keep the faucet closed until pressure has built up in the lines (40 to 50 psig - whatever you set your compressor at) and quickly open the faucet. This insures you get a high velocity of air through the water lines - remember, I said flow or velocity is what clears the water out of the lines. I repeat this three or four times at each faucet before moving on to the next faucet. Remember to also blow out your low point drains and your black tank flushing lines.

One thing I do when I do the second blow out, I remove the shower hose from the faucet and hang it up so it can drain any remaking water by gravity, and let's it dry out also. At the outdoor shower, I remove the shower head and store it away for the winter.

When all done, I personally leave all the faucets open. I think this allows any remaining moisture to evaporate and vent out.

By the way, when completed, go back and remove your water filter canister, empty any water out of it, dry it out with a towel, and reinstall it (so you don't hook up the water in the spring and turn it on with the water filter canister off - don't ask how I know about this ).

Finally, reinsert the drain plug/anode rod in the water heater. Again I leave it just sitting in the connector, not screwed in, to allow any remaining moisture to drain out.

Sorry this got so long. I've been using this method for about 25 - 30 years across three RV's and never had any freeze damage, even when we lived in northern Pennsylvania (winter temperatures as low as -20 degrees F). I never use the pink stuff - yuck!!!

Rick
__________________
Rick & Debbie; Brandy Schnoodle & Bucky (Dexter & Fritz R.I.P.) the Doxie "Kids"
2015 Jayco Pinnacle 36RSQS 5'er
2018 GMC Sierra Denali 3500HD, 6.6L Diesel Dually; B&W Companion 5'er hitch
ScanGauge, TST 507 TPMS
RJHuser is offline   Reply With Quote
Old 11-04-2013, 08:48 PM   #6
DW's 401(k) Plan
 
DaGrinch's Avatar
 
Join Date: Sep 2013
Location: Western MD
Posts: 2,372
I've got the whole WH by-pass bit, put something in the water filter canister to take up space, low point drains, etc...... What I am fuzzy about is the new trailers that have the anti-freeze filler inlet next to the city water connection. Screw a short hose into the anti-freeze filler and the other end stuck in a gallon of anti-freeze and let it siphon in with the water pump on?

I had no problem winterizing my Roo 23SS - got the kit to siphon the anti-freeze in the lines, WH by-pass, etc. But this new anti-freeze inlet has me a bit puzzled.

Thanks for the help.

Larry
__________________

"Sunny" the 2017 Sunseeker 3010DS
2006 Jeep Liberty Toad
.... and lovin' life........MOST of the time.
DaGrinch is offline   Reply With Quote
Old 11-04-2013, 08:49 PM   #7
Always Learning
 
ependydad's Avatar
 
Join Date: Nov 2011
Location: Four Corners, FL
Posts: 21,891
DaGrinch, that's exactly my understanding.
__________________
Officially a SOB with a 2022 Jayco Precept 36C
Checkout my site for RVing tips, tricks, and info | Was a Fulltime Family for 5 years, now we're part-timing on long trips
ependydad is offline   Reply With Quote
Old 11-04-2013, 09:21 PM   #8
DW's 401(k) Plan
 
DaGrinch's Avatar
 
Join Date: Sep 2013
Location: Western MD
Posts: 2,372
Quote:
Originally Posted by ependydad View Post
DaGrinch, that's exactly my understanding.
Cool.

Not sure I've run across the proper instructions yet and the TT goes to storage this weekend.

Larry
__________________

"Sunny" the 2017 Sunseeker 3010DS
2006 Jeep Liberty Toad
.... and lovin' life........MOST of the time.
DaGrinch is offline   Reply With Quote
Old 11-04-2013, 09:24 PM   #9
Always Learning
 
ependydad's Avatar
 
Join Date: Nov 2011
Location: Four Corners, FL
Posts: 21,891
Quote:
Originally Posted by DaGrinch View Post
Cool.

Not sure I've run across the proper instructions yet and the TT goes to storage this weekend.

Larry
There aren't a whole lot of "proper instructions". It's sort of what you glean from the Internet of what others do and make your own way...
__________________
Officially a SOB with a 2022 Jayco Precept 36C
Checkout my site for RVing tips, tricks, and info | Was a Fulltime Family for 5 years, now we're part-timing on long trips
ependydad is offline   Reply With Quote
Old 11-04-2013, 09:41 PM   #10
Senior Member
 
Hutch333id's Avatar
 
Join Date: Oct 2012
Location: Cochrane, AB
Posts: 829
Expendydad,

I may have missed it and forgive me if I did but did you mention popping off the metal filter screen inside the city water inlet, standing well back and to the side before pressing the little button to draw the pink stuff into the line for the city water feed. It will undoubtedly spray the pink stuff all over you and I know from experience it tastes foul and lasts a long time if you do happen to get a face full.
__________________


Richard & Diane
2014 Cedar Creek 38FL
2016 F350 Lariat CC DRW
Retired Metropolitan Police (UK)
Hutch333id is offline   Reply With Quote
Old 11-04-2013, 09:45 PM   #11
Always Learning
 
ependydad's Avatar
 
Join Date: Nov 2011
Location: Four Corners, FL
Posts: 21,891
Quote:
Originally Posted by Hutch333id View Post
Expendydad,

I may have missed it and forgive me if I did but did you mention popping off the metal filter screen inside the city water inlet, standing well back and to the side before pressing the little button to draw the pink stuff into the line for the city water feed. It will undoubtedly spray the pink stuff all over you and I know from experience it tastes foul and lasts a long time if you do happen to get a face full.
I do not have that in the instructions and realize now that it's been mentioned a couple of times here. I've got to get my camper back and see what y'all are talking about before writing that up...
__________________
Officially a SOB with a 2022 Jayco Precept 36C
Checkout my site for RVing tips, tricks, and info | Was a Fulltime Family for 5 years, now we're part-timing on long trips
ependydad is offline   Reply With Quote
Old 11-06-2013, 03:14 PM   #12
Paul & Sheri
 
pwb01's Avatar
 
Join Date: May 2012
Location: Upstate New York
Posts: 239
A couple more steps:

Clean refrigerator and freezer, put in open box of baking soda and lock slightly open.

Make sure you've removed everything that will freeze from the pantry, medicine cabinet and cleaning supplies.

Good idea to leave a vent slightly open if protected from weather.

Your gas appliance manuals might note to run them once a month in storage such as stove and furnace.

Remove batteries unless you want to keep them constantly charging. A dead battery will freeze.

Put a "Bounty" dryer sheet in every drawer, cabinet and in compartments such as the refrigerator and water heater. I'll put them under furniture and in storage areas. Air it out a day in the spring. Many camper parts stores carry them this time of year so I thought it must be a good idea.

All I can say is after 10 years of doing this I have never, never seen a mouse, an ant or a spider in any place in my campers including tubes around appliances.

Fact or fiction? It works for me and it's cheap enough. Will other brands work? I don't know but Bounty has so I stuck with it.

And lastly, admit that summers over.
__________________
2012 F150 F/X 4, 6cyl EcoBoost with Max tow pkg
2013 Rockwood 8280WS 5th wheel
2006 Sunline T1950
2004 T@B T-16
pwb01 is offline   Reply With Quote
Old 11-06-2013, 03:27 PM   #13
Paul & Sheri
 
pwb01's Avatar
 
Join Date: May 2012
Location: Upstate New York
Posts: 239
Quote:
Originally Posted by Hutch333id View Post
Expendydad,

I may have missed it and forgive me if I did but did you mention popping off the metal filter screen inside the city water inlet, standing well back and to the side before pressing the little button to draw the pink stuff into the line for the city water feed. It will undoubtedly spray the pink stuff all over you and I know from experience it tastes foul and lasts a long time if you do happen to get a face full.
I won't leave pressure in the system so I open a faucet when done pumping antifreeze in and when the pressure is very low I then stand aside and pop off the screen and push in the button. I learned the hard way myself a few years ago. It does taste foul!
__________________
2012 F150 F/X 4, 6cyl EcoBoost with Max tow pkg
2013 Rockwood 8280WS 5th wheel
2006 Sunline T1950
2004 T@B T-16
pwb01 is offline   Reply With Quote
Old 11-06-2013, 04:36 PM   #14
Anacortesians
 
Join Date: Oct 2010
Location: Anacortes, WA
Posts: 1,166
Since I can never remember the by-pass valve position when I want it to bypass, I leave the water heater pressure relief valve open. When the air is flowing from the compressor, I go listen at the PRV. If it's bubbling, I know the bypass isn't set right.
__________________
Frank and Eileen
No longer RVers or FR owners
F and E Damp is offline   Reply With Quote
Old 11-06-2013, 07:53 PM   #15
Paul & Sheri
 
pwb01's Avatar
 
Join Date: May 2012
Location: Upstate New York
Posts: 239
Quote:
Originally Posted by F and E Damp View Post
Since I can never remember the by-pass valve position when I want it to bypass, I leave the water heater pressure relief valve open. When the air is flowing from the compressor, I go listen at the PRV. If it's bubbling, I know the bypass isn't set right.
I drew a diagram for by-pass and non by-pass valve positions and put them in the manual. Same for the valve positions for the antifreeze intake. Without that, I'd forget too.
__________________
2012 F150 F/X 4, 6cyl EcoBoost with Max tow pkg
2013 Rockwood 8280WS 5th wheel
2006 Sunline T1950
2004 T@B T-16
pwb01 is offline   Reply With Quote
Old 11-06-2013, 08:22 PM   #16
DW's 401(k) Plan
 
DaGrinch's Avatar
 
Join Date: Sep 2013
Location: Western MD
Posts: 2,372
Quote:
Originally Posted by ependydad View Post
If you are going to do step #13 below and plan on pumping antifreeze into the lines, you want to fill up this canister with something that takes up space so that you don't waste a bunch of antifreeze. Capped soda bottles work well for this.
I put a dry, empty water bottle in the canister and when I started pumping in the pink stuff, the pressure collapsed the bottle, forcing the air out of the tightened bottle cap. Guess I'll find something a little more substantial next year. I think I let the other piece go with the 23SS when I sold it.
The good news is - thanks to ependydad and FR's anti-freeze filler, the whole procedure took about 10 minutes. I think I waited longer for my son to get home from work than it took to do the procedure.
Oh, and yeah, I stood to the side when I opened the city water valve. It does have some pressure, doesn't it?

Larry
__________________

"Sunny" the 2017 Sunseeker 3010DS
2006 Jeep Liberty Toad
.... and lovin' life........MOST of the time.
DaGrinch is offline   Reply With Quote
Reply

Tags
winter


Posting Rules
You may not post new threads
You may not post replies
You may not post attachments
You may not edit your posts

BB code is On
Smilies are On
[IMG] code is On
HTML code is Off
Trackbacks are Off
Pingbacks are Off
Refbacks are Off


» Featured Campgrounds

Reviews provided by

Disclaimer:

This website is not affiliated with or endorsed by Forest River, Inc. or any of its affiliates. This is an independent, unofficial site.


All times are GMT -5. The time now is 01:50 AM.