 |
|
 02-18-2019, 11:08 PM
|
#41
|
|
Member
Join Date: Nov 2016
Posts: 94
|
Quote:
Originally Posted by dward51

I just bought a Roadmaster Active Suspension for my 2002 GMC 1500 along with a set of Bilstein shocks. I'm thinking just get the Equa-Flex and see how it goes. We stick to paved roads and don't boondock.
|
I have the Roadmaster Active Suspension on the 2018 Crew Cab Tundra. I really like the ride without a load, you hardly notice any difference in ride quality. I have mine adjusted using the thicker washer, plus a little more.
It works as advertised, I would buy it again. Great product.
Sorry for the detour-back to the topic at hand.

__________________
2018 Toyota Tundra Crewmax
2017 Mini Lite 2509S
2012 Mini Lite 2306, 2000 Storm 32ft Class A w/dbl slides, 1998 Class C 23ft Fleetwood, 1990 8ft Lance.
Nights Camped 2016- 15, 2017- 30,2018-27, 2019-36 2020-21
|

|

|
|
02-18-2019, 11:08 PM
|
#42
|
|
Retired Old Fart
Join Date: Nov 2018
Location: McDonough, GA
Posts: 971
|
Quote:
Originally Posted by MOODMAN
One thing I would do FOR SURE is paint all the exposed metal. Even if it's covered by plastic. Use rustoleum. It's good stuff.
|
Yes absolutely.
I'm going to add some additional Rustoleum to what the Lippert tech put on before I button up my underbelly. I'm thinking of satin finish as the gloss is just too glossy and flat holds dirt somewhat.
I have a couple of areas on the underside of the side I-beams near the front of the trailer where the factory did not seal the coroplast very well to the bottom of the I-beam. I need to sand/grind down that rust, prime and repaint a couple of touch up spots. It's another one of those "might as well" since I have easy access to it with the underbelly off.
__________________
Just the 2 of us in a...
"Currently between trailers"
Sold the 246RKS in 2023
|
|
|
|
|
02-18-2019, 11:21 PM
|
#43
|
|
Member
Join Date: Nov 2016
Posts: 94
|
Quote:
Originally Posted by Lee Pedrick
I wanted to pull my underbelly off so I could inspect, and document whats under there. But I saw that just taking the stuff off and back on by itself would be a MAJOR undertaking. I'am thinking just cut a circle around each fastener,, roll it backwards out of the way,, and when I reinstall, I'll just refasten it next to the original holes. Hell, they got glues that will hold that stuff up.
|
I know the OP already removed the colorplast. In the forums here I found an option that worked pretty well. I found a small socket that just barley fit the head of the ram nail they use. A light tap with a hammer and it grabs those nails pretty good. You attach the socket to an extension and to an impact tool. Sometimes they just unscrew right out. Other times they become loose enough to get a pry bar under to pry out. I only had a couple I had to hammer sideways to shear them off. Re attach with 5/16x 3/4 inch long self tapping screws and a small fender washer. Yes its still a pain in the arse.
__________________
2018 Toyota Tundra Crewmax
2017 Mini Lite 2509S
2012 Mini Lite 2306, 2000 Storm 32ft Class A w/dbl slides, 1998 Class C 23ft Fleetwood, 1990 8ft Lance.
Nights Camped 2016- 15, 2017- 30,2018-27, 2019-36 2020-21
|
|
|
|
|
02-18-2019, 11:35 PM
|
#44
|
|
Retired Old Fart
Join Date: Nov 2018
Location: McDonough, GA
Posts: 971
|
Quote:
Originally Posted by ace911
I know the OP already removed the colorplast. In the forums here I found an option that worked pretty well. I found a small socket that just barley fit the head of the ram nail they use. A light tap with a hammer and it grabs those nails pretty good. You attach the socket to an extension and to an impact tool. Sometimes they just unscrew right out. Other times they become loose enough to get a pry bar under to pry out. I only had a couple I had to hammer sideways to shear them off. Re attach with 5/16x 3/4 inch long self tapping screws and a small fender washer. Yes its still a pain in the arse.
|
That's another advantage to adding the coroplast angle support under the cross beams. I can leave those ram nails that are still attached in place as they will be in the "gap". Even the Lippert tech said they hate those nails.
__________________
Just the 2 of us in a...
"Currently between trailers"
Sold the 246RKS in 2023
|
|
|
|
|
02-22-2019, 09:11 PM
|
#45
|
|
Senior Member
Join Date: Jul 2017
Location: California
Posts: 7,616
|
Quote:
Originally Posted by dward51
Photo is a screen grab from a KYD video on the upgrades they did for their Alaska trip. This is where I first saw the idea of boxing in the spring hangers on a trailer. Easy to do, inexpensive, and will make the hangers much stronger. This is right after welding and before painting the welds.
 |
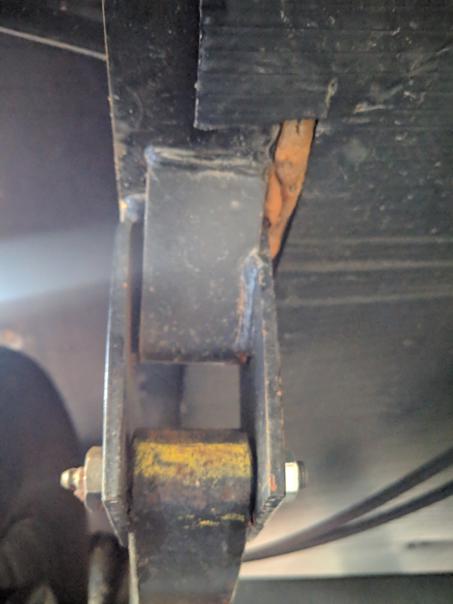
I have decided that boxing in the hangers is not a good idea after all. Below is the picture of my spring hanger. They are designed so the outer drop can bend toward the inner piece when installing the spring. Even the brace they put in allows the outer piece to move since it isn't welded to it. I will however add a cross brace between the inner spring hangers across from each other on the trailer.
It is interesting that the spring hangers that were shown in the video are a lot shorter than the ones installed on my Coachmen. It is possible that the ones installed on that trailer in the video are the exact width as the leaf spring width.
My C channel that I will be using to connect the two sides is 2" x 1" x 3/16".
|
|
|
|
|
02-24-2019, 06:11 PM
|
#46
|
|
Senior Member
Join Date: Oct 2017
Location: Delaware
Posts: 279
|
I don't understand,,,,, why does that outer hangar have to flex,, At all,,that alone puts stress on the frame weld,,,not that we change springs all the time but,,, where did you get that info and why is it necessary?
|
|
|
|
|
02-24-2019, 10:02 PM
|
#47
|
|
Senior Member
Join Date: Jul 2017
Location: California
Posts: 7,616
|
Quote:
Originally Posted by Lee Pedrick
I don't understand,,,,, why does that outer hangar have to flex,, At all,,that alone puts stress on the frame weld,,,not that we change springs all the time but,,, where did you get that info and why is it necessary?
|
To be snug with the spring. The hanger bends in toward the spring on that side. You can't tell from this angle but the outer side definitely bends in on mine.
|
|
|
|
|
02-24-2019, 10:07 PM
|
#48
|
|
Senior Member
Join Date: Jan 2018
Location: Raleigh, NC
Posts: 9,591
|
What's the idea?
Quote:
Originally Posted by babock
To be snug with the spring. The hanger bends in toward the spring on that side. You can't tell from this angle but the outer side definitely bends in on mine.
|
Is the idea that you tighten it so tight that you bind the metal sleeve in the center of the rubber bushings? In that case, what's the point of having a "wet bolt?"
Or do you just snug it down so the springs don't have much/any end play?
Larry
|
|
|
|
|
02-24-2019, 10:10 PM
|
#49
|
|
Senior Member
Join Date: Oct 2016
Location: Snohomish, WA
Posts: 1,151
|
Quote:
Originally Posted by Larry-NC
Is the idea that you tighten it so tight that you bind the metal sleeve in the center of the rubber bushings? In that case, what's the point of having a "wet bolt?"
Or do you just snug it down so the springs don't have much/any end play?
Larry
|
I think a little play and bend is ok. Realistically, if the hangers are so rigid, the next weakest point in the frame will show. I think with the hangers flexing a bit, it allows the frame to stay ridged. In my case where the hangers separated from the frame, the initial welds didn't penetrate and didn't actually mate the hangers to the frame. Looking at my new, correctly welded set up, I'd rather have some give in the hangers than the frame rip apart.
__________________

2017 Forest River Surveyor 247BHDS...
...Tugged by a 2016 F250 XLT FX4 SuperCrew, Shortbed 6.2L, 4wd, 3.73...
...Joined with a Husky Centerline TS 800-1200lbs WDH
|
|
|
|
|
02-25-2019, 01:26 AM
|
#50
|
|
Retired Old Fart
Join Date: Nov 2018
Location: McDonough, GA
Posts: 971
|
Quote:
Originally Posted by Larry-NC
Is the idea that you tighten it so tight that you bind the metal sleeve in the center of the rubber bushings? In that case, what's the point of having a "wet bolt?"
Or do you just snug it down so the springs don't have much/any end play?
Larry
|
Wet bolt let's you lube the bolt so as it moves against the spring, friction is reduced. The bronze bearings are much more durable than the nylon and other plastic ones (even the "never fail" which is a lubricant impregnated plastic polymer). Just look at any photo of the stock white plastic bushings that people take out of their springs. They will almost always have one side where the plastic is worn totally through. Lubrication from the wet bolt ports would help prevent that sort of wear on the bronze bushings. You just give them a shot of grease every so often (depends on how much you travel as to how often - 1 or 2 easy pulls on a hand grease gun is all you need, 1 if it's the bigger gun, 2 if it's the smaller one).
You still don't want the hanger crushed against the spring with the bronze bushing as it needs to be able to move to dampen the road forces. The grease just helps slow down the wear at the connection points to the trailer and the equalizer bar.
__________________
Just the 2 of us in a...
"Currently between trailers"
Sold the 246RKS in 2023
|
|
|
|
|
02-28-2019, 12:03 AM
|
#51
|
|
Retired Old Fart
Join Date: Nov 2018
Location: McDonough, GA
Posts: 971
|
Ok, the motherload of suspension upgrade parts has been ordered. Pending delivery, decent weather, and a back that holds up to crawling around under the 246RKS this is what I'm adding in the near future. I will try and document this well.
- Lippert Equa-Flex equalizer to replace the stock FE spread axle model (the 14 5/8" Equa-Flex)
- Roadmaster Comfort Ride shock system for 3" axle tube
- Mor/Ryde wet bolt kit (kit with the thicker shackles)
- 4 new 3,500lb leaf springs (I had 1 that was bad)
- add cross members below the short cross members that do not come to the level of the trailer frame rails (so the underbelly is screwed on flat)
- replace the 2 wimpy fresh water tank support channel with beefy steel U-channel pieces (I'll retask the wimpy support channels as cross members)
For the truck (2002 GMC Sierra 1500), I'm also upgrading the following:
- set of 4 Bilstien B6 4600 shocks
- Roadmaster Active Suspension unit
I'm also doing the following while the belly is open:
- using split wire looms and wire ties to tidy up all those loose wires just laying around
- upgrading the converter to battery wires from 6ga to 2ga marine tinned cable
- Rewiring the wiring junction box at the tongue (replacing the residential electrical box with holes to let rain and road dirt in with a sealed gasketed box)
- new 7 way and cable with new terminal box for trailer brakes/lights (another sealed box)
- replacing the 2 self reset breakers that are exposed to the weather (cruddy looking now)
- New break-a-way switch and cable
Here is my logic for all this. I got the trailer at a very good price. I did not have to pay for the frame repair (which is good because I did not know it was there when I bought the trailer!). I'm towing with a 1500 1/2 ton truck and this trailer, when at it's rated load is very close to my rated limit (doing all the proper math including us and gear in the truck). My logic is upgrade the trailer suspension as insurance on the frame that was just beefed up. The wet bolt kit the tech put in is the Lippert standard thickness kit. Mor/Ryde is 1/2" thick straps. Fixing the wire mess in the underbelly is a no brainer. Plus I'm going to note what wire is where for future repair reference.
I'm upgrading the truck suspension as the shocks are 17 years old and it's just time. Adding the RAS to aid with rear end squat which will also help with my Skeeter Bay boat as it does not have a WD hitch. The RAS will also help with body roll towing with the WD hitch and the FE 246RKS. Shocks and Equa-Flex will also help with trailer stability and the impact of road forces and things like the highway strips. I will re-dial in the WD hitch when all this is done as the tube under the axle hangers plus the Equa-Flex will change the height of the trailer frame upwards some (1 to 2").
The next unknown is the brakes. The bearings were done before we bought the trailer (saw the receipt), and the brakes were reported as OK, but I have not pulled them and put eyes on. On my last trip home I had error messages on my controller that indicated a wiring issue. This is when I noticed the axle shifted that started this whole adventure. The Lippert tech completely removed both axles for the repair, so he has rewired the brakes wires from the hubs to the main brake wire in the underbelly. I need to run the pin out on the lines to make sure I don't have an issue anywhere else with the wiring and double check the frame ground in that crappy residential (as in inside residential) box they made all the connections at the tongue in.
The other wildcard is bearings and the bake magnets and shoes. While doing all the above I will pull the hubs and check those. If the brakes are in major poor condition I'm seriously considering putting disc brakes on and being done with it. My logic for this is we are going to be towing in N GA and TN and there are a number of roads with 4 and 6 degree roads. Back to the trailer being close to the max for the truck, disc brakes make it a lot safer on the downhill side of those roads. I'm thinking $1,300 to $1,500 to do it and be done with brakes. I'm almost to the point of just doing this anyway for safety.
Yes it's overkill compared to what comes from the factory in this size trailer, but it's probably what "SHOULD" come or be optional. Especially if you are towing with a half ton truck.
Plus, if I do all of this including the brakes, I'm still well under the high end book value on what I have in the trailer. Like I said, I got a good price to start with. Plus we plan on keeping this trailer a while as I'll need to drop $50k on a new truck to go bigger. Not ready to do that.
Oh, I may change out the stock WFCO 55 amp converter/charger to a Progressive Dynamics drop in model. The 2ga wiring is sized with that in mind as the converter/charger is at the opposite end of the trailer from the battery on the tongue. Plus if I go with disc brakes, the electric over hydraulic unit will be in a new battery box that I'm either going to make out of epoxy sealed plywood or convert an aluminum toolbox to hold (along with changing out to a 2 battery either group 31 AGM or GC2 golf cart batteries and relocating the breakers as well).
__________________
Just the 2 of us in a...
"Currently between trailers"
Sold the 246RKS in 2023
|
|
|
|
|
02-28-2019, 01:34 AM
|
#52
|
|
Senior Member
Join Date: Jul 2017
Location: California
Posts: 7,616
|
I took a better look at that angle brace that lippert has welded in there on the inside of the spring hangers. Turns out they have it welded at angle so towards the front it's welded to one side of the hanger and on the rear it's welded to the other side of the hanger. Seriously? They couldn't come up with a piece of metal that hits all sides?
I did end up completing my welding of the c channel connecting the hanger from each side of the trailer.
|
|
|
|
|
02-28-2019, 10:24 AM
|
#53
|
|
Senior Member
Join Date: Jan 2018
Location: Raleigh, NC
Posts: 9,591
|
Serious project
Quote:
Originally Posted by dward51
Ok, the motherload of suspension upgrade parts has been ordered. Pending delivery, decent weather, and a back that holds up to crawling around under the 246RKS this is what I'm adding in the near future. I will try and document this well.
|
That's a serious project!
Do you have any idea how much weight what you (and Lippert) have added, and will add does to your overall weight and tongue weight?
Larry
|
|
|
|
|
02-28-2019, 10:42 AM
|
#54
|
|
Retired Old Fart
Join Date: Nov 2018
Location: McDonough, GA
Posts: 971
|
Lippert added maybe 100-125 pounds in steel and it's centered over the axles. I'm not adding that much more as I'm replacing components (unless I do the tongue box for batteries & brake actuator).
I'm rethinking the shocks for now, as I may see how much of a difference the rubber bushing equalizer makes before I invest another $500 in suspension parts. I'm almost thinking it would be better to put that money towards the disc brakes upgrade first. But the other suspension components are to be delivered today.
And it's raining again.... (go figure)
__________________
Just the 2 of us in a...
"Currently between trailers"
Sold the 246RKS in 2023
|
|
|
|
|
02-28-2019, 12:47 PM
|
#55
|
|
Senior Member
Join Date: Jul 2017
Location: California
Posts: 7,616
|
I really question the need for shocks. In addition, I think these weak frames would need a lot more additional reinforcement to where the shocks would attach.
That junction box for the 7 pole trailer cord is a great idea. Although I haven't done it yet to the travel trailer, I have done it to all my other trailers.
While you are under there, look at your brake wires and see what condition they are in. If you don't do disc brakes, consider doing new home runs to your new junction box.
BTW, l have Kodiak disc brakes on my boat trailer. Great addition to that trailer. I use the BrakeRite electric over hydraulic controller.
|
|
|
|
|
03-01-2019, 12:37 AM
|
#56
|
|
Retired Old Fart
Join Date: Nov 2018
Location: McDonough, GA
Posts: 971
|
Yeah, home runs of 12ga wire (or do I need #10?) for the brakes would ensure a good amperage supply for the magnets. I would go marine wire as it's UV rated and a lot more flexible and made to bounce around. I also have some marine grade "solder seal" butt connectors coming Saturday. Adhesive lined, water tight butt connectors with a low temp solder pellet lining in the center. Much better than crimp with heat shrink.
Of course the DW keep giving me the look every time a package shows up on the porch. This is what came in today:
- 4 new trailer springs
- Lippert 14 5/8" Equa-Flex
- Roadmaster Active Suspension for truck
- Chain keeper for WD hitch ball (my chains hang way too low for my taste)
- 4 Bilstien B6 4600 shocks for truck
One thing about the Equa-Flex that bugs me a little is it does have bronze bushings pressed in. However the two end bushings are not one solid piece that span the entire opening. They are two short bushings, one on each outer edge with no busing in the center 1/3 of the opening. Top center is a solid bushing like normal bronze ones. I've never seen this 1/3-blank-1/3 setup before. I have enough on the Mor/Ryde bushings coming in that wet bolt kit to press out the 1/3 bushings and insert solid 1 piece ones. My logic is I want the grease to spread evenly across the bearing surface, not pool in the blank center which is slightly a larger are as there is no bushing in the middle. Or am I nuts?
I'll try to post some photos tomorrow as it's getting late.
__________________
Just the 2 of us in a...
"Currently between trailers"
Sold the 246RKS in 2023
|
|
|
|
|
03-01-2019, 12:41 AM
|
#57
|
|
Senior Member
Join Date: Jul 2017
Location: California
Posts: 7,616
|
Quote:
Originally Posted by dward51
Yeah, home runs of 12ga wire (or do I need #10?) for the brakes would ensure a good amperage supply for the magnets. I would go marine wire as it's UV rated and a lot more flexible and made to bounce around. I also have some marine grade "solder seal" butt connectors coming Saturday. Adhesive lined, water tight butt connectors with a low temp solder pellet lining in the center. Much better than crimp with heat shrink.
|
Sorry but those solder seal connectors are not what you want. Crimp with heat shrink and adhesive is the best way. You never want solder on a connection in a vibration environment. Correctly crimp a connection with the proper crimp tool is the best way.
12 gauge is fine for brakes especially if you home run. My suggestion if you don't home run, have one axle on one wire and the other axle on another. That way if you lose one wire, you only lose half your brakes.
These are the connectors you want to use:
http://www.genuinedealz.com/marine-e...ectors?cat=170
These are the exact crimpers I use:
https://shop.marinehowto.com/product...nal-crimp-tool
Read this:
https://marinehowto.com/marine-wire-termination/
As an EE for 35 years in aerospace, automotive and commercial, I always am amazed at the people who recommend solder for all connections. Solder has it's place but not here.
|
|
|
|
|
03-01-2019, 01:25 AM
|
#58
|
|
Retired Old Fart
Join Date: Nov 2018
Location: McDonough, GA
Posts: 971
|
You mean I can't use grandad's needle nose "crimpers"???????????

Yes, I'm just kidding. I have the correct crimps with proper inserts for both heat shrink and regular connectors. And real wire strippers too (but I can skin insulation with dikes lightning fast without nicking the wires).
I'm familiar with the "correct" way, but I've never had an issue with the solder seal connectors in my boats or autos. I know the ABYC calls for cold formed connections, but I've been in the solder camp for years. I do have heat shrink adhesive lined crimp connectors as well.
Oh, and I've bought from Genuinedealz on eBay before! That is who I was going to order my wire from. He is in Brunswick, GA and I'm just south of Atlanta.
Lots of good info on that website you linked! Thanks!!!!
__________________
Just the 2 of us in a...
"Currently between trailers"
Sold the 246RKS in 2023
|
|
|
|
|
03-02-2019, 01:11 AM
|
#59
|
|
Retired Old Fart
Join Date: Nov 2018
Location: McDonough, GA
Posts: 971
|
Ok, as promised yesterday, I did take some photos of the Lippert Equa-Flex for the spread axle Freedom Express units (the 14 5/8" equalizer). It came in the box with the photo and info for the prior model which was not painted and came with the Lippert never fail bushings. When I ordered it, it was advertised as having bronze bushings. It does, but there is something odd about some of them.
On both equalizers the center bushing is a full side to side bronze bushing. But the two shackle end bushings are only 1/3 of the width. So you have 1/3 bronze bushing, 1/3 no bushing, and 1/3 bronze bushing (bronze bushings on the outer 1/3 on both sides and both ends - it makes more sense to look at the photo).
I'm upgrading the stock Lippert wet bolt shackles to the 1/2" thick Mor/Ryde wet bolt kit (I'll move the stock Lippert kit to my Skeeter boat trailer as it needs new shackles any way and these are brand new). So I have enough full length bronze bushing to press out those 1/3 units and replace them. I'm 99% sure I'm going to do this. I would think the bushing and bolt would both wear more evenly with a full length bushing surface to bear against as opposed to only 1/3 on each outside edge.

Equalizer hanger bushing - full sized bronze bushing

Each end only has 1/3 sections of bronze bushings pressed in. You can see no bushing in the center.

__________________
Just the 2 of us in a...
"Currently between trailers"
Sold the 246RKS in 2023
|
|
|
|
|
03-02-2019, 01:27 AM
|
#60
|
|
Retired Old Fart
Join Date: Nov 2018
Location: McDonough, GA
Posts: 971
|
Oh, and let me rant a little about the crappy materials they used for the electrical distribution at the front of the trailer. IT'S A UNSEALED RESIDENTIAL BOX (as in for inside a house - not weatherproof). The 2 breakers may have been protected when they left the factory but a short time in the sun and they are not.
Also I'm scratching my head and trying to decypher exactly how they have wired the 2 auto reset breakers. It looks like the power into one breaker feeds from the outbound (controlled side) to the input on the other breaker? What???? Looking at the wiring and the jumpers it's not making sense and makes my head hurt just to look at these photos. I need to pull those covers off, break out the Fluke meter and a scratch pad and figure out what they have done.
I mean, no weather proof connectors anywhere, it looks like they used the breakers as buss bars for distribution of power bypassing the breaker? What????? Of course none of the wires are loomed and all the markings are UV faded (I'll have to see what the gauge is under the trailer, it should be readable there as it was protected). Also it appears the negative from the battery bonds to the trailer frame and there is no actual negative wire to the WFCO converter/charger and the rest of the trailer. It's all frame grounded. Since there is a negative wire into the WFCO, I presume they just bond a short jumper to the frame in the back of the trailer where the WFCO is. I'm used to seeing a home run in addition to a frame ground, but I guess it works.
Folks, if you have not done so, go look at your tongue wiring and see if it's in need of an upgrade. I suspect this is "industry standard" and widespread.
Yes, this is going to be changed. I can't believe they would put this at the front of a travel trailer where it is exposed to rain and road water kicked up by the tow vehicle (and road salt if you travel in the winter). I'm dreading what I will find inside that terminal box. If it does not rain again tomorrow, I'll pull the cover and see what we have inside there for the 7 way wiring and brake wiring. I'm almost expecting twist on wire nuts....


__________________
Just the 2 of us in a...
"Currently between trailers"
Sold the 246RKS in 2023
|
|
|
|
|
|
 Posting Rules
|
You may not post new threads
You may not post replies
You may not post attachments
You may not edit your posts
HTML code is Off
|
|
|
|
 » Recent Discussions
 |
|
|
|
|
|
|
|
|
|
|
|
|
|
|
|
|
|
|
|
|
|
|
|
|
|
|
|
|
|
|
|
|
|


 Linear Mode

