 |
 02-07-2019, 06:19 PM
|
#1
|
|
Senior Member
Join Date: Oct 2017
Location: Delaware
Posts: 279
|
under belly enclosed
Is the under belly easy to remove and reinstall? I would love to remove mine,,,inspect everything,,,and reinstall. 2018 Catalina 243.
|

|

|
|
02-07-2019, 06:21 PM
|
#2
|
|
Senior Member
Join Date: Jan 2017
Location: Kalamazoo
Posts: 2,139
|
a bunch of work but yes. When they put it on in the factory the frame is upside down to help. If you are not having issues what is to inspect?
|
|
|
|
|
02-07-2019, 06:44 PM
|
#3
|
|
Senior Member
Join Date: Oct 2017
Location: Delaware
Posts: 279
|
I just like to know how things are under there. Planning on doing some boondocking and don't want my tanks falling out on the highway. Looking thru my floor heat ducts, I saw some very shoddy workmenship. Just want a blueprint in my mind of whats in my Rig. God knows Forest River can't give you that info. This is my last purchase. Want to know whats there. I am very mechanically inclined. I fixed most of the warranty crap myself because I know they can't.
|
|
|
|
|
02-08-2019, 01:37 AM
|
#4
|
|
Senior Member
Join Date: Jul 2017
Location: California
Posts: 7,616
|
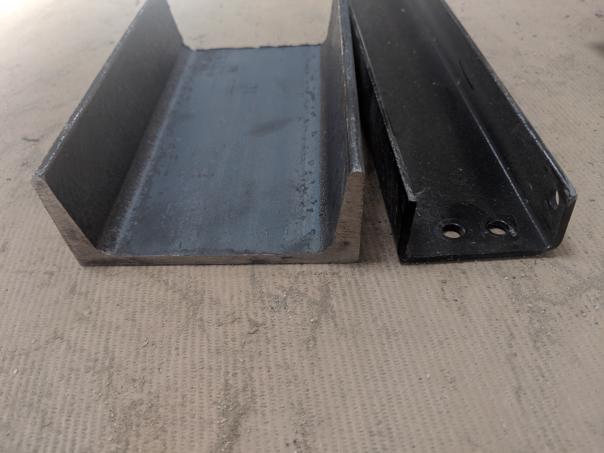
Which Coachmen did you buy? On mine one of the first things I did was replace the fresh water tank braces with substantially larger metal C channel.
This shows the size difference of the old brace and the new one.
|
|
|
|
|
02-08-2019, 08:56 AM
|
#5
|
|
Senior Member
Join Date: Nov 2013
Posts: 1,947
|
After a couple years I have had a few of the screws holding the underbelly come loose and when I try to screw them back in they don't seem to be biting into much. So I am debating doing the same thing and taking it down, inspecting everything while there and putting it back. Just not sure if it's more trouble than it's worth and exactly the best way to reattach the underbelly. Don't think the screws the manufacturer uses are the right ones. Mine's not a Coachmen put I suspect there won't be much difference.
__________________
2016 Chevy Silverado 2500 Duramax
2016 Rockwood 8289WS, Diamond Pkg.
|
|
|
|
|
02-08-2019, 09:06 AM
|
#6
|
|
Senior Member
Join Date: Mar 2018
Posts: 117
|
i took mine off - squirrel had eaten a hole into the FW tank! It was more of an inconvenience job than difficult nor hard. manufacturer uses whatever is on hand when installing it. you will end up with a much better job (and some screws would not move so i ground them off). have fun!
__________________
2015 Flagstaff 26FKWS
Ram 1500

|
|
|
|
|
02-09-2019, 12:13 AM
|
#7
|
|
Retired Old Fart
Join Date: Nov 2018
Location: McDonough, GA
Posts: 971
|
I had to take mine off so Lippert could repair some frame cracking. The corrugated plastic underbelly is not hard to get off, but being one large piece it's hard to work with. The main problem I ran into is the "nails" they used to install the center sections of ours. Apparently instead of screws 80% of our fasteners were shot from some sort of nail gun and never meant to be removed. Some we could torque out with vice grips but others would not budge. I ended up just cutting the underbelly into manageable pieces and intend on replacing it with 4x8' sheets purchased locally that are cut to fit. The width is an odd size of 67 1/8" on ours. Then I took a "cats paw" nail puller and pulled them out later. There is basically no way to reuse them. They look like they have hex heads but are nails and not screws. I used a larger size screw for the existing holes and I'm going to add some cut 1x2 pressure treated wood to act as bracing where the edges of the new panels meet. it's lighter than steel and easier to work with (and the Lippert Tech recommended it). The other problem was the gas and dump lines that penetrated the underbelly. I had to slit around them to get the sections out. I'm looking for the black Coroplast sheets now, but may just go with white as they are a stock item at my local Home Depot. I don't think color will matter on the bottom of the trailer anyhow.
Once you take the underbelly off, the wiring and everything else is just sort of thrown in there in no order and not secured. It looks like a mess. Pick up some wire loom material and tie wraps and clean it up while you are in there. I'm doing ours that way. Also take photographs and measurements. If it's 3 years before you need to fix something under there I want a photograph and notes on where a water line or electrical line is instead of relying on my memory.
Also X2 on replacing the stock fresh water braces with C channel. I'm going to do that with mine as well. I don't travel with a full fresh tank, but I do keep some water for flushing and washing of hands in case we need to make a "stop" while enroute. Even 10 gallons is going to be 80 pounds or so sloshing around in the tank and that can put a lot of force on that stock brace. I'm also changing out the smaller self tapping screws to more substantial bolts with a backer plate and nylock nuts.
|
|
|
|
|
02-09-2019, 12:17 PM
|
#8
|
|
Senior Member
Join Date: Oct 2017
Location: Delaware
Posts: 279
|
Catalina 243 RBS Legacy
|
|
|
|
|
02-09-2019, 12:26 PM
|
#9
|
|
Senior Member
Join Date: Oct 2017
Location: Delaware
Posts: 279
|
Thank You all. Like I thought,,,a labor intensive job, and stuff just thrown around in there. Would be a nice selling point to a future customer to have proof under there that everything is secure. Thanks again.
|
|
|
|
|
02-09-2019, 02:11 PM
|
#10
|
|
Retired Old Fart
Join Date: Nov 2018
Location: McDonough, GA
Posts: 971
|
I love the idea of a company giving the buyer of a unit photos of the interior of the underbelly along with a dimensional diagram and full schematic (along with a "average person" drawn view of what electrical/12v/water/drain lines are where under the trailer and hidden under the belly material). I would not think it costs that much more to put wires in plastic wire loom material, use pipe insulation material on water lines, etc... The photos are a simple couple of shots from overhead and the diagrams are a "do it once" for each model sort of thing. It's little things like that which would show a quality product.
I know it's all about get it done quickly and at as low a cost as possible for profit margins which can be razor thin, but how hard would this be? If a manufacturer wanted to stand out in the quality product area this would be a great idea (and unfortunately most companies do not participate or read forums such as this, but it is still a great idea).
I've been having some nerve flare ups and that and the weather I have not been under mine to document and clean up my underbelly yet. But when I do I will document the crap out of it for both myself and to share later. I intend on taking good measurements as well. Mainly for future reference as eventually I will probably need to be back under there to modify or repair something. As to the last post about underbelly removal being "a labor intensive job", I don't think it is so much labor intensive than it is the size of the factory panel. It's super light, just big. The hardest part for most of us would be do you have the proper jack stands and pump jacks to get the trailer up so you could crawl (or use a mechanics creeper!!!) around under there. Then do you have the power tools to make the job easier? It can be done with manual hand tools, but power tools are so much better. I think 1 person "could" do it if using panels of coroplast instead of single sheet on the re-install, but 2 people would be much less frustrating basically due to the size of the panels.
One thing I found out in talking with FR and Lippert about my frame repairs (which Lippert graciously covered 100% except for removal and reinstall of underbelly - thank you again), is there is a series of models that are built on the same frame. The length and interior may vary, but the basic Lippert frame is the same. So my dimensional notes may be helpful to others. My frame 2015 Freedom Express 246RKS is a "Forest River #220 Coachmen" on the frame stick which is street side near the front of the frame/tongue area. Strangely enough its a 220 coachmen TT2013 frame and my trailer is a 2015, so the design apparently does not change from year to year either (unless there is a major revision?) That made me wonder if that is why I had some frame cracking issues like in the 2013 and 2014 models? No one ever said that was the case, but Lippert did step up and do the right thing for us. But that is getting off topic and I covered in another thread elsewhere.

|
|
|
|
|
02-09-2019, 02:45 PM
|
#11
|
|
Senior Member
Join Date: Jul 2017
Location: California
Posts: 7,616
|
Quote:
Originally Posted by dward51

One thing I found out in talking with FR and Lippert about my frame repairs (which Lippert graciously covered 100% except for removal and reinstall of underbelly - thank you again), is there is a series of models that are built on the same frame. The length and interior may vary, but the basic Lippert frame is the same. So my dimensional notes may be helpful to others. My frame 2015 Freedom Express 246RKS is a "Forest River #220 Coachmen" on the frame stick which is street side near the front of the frame/tongue area. Strangely enough its a 220 coachmen TT2013 frame and my trailer is a 2015, so the design apparently does not change from year to year either (unless there is a major revision?) That made me wonder if that is why I had some frame cracking issues like in the 2013 and 2014 models? No one ever said that was the case, but Lippert did step up and do the right thing for us. But that is getting off topic and I covered in another thread elsewhere.
|
I see you have spread axles. I am pretty convinced that spread axles in combo with sharp turns puts WAY too much stress on these Lippert frames. My trailer does not have spread axles but I am being proactive and boxing the fore and aft spring hangers on the side the spring doesn't come out of and adding supports across the trailer to the other spring hangers. I am assuming your frame cracked where the spring hangers are?
I know on our 2017, they added some reinforcement to the spring hanger area but I don't trust it to last forever.
|
|
|
|
|
02-09-2019, 09:51 PM
|
#12
|
|
Retired Old Fart
Join Date: Nov 2018
Location: McDonough, GA
Posts: 971
|
Quote:
Originally Posted by babock
I see you have spread axles. I am pretty convinced that spread axles in combo with sharp turns puts WAY too much stress on these Lippert frames. My trailer does not have spread axles but I am being proactive and boxing the fore and aft spring hangers on the side the spring doesn't come out of and adding supports across the trailer to the other spring hangers. I am assuming your frame cracked where the spring hangers are?
I know on our 2017, they added some reinforcement to the spring hanger area but I don't trust it to last forever.
|
I had cracks in several locations on both sides. I also had outriggers that had cracked where they were welded to the frame. The front axle hangers were bent 1 1/2" towards the street (which is what made me notice there was a problem). Not overloaded and did not hit anything or a pothole. I think the cracking just weakened the frame that like you said with the spread axles in a tight turn the forces bent the front hangers and slightly bent the frame on one side.
I think it was the combination of thin steel and road forces that led to the cracking. I'm the 2nd owner and they covered it. Lippert sent a factory tech in a mobile repair truck to my home and he spent 2 days under there fixing and re-enforcing the frame. Cracks were all ground down, welded and plate welded. Used 7 gauge 1x2" tube steel to re-enforce about 8' on each side at the hangers. All new heavier steel hangers than stock. Welded very thick angle bars from one side to the other on the hangers and they also have angle inside the "U" of the hanger. Never going to move again. Final alignment is only 1/16" off absolute perfect measurement across entire trailer carriage now. He even upgraded me to a wet bolt kit since the axles were off already.
I just have to get the underbelly back on. I'm starting to consider a insulation upgrade and maybe changing from the corrugated plastic coroplast type underbelly to a lamination of 1/16" PVC panel and 1/2" XPS rigid foam. Would add R3 to where I had R0 before and should not sag like the coroplast wanted to do between the fasteners.
Whatever I do, I'm going to take a ton of photos and post a thread on the good and the bad. Sharing is what makes forums like this work better!
If this works, it's a link to my IMGUR album with the photos of the "before" damage. The technician said there were more cracks than what I show in these photos. This is a set I Lippert so there is more than just the cracked area in the album.
https://imgur.com/a/3fptoSX
Here is a particularly nasty example of what I had. This is the worst one and is at the frame/hanger bend.

|
|
|
|
|
02-10-2019, 12:16 AM
|
#13
|
|
Senior Member
Join Date: Jul 2017
Location: California
Posts: 7,616
|
Quote:
Originally Posted by dward51
|
Wow...that is bad. Almost looked like corrosion had a part in the cracks at the outriggers?
Have pictures of the repair?
|
|
|
|
|
02-10-2019, 01:04 AM
|
#14
|
|
Retired Old Fart
Join Date: Nov 2018
Location: McDonough, GA
Posts: 971
|
Not yet. I'm going to take repair photos when I crawl around and map out the underbelly with measurements. I'll start a new thread on all that. Between the cold, rain, and my pinched nerve I have not been able to get to it yet. Still sitting in the driveway with stuff hanging down and no underbelly (and the wife giving me the stink-eye about not being able to get her car in the garage).
I think that corrosion is a secondary effect. Metal cracked, breaking the pain seal which let the exposed metal corrode. It had been cracked for a while apparently before it bent.
Everyone with a light weight (1/2 ton towable) trailer should crawl up under the frame and check it at least once a year. I never thought about this before, but it was a learning experience for us. I think its a trade off between keeping weight down for 1/2 ton towability vs the thickness and strength of the steel. Some people talk about Lippert being to blame, but all they do is build exactly what the "maker" specifies and contracts them to build.
Just something to be aware of if you have a light weight trailer (and spread axle may contribute?).
__________________
Just the 2 of us in a...
"Currently between trailers"
Sold the 246RKS in 2023
|
|
|
|
|
02-10-2019, 01:16 AM
|
#15
|
|
Senior Member
Join Date: Jul 2017
Location: California
Posts: 7,616
|
I just added a Morryde 3000 suspension to mine. Hoping it will help soften the ride a bit and prevent some frame stress. Seems like your cracks at the outriggers were a separate issue from the hanger failures and more due to just jarring.
Do you know how many miles are on your trailer? Been on rough roads?
|
|
|
|
|
02-10-2019, 01:23 AM
|
#16
|
|
Retired Old Fart
Join Date: Nov 2018
Location: McDonough, GA
Posts: 971
|
No idea on how many miles the original owner put on it. I have not had it on any rough roads at all and no boondocking on dirt roads, fields, etc...
The Lippert tech said it was in great shape except for the frame issues and complemented us on how well it had been taken care of (the rest of the trailer) compared to most of them he sees. He said there was no evidence of abuse by us or the prior owners he could see. I think it all goes back to weight and strength of thin steel. I think once the cracks started, it just got slowly worse and once the paint flexed and cracked corrosion crept in and just accelerated the process. Sort of a perfect storm thing.
I'm considering the 14 5/8" Lippert Equa-flex for the spread axle design and also a Roadmaster Comfort Ride shock upgrade. The tech recommended I replace one of the springs (and that means the pair) and I figure springs are cheap so I'll do all four. Adding the new equalizer is a "might as well" since I have to take the axles off anyway. Shocks are not inexpensive, but they will also add additional lateral support to the suspension which should help with the forces from the spread axle. The Comfort Ride are supposed to be better at that then the Lippert add on models (Comfort Ride is formerly the Joy Rider system).
And I need to apologize to the OP as this is slowly becoming a thread hijack. Not my intention.
__________________
Just the 2 of us in a...
"Currently between trailers"
Sold the 246RKS in 2023
|
|
|
|
|
02-11-2019, 10:47 PM
|
#17
|
|
Retired Old Fart
Join Date: Nov 2018
Location: McDonough, GA
Posts: 971
|
To keep from further topic creep, I created a new thread on our frame crack issues and what I'm doing about it. Yes, it is related as we did have to pull the underbelly, but I don't want to hijack the thread.
http://www.forestriverforums.com/for...os-178539.html
__________________
Just the 2 of us in a...
"Currently between trailers"
Sold the 246RKS in 2023
|
|
|
|
|
 Posting Rules
|
You may not post new threads
You may not post replies
You may not post attachments
You may not edit your posts
HTML code is Off
|
|
|
|
 » Recent Discussions
 |
|
|
|
|
|
|
|
|
|
|
|
|
|
|
|
|
|
|
|
|
|
|
|
|
|
|
|
|
|
|
|
|
|


 Linear Mode

