 |
|
 01-10-2018, 12:50 PM
|
#21
|
|
Senior Member
Join Date: Jul 2017
Location: Zephyrhills FL
Posts: 1,109
|
Cutting the water lines only going to make more work. You need to find a way to loosen the connections on the water lines at the faucet, then get the nuts off the fittings to be able to get the faucet out. The only other way is to destroy the faucet, break it off at counter top level from the top. Then the water lines and other parts should fall out the bottom where you can get to them. Then unscrew the parts of the old faucet and install the new one. You are still going to need to figure out how to reach up in there to install the new one.
Also we had a faucet like that in our MH and I hated the thing, impossible to wash hands without hitting against the back of the sink, went to a home store and bought a faucet with a higher and longer spout so the water is delivered close to the center of the sink. Much happier with it now.
__________________
(Previous) Coachmen Mirada Select 37RB
(Previous) Coachmen Freedom Express 246RKS
(Current)2022 Grand Design Reflection150 226RK
2022 F150 Powerboost Hybrid.
|

|

|
|
01-10-2018, 12:52 PM
|
#22
|
|
Dr Travel
Join Date: Apr 2015
Location: Full timers
Posts: 176
|
Thanks. I'll give that a try.
|
|
|
|
|
01-10-2018, 12:54 PM
|
#23
|
|
Dr Travel
Join Date: Apr 2015
Location: Full timers
Posts: 176
|
Yes, we did the same thing. Got a faucet that extends out into the sink, with a single handle instead of separate hot and cold. I'll see if disconnecting the sink works - that part I can get undone. Guess I'll fiddle with it any way I can, and see what happens.
__________________
Homesick for places we've never been.
Fulltimers since 2014; still going strong in our RW Sig Ultralight Fiver. Have towed the Rockwood 27,000 miles with nary a hiccup. (Except for when participating in happy hours)

|
|
|
|
|
01-10-2018, 12:59 PM
|
#24
|
|
Senior Member
Join Date: Jun 2012
Location: Southern NM
Posts: 9,562
|
Quote:
Originally Posted by robsshots

Ah. You are going where I was going. Cut the lines and insert connectors once the faucet is replaced. That's all I have been able to think of....
|
We always replace all the faucets when we get a new rig. Some of the lines weren't long enough for the new faucets so I cut the line and then put a new fitting on the pex and use a braided wire, standard sink hose for the extension.
__________________
Scott and Liz - Southern NM
2012 Wildcat Sterling 32RL - w/level up (best option ever)
2007 Chevy 2500HD Duramax
Reese Fifth Airborne Sidewinder

|

|
|
|
01-10-2018, 01:03 PM
|
#25
|
|
Senior Member
Join Date: Dec 2017
Posts: 954
|
Back to removing the sink--are u sure it is glued? I have never seen one that didn't use plumbers putty. That is the gray stuff u see oozing out of the sink rim that touches the counter top.
Plumbers putty is pliable, mostly stays soft for the life of the sink, allows the sink to be removable and creates an effective water barrier.
To remove the sink, loosen the underside clips that hold it to the counter top. Use putty knife to gently pry the sink from the counter top. Use firm but slow pressure and it will lift off.
Use new plumbers putty when reinstalling the sink.
__________________
2016 RAM 3500 DRW 4x4 LB LoneStar, w/RDS 33Gal Aux tank, Timbrens, Andersen Ultimate2, SwiftHitch SH04
2018 Chaparral 360IBL w/TST507 TPMS, Lippert GC3 Autolevel, Furrion Backup Cam, Progressive HW50C
2006 RAM 3500 DRW LoneStar Edition
2011 Starcraft 392BHUw/Andersen No-Sway

|
|
|
|
|
01-10-2018, 01:09 PM
|
#26
|
|
Senior Member
Join Date: Sep 2013
Posts: 362
|
Take a hacksaw or Drexel with cutting wheel and cut apart the faucet. Then you might be able to look down from above to get a better look, and/or get some pliers on top to unscrew the valve from supply line.
|
|
|
|
|
01-10-2018, 01:13 PM
|
#27
|
|
Senior Member
Join Date: Apr 2016
Location: Port Charlotte Fl/Hinsdale Ma
Posts: 4,823
|
I may be wrong but the sink and top seem to be one piece. I don't see the sink sitting on top of the countertop.
|
|
|
|
|
01-10-2018, 01:15 PM
|
#28
|
|
Scoundrel
Join Date: Feb 2017
Location: Montrose, Colorado
Posts: 2,809
|
I had the same problem when I replaced mine. You have to want it out more than it wants to stay in.
__________________
2024 Geo Pro 15TB, 400W Solar, 2 Golf Cart batteries
2015 F-150 5.0L V8 XLT Crew Cab, 4x4, Tow Package, 36 gal tank, 3.55 locker, 1891 payload, Integrated Brake Controller, Roadmaster Active Suspension
Wooden Spoon Survivor
|
|
|
|
|
01-10-2018, 01:17 PM
|
#29
|
|
Senior Member
Join Date: Jan 2017
Location: In the south
Posts: 266
|
Get one of these if this doesnt work then the easiest thing to do is remove the sink replace with a regular house faucet and supply lines.
|
|
|
|
|
01-10-2018, 01:17 PM
|
#30
|
|
Senior Member
Join Date: Jun 2012
Location: Southern NM
Posts: 9,562
|
Quote:
Originally Posted by HangDiver
I had the same problem when I replaced mine. You have to want it out more than it wants to stay in.
|
LOL!! Fantastic answer 
__________________
Scott and Liz - Southern NM
2012 Wildcat Sterling 32RL - w/level up (best option ever)
2007 Chevy 2500HD Duramax
Reese Fifth Airborne Sidewinder
|
|
|
|
|
01-10-2018, 01:23 PM
|
#31
|
|
Senior Member
Join Date: Aug 2011
Location: Albany, GA.
Posts: 1,359
|
I had a very successful "HandyMan" type business for nine years, a heart attack told me to slow down, and I ran into this type stuff often. I'm doing some thinking from outside the normal box of thought. From the photos it appears that the sink is mounted from beneath the countertop as a lot of homes have nowadays using an epoxy resin to hold it in place. I'm looking at this with "reverse engineering" in mind. How did the build team at the factory put this sink/cabinet combo in? It appears that the cabinet was set in place, the drain lines and water supply lines were already stubbed in. That black device with the two white hoses might be a black tank flush anti-siphon valve sitting on top. Use a bright flashlight and look up under the sink top and see if you can find any attachment fittings. I'm thinking that they had the sink/faucet pre-assembled, the cold/hot water lines were in place with just enough sticking up to attach to the faucet, the sink/countertop was set in place and the drain lines finished. IF you can get your hands into the areas where the sink mates onto the top of the cabinet try running the edge of a sharp razor knife along the mating edges between the bottom of the sink/countertop and the cabinet top. The sink/countertop may have been mated to the cabinet with some type of glue, maybe even silicone. The other option I can see is that the sink/cabinet combo were pre-assembled with the hot/cold lines and drain line stubbed into place then set on the cabinet with someone feeding the supply lines through the floor openings. That would have been before they installed the underbelly (if there is one) and all connections would have been made from the bottom. Good Luck
|
|
|
|
|
01-10-2018, 01:29 PM
|
#32
|
|
Senior Member
Join Date: Sep 2010
Location: Eastern Ontario
Posts: 4,167
|
__________________
Fonzie
2011 Rockwood 8319SS with ProPride 3P hitch/GoodYear Marathons/TST TPMS 507
2019 F350 Ruby Red 6.7l diesel 3.31 axle electronic locker
Yamaha 3000iseb generator:Progressive Ind. EMS-HW30C : Eastern Ontario
Nights Camped: 2014 (18) 2015 (18) 2016 (36) 2017 (32) 2018 (42) 2019 (28) 2020 (35)

|
|
|
|
|
01-10-2018, 01:33 PM
|
#33
|
|
Senior Member
Join Date: Feb 2014
Posts: 2,832
|
This tool got me in places standard undersing basin wrenchs wouldn't go. The interchangeable ends let you address about any loosen/tighten situation and the slotted design lets it fit right OVER the water lines for easy access. Amazon has it.
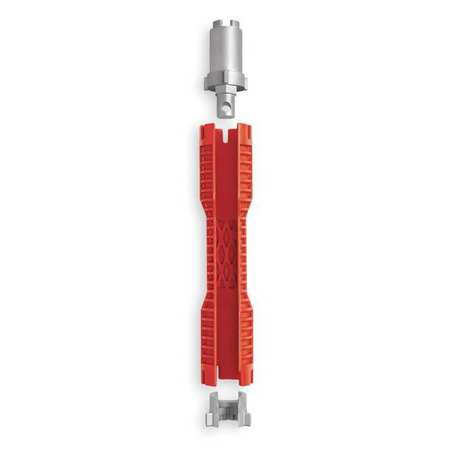
Home depot is where I got mine and they have a video here:
https://www.homedepot.com/p/RIDGID-M...7018/100595073
Edit...the undersink nuts probably look something like this...

Removing the metal parts from the tool leaves you with an oranfe section that fits over your water lines and has slots that fit over the tabs on these nuts for easy removal. Good luck.
__________________
________
Cam
2015 Georgetown 280DS
2019 Vespa Primavera 150's (pair)
|
|
|
|
|
01-10-2018, 01:36 PM
|
#34
|
|
Senior Member
Join Date: Apr 2015
Location: Ontario, California
Posts: 2,146
|
Lay your cel phone on the shelf and take picture looking up behind the sink. My bet, there are screws that will release the sink so you can life it up and access that way. Up in my experience, the spring loaded 90 degree angle wrench designed to turn both the hose fitting that attach to the faucet and turn the nuts that bolt the faucet down and it can be done. Sometimes I have to get soneone with smaller hands and better mechanic's dexterity than me, but it CAN BE DONE.
__________________
Tom48
In Sunny So Cal /w
Now in 2005 Holiday Rambler Ambassador DP and The Hot Air Balloon RESTLESS
NO MORE Tricked out
2017 Sandstorm 250 T.H.
|
|
|
|
|
01-10-2018, 01:39 PM
|
#35
|
|
Senior Member
Join Date: Apr 2015
Location: Ontario, California
Posts: 2,146
|
Quote:
Originally Posted by fonzie
|
This is the one that I have and it (so far) has always gotten me through.
__________________
Tom48
In Sunny So Cal /w
Now in 2005 Holiday Rambler Ambassador DP and The Hot Air Balloon RESTLESS
NO MORE Tricked out
2017 Sandstorm 250 T.H.
|
|
|
|
|
01-10-2018, 01:44 PM
|
#36
|
|
Senior Member
Join Date: Apr 2015
Location: Ontario, California
Posts: 2,146
|
Quote:
Originally Posted by Thurman
I had a very successful "HandyMan" type business for nine years, a heart attack told me to slow down, and I ran into this type stuff often. I'm doing some thinking from outside the normal box of thought. From the photos it appears that the sink is mounted from beneath the countertop as a lot of homes have nowadays using an epoxy resin to hold it in place. I'm looking at this with "reverse engineering" in mind. How did the build team at the factory put this sink/cabinet combo in? . Good Luck
|
Sadly, at the factory it is mounted before the outside wall is installed. I have a picture but can't remember how to hang it through the phone.
__________________
Tom48
In Sunny So Cal /w
Now in 2005 Holiday Rambler Ambassador DP and The Hot Air Balloon RESTLESS
NO MORE Tricked out
2017 Sandstorm 250 T.H.
|
|
|
|
|
01-10-2018, 01:45 PM
|
#37
|
|
ARLO
Join Date: Oct 2008
Location: N Chili, NY
Posts: 910
|
Youtube shows the faucet being held in by 2 each 7/16 nuts. I found several videos on youtube related to this.
|
|
|
|
|
01-10-2018, 01:49 PM
|
#38
|
|
Senior Member
Join Date: Feb 2016
Location: Pittsburgh, PA
Posts: 322
|
Can you remove the whole counter top and move it forward a couple of inches to disconnect the supply lines? Usually the counter is held on by wood screws from the cabinet frame.Then lift the entire counter off to replace the fixture.
__________________
Catalina 333RETS
Keystone Outback 23RS
Silverado 2500HD
Goldwing 1800GL
|
|
|
|
|
01-10-2018, 01:49 PM
|
#39
|
|
Senior Member
Join Date: Apr 2017
Posts: 477
|
I'm following this . . .
__________________
McCormickJim
2017 GT 31L5
|
|
|
|
|
01-10-2018, 01:58 PM
|
#40
|
|
Senior Member
Join Date: Apr 2015
Location: Liverpool NY
Posts: 967
|
My sink/vanity looks kind of like yours except my sink is not recessed. The dealer replaced the countertop (under warranty) when moisture got under the laminate.
The countertop was held on by screws that come up through the frame (recessed holes) into the countertop. I know this because the dealer used too long screws putting in the replacement and noticed after driving 4 of them up through the new countertop.
If yours is mounted the same and you can locate the recessed holes to unscrew the top and slide it forward, you may be able to reach the faucet nuts (assuming there is enough play in the lines). BTW, I couldn't believe how thin the sink material is so be careful working around it.
Edit: wrote and posted and then saw WILCO's comment
__________________
2015 Shamrock 23IKSS, Oyster shell
2019 Chev Silverado LT Z71 Ext. Cab, 4x4, 5.3L V/8
Reese Straight Line WDH, 2000W Honda Gen.
2 Old Town kayaks & 2 Boston Terriers - Zoey/Gonzo
Lar & Ruth
|
|
|
|
|
|
 Posting Rules
|
You may not post new threads
You may not post replies
You may not post attachments
You may not edit your posts
HTML code is Off
|
|
|
|
 » Recent Discussions
 |
|
|
|
|
|
|
|
|
|
|
|
|
|
|
|
|
|
|
|
|
|
|
|
|
|
|
|
|
|
|
|
|
|


 Linear Mode

