 |
 07-13-2019, 10:43 AM
|
#1
|
|
Senior Member
Join Date: Apr 2018
Location: NC
Posts: 225
|
Fresh water tank bowed, can't fully empty.
2015 Coachman Clipper 16B Travel Trailer. We've only had it one year.
About to do our first boondocking for the year and want to clean and freshen the fresh water tank. I learned today that the tank is bowed so badly that the drain or the pump will only remove about 75% of the water at the most. I've never liked that it is only held in place by 2 straps. I added a 3rd across the center today (tighter than the other 2) but it helped very little other than it does supply additional support, which is good.
The pump intake and the tank drain T's at the bottom of the tank. My guess is that 5-7 gallons are being left in the tank at all times and can't be used or drained.
I've seen somewhere on a forum where a gentleman added 1, 2, or 3 metal angle iron braces across the bottom of the tank with pics but I can't find that now. Anyone know where that "fix" is located or other documentation on how to make the bottom of the tank more flat and thereby get more complete use of the fresh water and be able to flush and clean it better each season?
Thanks for your help.
Outsider
|

|

|
|
07-13-2019, 11:04 AM
|
#2
|
|
Member
Join Date: Jun 2019
Posts: 93
|
Access to a welder?
Quote:
Originally Posted by Outsider

2015 Coachman Clipper 16B Travel Trailer. We've only had it one year.
About to do our first boondocking for the year and want to clean and freshen the fresh water tank. I learned today that the tank is bowed so badly that the drain or the pump will only remove about 75% of the water at the most. I've never liked that it is only held in place by 2 straps. I added a 3rd across the center today (tighter than the other 2) but it helped very little other than it does supply additional support, which is good.
The pump intake and the tank drain T's at the bottom of the tank. My guess is that 5-7 gallons are being left in the tank at all times and can't be used or drained.
I've seen somewhere on a forum where a gentleman added 1, 2, or 3 metal angle iron braces across the bottom of the tank with pics but I can't find that now. Anyone know where that "fix" is located or other documentation on how to make the bottom of the tank more flat and thereby get more complete use of the fresh water and be able to flush and clean it better each season?
Thanks for your help.
Outsider
|
Sounds like you need to do like this guy's repair:
|
|
|
|
|
07-13-2019, 11:43 AM
|
#3
|
|
Senior Member
Join Date: Jul 2017
Location: North of Seattle, WA
Posts: 17,362
|
First thing I would do is to see if there is any space to allow the tank to be raised. If you watch the video that was attached, while the guy was jacking up the support to straighten the support, the tank was able to be raised an estimated 2" or so.
If you have room for the tank to be raised consider adding a piece of marine grade plywood that is the same size as the tank's bottom on top of the supports. I'd consider 3/4" to be minimum thickness with one inch being better.
Paint the plywood for even more water resistance.
This will provide a "flat floor" for the tank and prevent the sag.
As an alternate, if you can't raise the tank, hangar brackets can be added to the frame on either end of the tank and then put the plywood under the tank and support with some U-Channel or square tubing from end to end, holding up the plywood and tank.
Problem with using straps or metal cross bars is that they only support the tank in a narrow area and the tank will continue to bulge around it. Having a flat structural support like the plywood prevents the bulges.
__________________
"A wise man can change his mind. A fool never will." (Japanese Proverb)
"You only grow old when you run out of new things to do"
2018 Flagstaff Micro Lite 25BDS
2023 f-150 SCREW XLT 3.5 Ecoboost (The result of a $68,000 oil change  )
|

|
|
|
07-13-2019, 12:03 PM
|
#4
|
|
Senior Member
Join Date: Jul 2017
Location: California
Posts: 7,616
|
Quote:
Originally Posted by Outsider
I've seen somewhere on a forum where a gentleman added 1, 2, or 3 metal angle iron braces across the bottom of the tank with pics but I can't find that now. Anyone know where that "fix" is located or other documentation on how to make the bottom of the tank more flat and thereby get more complete use of the fresh water and be able to flush and clean it better each season?
Thanks for your help.
Outsider
|
I was one of those people.
This compares the size of the original braces to what I put in.
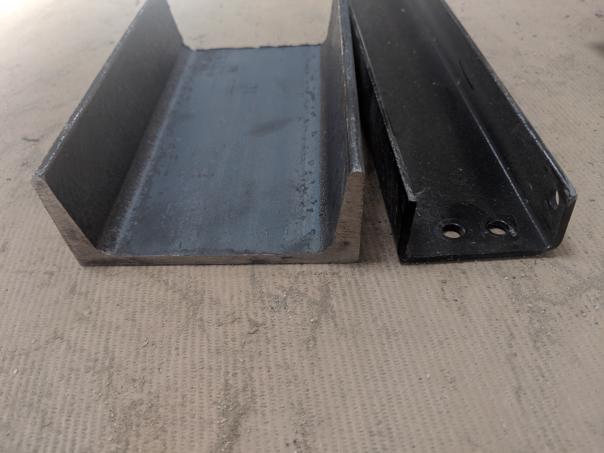
This shows new braces in place of old ones. I used stainless bolts on the lip of the frame. Of course yours may require a different attachment. I weld so I had many options I could do.
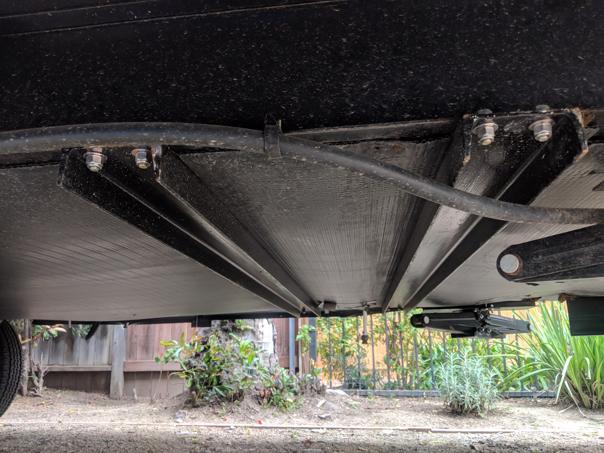
The braces I used were super overkill. They were around 4" wide and over an inch tall and 3/16" or so thick. Can go smaller like 3"x1"x1/8" likely depending onthe size of the tank and how many braces.
|
|
|
|
|
07-13-2019, 12:43 PM
|
#5
|
|
Senior Member
Join Date: Mar 2016
Posts: 432
|
Quote:
Originally Posted by babock
I was one of those people.
This compares the size of the original braces to what I put in.
This shows new braces in place of old ones. I used stainless bolts on the lip of the frame. Of course yours may require a different attachment. I weld so I had many options I could do.
The braces I used were super overkill. They were around 4" wide and over an inch tall and 3/16" or so thick. Can go smaller like 3"x1"x1/8" likely depending onthe size of the tank and how many braces. |
Those beams are steel. I bought some cheap aluminium channel beams of about the same thickness, very cheap on Amazon. Sometimes you get lucky.
__________________
Jeff

2016 APEX 215rbk
2016 F-150 4WD 3.55 3.5l ecoboost
|
|
|
|
|
07-13-2019, 01:03 PM
|
#6
|
|
Senior Member
Join Date: Jul 2017
Location: North of Seattle, WA
Posts: 17,362
|
Quote:
Originally Posted by babock
I weld so I had many options I could do.
|
I too weld but rarely when I think I might eventually have to remove what I've welded on 
When I had the bottom cover off of my TT to do some wiring upgrading I noticed very slight sagging. There were a total of two lateral supports (at edges) and three longitudinal support/braces. I estimated that I probably had less than a couple gallons "trapped" in my tank and since the supports looked adequate I just left it all.
You must have a lot of steel stashed in your shop. I've seen the pic's of your battery mount too 
__________________
"A wise man can change his mind. A fool never will." (Japanese Proverb)
"You only grow old when you run out of new things to do"
2018 Flagstaff Micro Lite 25BDS
2023 f-150 SCREW XLT 3.5 Ecoboost (The result of a $68,000 oil change )
|
|
|
|
|
07-13-2019, 01:30 PM
|
#7
|
|
Senior Member
Join Date: Oct 2016
Posts: 182
|
As an easy redneck solution, I have in the past parked on a slope with the drain at the lowest point, and let gravity do the work. This also makes the lifting of the tank much easier, when installing a plywood deck under it. If you can't readily get marine plywood, you could use the CDX sheathing grade, which uses water resistant glue also, and is much cheaper. 3/4" is also a great plan, or two layers of 1/2" would be better, since you will have much of the sheet left over anyway. And yes, by all means paint the wood well, including the edges. I use old fashioned Rustoleum for most stuff. Look for the variety with the red logo on the label, as it is the most durable.
If you have a metal warehouse nearby, such as Pipe Plus, they can supply whatever channel you may want, and can even press brake special sizes for you. I don't believe I would go heavier than about 3/16" thick. Remember, most of the strength is in the vertical sides when installed.
|
|
|
|
|
07-13-2019, 01:39 PM
|
#8
|
|
Senior Member
Join Date: Sep 2013
Location: Michigan
Posts: 436
|
Quote:
Originally Posted by Outsider
2015 Coachman Clipper 16B Travel Trailer. We've only had it one year.
About to do our first boondocking for the year and want to clean and freshen the fresh water tank. I learned today that the tank is bowed so badly that the drain or the pump will only remove about 75% of the water at the most. I've never liked that it is only held in place by 2 straps. I added a 3rd across the center today (tighter than the other 2) but it helped very little other than it does supply additional support, which is good.
The pump intake and the tank drain T's at the bottom of the tank. My guess is that 5-7 gallons are being left in the tank at all times and can't be used or drained.
I've seen somewhere on a forum where a gentleman added 1, 2, or 3 metal angle iron braces across the bottom of the tank with pics but I can't find that now. Anyone know where that "fix" is located or other documentation on how to make the bottom of the tank more flat and thereby get more complete use of the fresh water and be able to flush and clean it better each season?
Thanks for your help.
Outsider
|
I had my tank fall out onto the front axle and the only thing holding it in place was the gas line. it was half full of water so I jacked the tank up with a hydraulic car jack and a length of wood so I could drain it completely. I then went to tractor supply and bought two 4 foot lengths of angle. I was able to get the tank back into the area it was supposed to be when it was empty I then held it up there with a car jack and cut the angle into 2 foot sections so I could support the front of the tank to a cross brace that ran between the frame rails, I clamped then in place with "C" clamps and then drilled and bolted the angles. These angles run front to rear across the bottom of the water tank. I would show pictures but the unit is in the dealer for other repairs and to have the angles welded into place. This seems to be a real problem these days as they keep trying to find cheaper ways to lighten these trailers so they can be towed by 1/2 ton or smaller vehicles.
|
|
|
|
|
07-13-2019, 02:19 PM
|
#9
|
|
Senior Member
Join Date: Jan 2014
Location: Stanfordville
Posts: 144
|
Here’s what I did. Used cdx plywood but only had room for 1/2”. Unfortunately I didn’t think to paint or preserve the plywood��. the Ultimate goal was to get a flat surface to distribute the weight. I then used 1/2” square tubing, followed by heavy guage aluminum C Channel on exterior,(not shown) ran across the TT frame to frame perpendicular to the 1/2” square tubing after re installing the coroplast enclosed belly
Been three seasons now. Always boon dock, always carry full tank. 52 gals approximately 400 lbs. so far no issues.
|
|
|
|
|
07-13-2019, 03:03 PM
|
#10
|
|
Senior Member
Join Date: Apr 2017
Location: Berks County, PA
Posts: 208
|
Tank Bowed - Solution
I was able to fabricate a polyethylene flange and mount it beneath the tank using 1/4-20 SS hardware. While not a boondocker, I wanted to be able to completely drain my tank after use or disinfecting.
The photos show (in somewhat reverse order), how I accomplished mounting a flange without access other than through a 2-1/4 hole on the bottom.
Apologies-I am another of those here that cant get photos oriented properly.
|
|
|
|
|
07-13-2019, 03:13 PM
|
#11
|
|
Junior Member
Join Date: Jul 2019
Posts: 15
|
Have you searched all posts using search feature? Try this link here on other water tank issues: http://www.forestriverforums.com/forums/f34/2909ws-fresh-water-tank-size-problem-189248.html
|
|
|
|
|
07-13-2019, 04:42 PM
|
#12
|
|
Senior Member
Join Date: Feb 2013
Location: Brownsville
Posts: 1,166
|
Quote:
Originally Posted by TitanMike
First thing I would do is to see if there is any space to allow the tank to be raised. If you watch the video that was attached, while the guy was jacking up the support to straighten the support, the tank was able to be raised an estimated 2" or so.
If you have room for the tank to be raised consider adding a piece of marine grade plywood that is the same size as the tank's bottom on top of the supports. I'd consider 3/4" to be minimum thickness with one inch being better.
Paint the plywood for even more water resistance.
This will provide a "flat floor" for the tank and prevent the sag.
As an alternate, if you can't raise the tank, hangar brackets can be added to the frame on either end of the tank and then put the plywood under the tank and support with some U-Channel or square tubing from end to end, holding up the plywood and tank.
Problem with using straps or metal cross bars is that they only support the tank in a narrow area and the tank will continue to bulge around it. Having a flat structural support like the plywood prevents the bulges.
|
Great idea with the plywood
__________________
2019 Flagstaff 26 RBWS
2015 GMC Sierra 1500
2019 camp 17 nites. Bill,Alley and are two kids Sierra,Ivy. 2020 camp 9 nites
|
|
|
|
|
07-13-2019, 08:25 PM
|
#13
|
|
Senior Member
Join Date: Apr 2018
Location: NC
Posts: 225
|
HappyChappie, Yes I searched using multiple word groups but did not come up with the exact thread and pics that I was looking for.
However I did get some very good and workable ideas with this thread.
Thanks.
__________________
Outsider
2007 F150 w/5.4 V8 (& 373 rear gears)
2020 Rockwood Geo Pro G19FD
|
|
|
|
|
07-14-2019, 03:52 PM
|
#14
|
|
Senior Member
Join Date: Jul 2017
Location: California
Posts: 7,616
|
I would never weld something that was permanent to the trailer. Sometimes you have to weld the bracket into a U configuration so that you can then bolt it to to trailer frame
Quote:
Originally Posted by TitanMike
I too weld but rarely when I think I might eventually have to remove what I've welded on
When I had the bottom cover off of my TT to do some wiring upgrading I noticed very slight sagging. There were a total of two lateral supports (at edges) and three longitudinal support/braces. I estimated that I probably had less than a couple gallons "trapped" in my tank and since the supports looked adequate I just left it all.
You must have a lot of steel stashed in your shop. I've seen the pic's of your battery mount too |
|
|
|
|
|
07-15-2019, 10:23 PM
|
#15
|
|
Junior Member
Join Date: Jul 2019
Posts: 1
|
Reply from Tapatalk
|
|
|
|
|
07-15-2019, 10:26 PM
|
#16
|
|
Junior Member
Join Date: Jul 2019
Posts: 1
|
Quote:
Originally Posted by jocelyn1
Reply from Tapatalk
|
Replied; please delete this test post
|
|
|
|
|
 Posting Rules
|
You may not post new threads
You may not post replies
You may not post attachments
You may not edit your posts
HTML code is Off
|
|
|
|
 » Recent Discussions
 |
|
|
|
|
|
|
|
|
|
|
|
|
|
|
|
|
|
|
|
|
|
|
|
|
|
|
|
|
|
|
|
|
|


 Linear Mode

