 |
|
 10-17-2016, 11:52 AM
|
#1
|
|
Member
Join Date: Sep 2016
Posts: 57
|
SSLance's 2016 300DS trips and mods thread
We've had our 2016 Coachmen Concord 300DS for just over a year now and with several long trips, many more short trips and a total of about 9,000 miles on it now...it is time to document our experience so far and start thinking about changes to make to the RV to make it work better for us.
Overall, we love it so far and it has performed great for our needs. We use it to pull my racecar to the away tracks and to vacation both near and far away. We currently live in Kansas City and it has been to Florida last winter and recently Albuquerque, NM to the Albuquerque International Balloon Fiesta as well as tracks in Nebraska, Indiana, Iowa and Kansas.
Because it is still fresh I'll share some pics from the Balloon trip. If you have been, you know the spectacle the Fiesta is, if you haven't been...you MUST go.
Here we are parked in Standard RV parking.


We have already decided that when we go back next year we are upgrading to VIP RV Parking West (reservations open up tomorrow I think) to make it a touch easier to see sites like this early in the morning.


We had a great time there but struggled just a bit with power while dry camped for 3 full days. Waking up at 5 am to a screaming CO monitor because of low voltage and having to jump start the house batteries with the chassis battery to start the Genset is not my idea of fun. Some of it was operator error and some of it was just inadequate battery storage for what we were trying to do. My intention is to have twice the battery storage power, enough solar panels to help keep them charged and an inverter so I can make a cup of coffee in the morning without starting the generator all installed before our next long term dry camp experience. I might need to lean on some of you more experienced RVers here for help while making these upgrades.
Otherwise, the RV did great. We got about 6.5 mpg on the way West on I40 and just under 8 MPG on the way back home heading East flat towing our 2012 Jeep Liberty and running mostly around 73-75 MPH. I've discovered that speed and weight really aren't a factor in mileage...but wind direction and force is. I'm happy with the mileage and REALLY happy with how well the RV rolls down the road when trying to make time. We drove 13.5 hours on the last day on our way home, we didn't really plan on doing it in one day but the wind was in our favor, we got an early start and the driving was fairly easy. It says something that one can drive this chassis for that long of a day and not be completely wore out once stopped. Love how this thing goes down the road.
Here is what the rig looks like when heading to a race event.

It pulls the 6100# trailer with relative ease and having living quarters on site in the paddock makes taking my wife and dogs with me to races possible and really pretty comfortable.
Again, a lot of the time we'll be dry camped at a track so a power upgrade would help here as well. I'd also like to insulate the compartment around the Generator to help cut down some of the noise inside the RV. has anyone ever tried this? there doesn't appear to be a lot of room there but I'm thinking maybe dropping the Gen and lining the inside of the compartment with Dynomat or some other sound absorption material. We have a big bean bag chair that we carry with us when we'll be camped in one spot for a while and with it set on the floor over the generator, it cuts the inside noise down probably a third...so I know it can be improved upon.
Overall, we love the RV and can't wait to make it even better and share our experiences with the members here.
__________________

|

|

|
|
10-18-2016, 05:30 AM
|
#2
|
|
World Wide Wanderer
Join Date: Feb 2016
Location: Sprung Leak, NC
Posts: 1,732
|
Looking good! 
I have seen the balloon festival, many years ago, always impressive.
I will be adding an inverter to ours in the near future (that could mean up to two years). I plan to use a 2,000 watt Pure Sine and mount it behind the fireplace. Batteries; I am still looking for a place to add two more. Might have to re-configure the step area for a sliding tray. Still contemplating that one. I do have 100 watt portable solar panels that I plug into the outside port. The solar panels are a Renogy Suitcase set. They put out 5-6 amps in full sun. I may put panels on the top, however in this part of the country we prefer shady camp sites so the portable panels work better for the time being.
Be careful when adding insulation around the generator NOT to block air flow. I haven't looked at that area yet. I do plan to add some insulation to the engine doghouse area eventually.
When we are dry camping (no hook-ups) I either us a stove top percolator or a Melitta drip coffee maker. I have both a 6 cup and a single cup. Usually use the single cup one.
Another handy thing to consider is a good quality power meter to monitor power usage. I am planning on using a Victron BMV-700 with the bluetooth dongle.
Aaron 
__________________
Aaron & Rhonda
wahoonc & Airangel60
2016 Coachmen Concord 300DS
2015 Fusion Hybrid following along
|
|
|
|
|
10-18-2016, 07:18 AM
|
#3
|
|
Member
Join Date: Sep 2016
Posts: 57
|
Thanks Aaron, that is a good point about shade and the panels on the roof. My issue is, if I don't put them on the roof, where will I carry them? As you know storage space under the 300DS is a premium. How big are your panels when folded up?
I agree on insulation needed for the doghouse as well, the floor and side of the dog house do get pretty warm when under way. I am a car guy and there are several products used on the interior of car restorations to keep heat and sound to a minimum that are light and thin. RAAMAT, Dynomat, and Lizardskin are just a few. I used Raamat on the interior of my 1985 Monte carlo and it is amazing how it made a clangy old GM car sound more like a late model Lexus on the inside. It is more for sound and less for heat blocking though, probably a good choice for around the Gen.
I'll check out that power monitor...I borrowed a Class A a few times before buying this rig and it's inverter showed a real clear picture of exactly what was going on with the electrical system in the RV which is a pretty handy feature.
My thought on adding batteries is to look for a space under the rig on the chassis somewhere to find a place to mount brackets for a couple of Blue Top Optima batteries. You can mount them in any location since they are AGM batteries. Then just need to run cables from them to the battery box under the step. Granted this is all in theory as I haven't crawled under to map out a location as of yet.
__________________
|
|
|
|
|
10-18-2016, 01:42 PM
|
#4
|
|
World Wide Wanderer
Join Date: Feb 2016
Location: Sprung Leak, NC
Posts: 1,732
|
My panels are pretty small, they fold in half and store in a semi-rigid case. I keep them in compartment on the right rear side.
Aaron

__________________
Aaron & Rhonda
wahoonc & Airangel60
2016 Coachmen Concord 300DS
2015 Fusion Hybrid following along
|
|
|
|
|
10-19-2016, 09:37 AM
|
#5
|
|
Member
Join Date: Sep 2016
Posts: 57
|
Thanks for sharing the pictures Aaron, that helps a lot. So those come with a controller on them and just plug into the port and go, right?
Something to think about for sure. Looks like it comes with a 10' cord, are you able to extend that if needed? Say you needed to put the panels near the back of the RV...
__________________
|
|
|
|
|
10-19-2016, 11:29 AM
|
#6
|
|
Member
Join Date: Sep 2016
Posts: 57
|
So it looks like I get to get some practice in with my Millermatic building a battery box. There is a void directly in front of the step well that is large enough to fit a box designed to hold two Optima Blue Top batteries.
The box will have to work around a outrigger style support brace and be pretty strong to support the weight...but this place will provide very convenient wiring to the rest of the house batteries as they are right next door.

I also peeked around the Genset while under there and there is a void I can fit my hand into between the top of the Genset and the bottom of the floor of the house. I think if I cover this sheetmetal which you see on the bottom of the floor here with dynomat or some other sound insulation, it should greatly reduce the amount of noise transmitted inside the RV when the Genset is running.

Will most likely have to drop the Genset carrier down a bit to make room to install but it appears to just be hanging on those 4 bolts in rubber isolators and the whole carrier will just drop down. Hopefully it'll come down far enough to make the room needed without having to take the wire harnesses loose.
__________________
|
|
|
|
|
10-19-2016, 05:57 PM
|
#7
|
|
World Wide Wanderer
Join Date: Feb 2016
Location: Sprung Leak, NC
Posts: 1,732
|
Quote:
Originally Posted by SSLance

Thanks for sharing the pictures Aaron, that helps a lot. So those come with a controller on them and just plug into the port and go, right?
Something to think about for sure. Looks like it comes with a 10' cord, are you able to extend that if needed? Say you needed to put the panels near the back of the RV...
|
Pretty much. You will need an adapter cord to go from the panel cord to the RV plug. I bought mine from Solar Dealz.
I would also consider the possibility of buying a controller and installing it in the camper and then you could use both roof top and remote panels. With solar the closer the controller is to the batteries the better and the smaller the wire you need from the panels to the controller. (One of my future plans) They make the suitcase set without the controller on it. I would also consider going up to 160 watts or even 200. I think 300 watts seems to be the ideal size for most RV's, but that is getting too big for portable use.
I think I have about 25' of wire on mine. It has an SAE connector, I have a set of battery clips and the adapter cable so I can go either way with it. If you mount the controller in the RV you can go a lot longer on the cable without having to go crazy on the gauge. If you leave the controller on the panels you will have to kick the cable up several sizes if you start to get too long.
Aaron
__________________
Aaron & Rhonda
wahoonc & Airangel60
2016 Coachmen Concord 300DS
2015 Fusion Hybrid following along
|
|
|
|
|
11-05-2016, 08:25 AM
|
#8
|
|
Junior Member
Join Date: Oct 2016
Posts: 17
|
Awesome pics!
Hi,
We recently purchased a 2015 Concord and love it! I am trying to add an HDMI wire to the TV but can't seem to figure out how to get behind it. Any idea how to remove it long enough to plug HDMI into it?
|
|
|
|
|
11-05-2016, 09:40 AM
|
#9
|
|
Member
Join Date: Sep 2016
Posts: 57
|
Quote:
Originally Posted by sgarrett415
Hi,
We recently purchased a 2015 Concord and love it! I am trying to add an HDMI wire to the TV but can't seem to figure out how to get behind it. Any idea how to remove it long enough to plug HDMI into it?
|
There are 4 screws in the wood panel the TV is mounted too, remove those 4 screws (be careful when taking the last ones loose) and then the TV and the wood panel come loose letting you get to the back of the TV.
Congrats on the purchase...
__________________
|
|
|
|
|
03-05-2017, 04:06 PM
|
#10
|
|
Member
Join Date: Sep 2016
Posts: 57
|
Figured I should update my Mod thread here now that all of our electrical upgrades are complete and road tested. Here's how it all started...
After a 5 am wakeup call from a low voltage warning from our Carbon Monoxide monitor while boondocking, we decided that would never happen again and started to put a plan in place to remedy the situation.
I spent a lot of time researching and found some very helpful blogs on the subject. The 12volt Side of Life The 12volt Side of Life (Part 1) probably helped the most along with some vendors and Aaron (wahoonc).
Here is a list of the parts we bought before starting the upgrade.
Products Ordered:
Trimetric 2030RV Battery System Monitor
Shunt: 500 Amp, Cable: 35 Ft. Meter to Shunt Cable
PST-2000-12 Samlex PST-2000-12 Pure Sine Inverter
ZS-200-P Zamp 200 Watt Portable Solar Charging System ZS-200-P
Accessories: Add Plug and Cord
PD4655V PD4655V 55 Amp Converter Upgrade Section
PMTS-30 Powermax 30 Amp Transfer Switch (2)
EMS-PT30C EMS-PT30C 30 Amp Portable EMS
Duracell GC2 XHD 6 Volt Deep Cell Batteries (2)

I have never really done much work on RV systems before but am pretty mechanical in nature and have friends to lean on for consultation if needed...so away I went.
My plan was to start out the outlets I wanted to power from the inverter and work my way backwards all the way to the inverter. Our 300 DS has 11 outlets, 6 on the GFI circuit and 5 on the Bedroom\Overhead entertainment circuit. The fridge was also on the BR circuit and I did not want it to be powered by the inverter. So the plan was to isolate out the fridge outlet, leave it on the coach circuit panel and then run the rest of these two circuits to behind the fireplace where the inverter would live.
This actually turned out to be way easier than I thought once we dug in. I'll update how we did this in my next post.
__________________
|
|
|
|
|
03-05-2017, 04:08 PM
|
#11
|
|
Member
Join Date: Sep 2016
Posts: 57
|
First we followed the Fridge/Bedroom circuit from the control panel, it led to the outlet in the compartment behind the fridge where the fridge plugs in. One wire in, two wires out. We separated the somewhat skeptical outlet, installed a weather proof box and outlet and connected just the wire from the panel to the outlet. This is now a circuit just for the fridge.
The other two wires had enough slack in them to pull back down below the shower to just behind the control panel. They led to the bedroom outlets and the overhead entertainment outlets.
The other circuit that fed the GFI circuits was removed from the panel and rerouted to that junction box as well.
We put a 30 amp breaker in the bottom of the panel in the last open spot and ran 10 awg wire to up behind the fireplace where the inverter would go and ran two 12 awg wires back to the junction box.
The idea was the 30 amp circuit would feed a transfer switch the inverter would also feed, this switch leads to a sub panel with 2 15 amp breakers in it which feed the GFI and Bedroom circuits.
Here is the 3 wires we ran from the control panel to transfer switch.

The junction box behind the control panel

The auto transfer switch on right, sub panel on left.

And here is the control panel pulled away from wall so we could add and remove wires from it.

This was where we ran into the first hassle. The plastic clips the manufacturer used to clamp the wires to the back of the panel housing are like a zip tie...meant for single use only. We were finally able to pull the push pin out, loosen the wires and reuse the clips again. An alternative might have been to remove them and replace them with real clamps but this would have meant taking each wire loose and wasn't our first choice.
Since we were going to be making so many changes to the electrical system, we decided to make a change and then test everything before moving on to the next part. With the two outlet circuits completely re-ran thru new main panel breaker, transfer switch and sub panels breakers back to the junction box and outlets, we plugged the shore power back in and tested...all 11 outlets were good.
__________________
|
|
|
|
|
03-05-2017, 04:10 PM
|
#12
|
|
Member
Join Date: Sep 2016
Posts: 57
|
Next up was installing the inverter. I kind of went overboard with the 2000 watt inverter, but I only wanted to do this once and our main goal was to be able to make a cup of coffee or two in the morning while watching the morning news on TV without having to start the Genset and the Kuerig uses about 1350 watts. What I learned during the install is stepping up from the 1500 watt to the 2000 watt inverter also means MUCH larger wire to feed the inverter as well as larger connectors, fuses, and shunt for the battery monitor. Overall I'm glad I went this route and also glad I chose to over wire vs underwire so that everything is plenty safe to run even at full draw.
The inverter puts out about 16 amps, so 12 awg was used to hard wire the inverter to the auto transfer switch. Requirements for the battery leads are 2 / 0 awg. I found it in multi strand bulk at OReillys and bought 2 six foot pieces. I also bought a handful of 3/8s stud 2/0 connectors, some 3/4" shrink wrap and borrowed a real nice crimper and cutter from a friend.

The inverter needs an inline 300 amp MRBF less than 7" from the battery and a direct line from there to the DC input. I found the fuse and a fuse holder at OReillys as well. I ran the 2/0 ground wire from the inverter to the chassis ground under the battery box and then ran another 2/0 wire up to the battery box where I connected it to one side of the shunt. The other side of the shunt went to the negative battery post. I'll explain what the shunt does later.
Here is the inverter mounted on the wall behind the fireplace.

This is what the mess of wires beside the battery box looked like when I started.

I spent some time testing and tracing to figure out what each wire in there does so I could rearrange them to clean up and make room. Here is what it looks like now with the original connections moved to the left, new holes drilled for the new 2/0 wires and Marine Ready Buss Fuse and Shunt mounted and wired up.

I decided to upgrade the 24DC 12v batteries to GC2 XHD 6 volt batteries. These batteries were about 1.5" taller but fit very well into the OEM box. I did have to redo the battery cables though as they had to be wired in series instead of in parallel. Here are the new batteries in place and wired up.

The last connection I make was the battery positive cable to the 300 amp fuse. You have to watch out as the inverter has capacitors in it and the first time power is put to the inverter a LARGE amount of juice flows. It made a spark like a welding arc when I touched the cable end to the post. Be careful for this step.
Once all connections were doubled checked for tightness we tested everything again to make sure it all worked as planned. I had the control panel feeding the transfer switch and the inverter turned on. When I flipped the 30 amp breaker off feeding the outlet sub panel, the transfer switch clicked...then in about 15-20 seconds the outlets became live again only this time the batteries were feeding 120v to the outlets through the inverter!! SWEET!!!
__________________
|
|
|
|
|
03-05-2017, 04:18 PM
|
#13
|
|
Member
Join Date: Sep 2016
Posts: 57
|
The next upgrade was to add another 30 amp auto transfer switch back where the shore power line connects to the coach. OEM setup was a plug outlet for the Genset feed that the shore power line had to be plugged into for the Genset to feed the control panel.
We took that outlet off and found the Genset feed and line to control panel leading to a blind space between the cord cubby and the rear storage compartment held in place by another of those stupid single use plastic clips. This clip suffered catastrophic failure during removal.


In the storage compartment we removed the light and the box covering the slide controller and figured out we could pull the Genset and control panel lines to this side with fish tape where we put them in a junction box and extended them to where the new transfer switch would mount.


We also drilled a new smaller hole in the cubby hole side, put a grommet in and fed the shore power cord to the storage compartment as well.

We then mounted the transfer switch, wired the Genset, control panel and shore power lines to the transfer switch and buttoned everything back up again then tested.


The first benefit of this switch is not having to get out to plug the shore power cord into the outlet if you need to run the Genset, the second is not having that large box in the way when trying to stuff the cord back into the cubby hole. The transfer switch works seamlessly and was well worth the trouble it took to fish those stiff 10 awg wires through the blind space.
__________________
|
|
|
|
|
03-05-2017, 04:20 PM
|
#14
|
|
Member
Join Date: Sep 2016
Posts: 57
|
That last interior electrical upgrade was the Progressive Dynamics DC converter with the 3 stage battery charger we put in place where the WFCO 8955 converter was in the lower portion of the control panel. This upgrade was made in an attempt to take better care of the RV's batteries with faster charging when batteries are low and slower topping off of batteries when nearly full.
We thought this would be one of the easier jobs but in reality it turned into one of the more frustrating mainly because of the plastic clips holding the 12v battery feed wires to the back of the DC side of the panel box. That and the places the 2 gauge battery wires hook to the new DC panel were different and the wires did NOT want to bend into place. This swap took two of us several hours and many cuss words while trying to get short stiff wires to play nice. Not sure how I would do it differently if I had to do it again, just know going in you might have a fight on your hands if you decide to make this upgrade.
Having a 3 stage battery charger now hopefully makes up for the hassle, we'll see as we go along. Sorry I don't have any pictures taken during this part as we just didn't stop to take any.
This catches my project up to date. I'm still working on installing the Battery monitor and remote for the inverter, once I get those in I'll share pics and then put the rest of the interior of the RV back together again. I'm also waiting for the solar panel suitcase kit to arrive so I can figure out how to wire the cable to charge the batteries with the free sunlight.
All of these upgrades were designed to make the Class B+ electrical system work as seamlessly whether plugged in or not as most larger Class A RVs do. I think it's turned out well and I hope by sharing this more of you that have similar wants might be tempted to make the upgrades as well. I'm happy to share and help out anyway I can as I know it's easier to do a project like this if you have someone to kind of show you the ropes. I know I've leaned on a few people during the install to get me past the questions I had.
__________________
|
|
|
|
|
03-05-2017, 04:42 PM
|
#15
|
|
Member
Join Date: Sep 2016
Posts: 57
|
Here is a picture of the Battery monitor... After our trip to AZ and back I can now say this is my favorite part of the upgrade. You can tell at an instant EXACTLY what is going on with your 12v house batteries (and even your chassis battery too).

You can toggle between Chassi battery volts, house batteries volts, AMP draw or charge, and percentage of charge of the house batteries. Absolutely no more guessing about how much you are drawing, how much you are charging or how much is left in your batteries. I can't imagine ever owning an RV again without one of these installed, especially after seeing how easy they are to install and they don't cost that much.
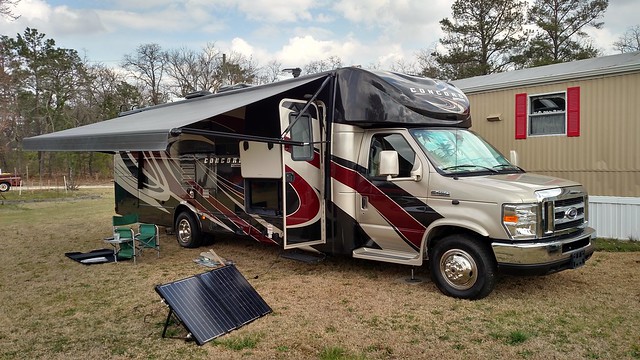
Here is our new Zamp 200 watt Suitcase style solar panel.

Here is the controller mounted on the inside of the panels...

In full sun it puts out just under 11 amps. I bought the adapter to plug it into the Furrion plug on the RV and a 25' extension cord. Here is the charger in action...watching it on my battery monitor.
https://youtu.be/bPd8Putuxok
The Furrion plug says 10 amp on it but I've had the panel put 10.74-10.8 amps thru it and has not popped the circuit breaker, so I'm calling it good. So nice to be able to harness free electricity to charge the batteries back up when boondocking, just one more step to make the coach more user friendly.
If anyone has any questions on any of these installs, just ask away. I'd be happy to share my experience with any of them.
__________________
|
|
|
|
|
03-05-2017, 11:21 PM
|
#16
|
|
Senior Member
Join Date: May 2014
Location: Wisconsin
Posts: 801
|
Excuse my ignorance, but why are you doing all this work?
|
|
|
|
|
03-06-2017, 05:33 AM
|
#17
|
|
World Wide Wanderer
Join Date: Feb 2016
Location: Sprung Leak, NC
Posts: 1,732
|
Quote:
Originally Posted by jonwisconsin
Excuse my ignorance, but why are you doing all this work?
|
It allows him to camp off grid without having to run the generator 24/7. I suspect with this setup he will able to go until he runs out of either water or holding tank space. The way the Concord comes from the factory it is only good for a 2-3 nights at best, then you have to run the generator for 3-4 hours to top the batteries back up. This is another option.
I am going to be doing some similar mods to mine. Currently I don't like the fact that I have to either be plugged in or have the generator on to watch television. I don't plan to boon dock quite as intensely as Lance, but I do use my motor home for a traveling motel room and spend the night off grid for a day and a night several times a year. Currently I get by with a 100 watts of portable solar, but with solar more is better.
Aaron
__________________
Aaron & Rhonda
wahoonc & Airangel60
2016 Coachmen Concord 300DS
2015 Fusion Hybrid following along
|
|
|
|
|
03-06-2017, 09:01 AM
|
#18
|
|
Member
Join Date: Sep 2016
Posts: 57
|
^ What Aaron said...
After using the RV for a year or so, our biggest inconveniences all had to do with electrical inefficiencies. The final straw was a low voltage alarm at 5 in the morning when it was 30 degrees outside and I had to send the wife and dogs out for a walk while I dug my jumper cables out, started the chassis engine and then used the chassis battery to jump the house batteries so I could start the Genset...all just to make the CO monitor stop screaming.
It was that very moment when I decided the hot rodder in me was going to make this Class B+ act and feel more like Class As with similar trim. I see no reason RVs this nice do not come with an inverter already installed along with proper battery monitoring and charging equipment. "All of this work" was necessary to make the system work seamlessly, I wanted to make it all as automatic as possible so my wife could run everything she needs to while boondocking without issue and we accomplished that task for sure.
No more starting the Genset up just to charge a GoPro camera, make a cup of coffee or watch the evening news on TV before going to bed.
__________________
|
|
|
|
|
03-06-2017, 11:13 AM
|
#19
|
|
Senior Member
Join Date: May 2014
Location: Wisconsin
Posts: 801
|
Thank you Aaron and Lance. I have limited knowledge of electronic stuff like this. I'm just more of a mechanic stuff guy. Just wanted to learn. Again, thanks.
|
|
|
|
|
03-06-2017, 07:46 PM
|
#20
|
|
World Wide Wanderer
Join Date: Feb 2016
Location: Sprung Leak, NC
Posts: 1,732
|
Quote:
Originally Posted by jonwisconsin
Thank you Aaron and Lance. I have limited knowledge of electronic stuff like this. I'm just more of a mechanic stuff guy. Just wanted to learn. Again, thanks.
|
Lance is way ahead of me in getting this done. I am going a similar route on my electric system.
On the power monitoring front I like the Victron slightly better than the Trimetric. Mainly because it comes with an optional bluetooth connection. That way my lazy butt can sit in a chair in the shade and see what is going on from my phone. 
Aaron
__________________
Aaron & Rhonda
wahoonc & Airangel60
2016 Coachmen Concord 300DS
2015 Fusion Hybrid following along
|
|
|
|
|
|
 Posting Rules
|
You may not post new threads
You may not post replies
You may not post attachments
You may not edit your posts
HTML code is Off
|
|
|
|
 » Recent Discussions
 |
|
|
|
|
|
|
|
|
|
|
|
|
|
|
|
|
|
|
|
|
|
|
|
|
|
|
|
|
|
|
|
|
|


 Linear Mode

