 |
|
 07-21-2015, 10:25 AM
|
#21
|
|
Senior Member
Join Date: Jul 2014
Location: SW Missouri
Posts: 357
|
Quote:
Originally Posted by lakejumper

Offroad- I purchased the exact same fans and when I bench tested them to get the correct wires, the fan would only "flinch" but wouldn't rotate. I used a 12v battery and tried every combination of wires. Am I missing something or do I have defective fans?
|
I would bet the fans are fine, you'd think that with only three wires it would be easy to figure out which is 12V+, 12V- and the rpm signal wire (you won't use this) but it's not.
It won't run backwards if you have 12V+ and 12V- reversed, keep trying and you'll get it.
When I got the right combination, I cut the rpm wire short and put a knot in the 12V+ wire to mark it. Since these are premade for computers with a motherboard connector on it, none of the wires are marked.
You also need to install the fans blowing up (the direction of the rising hot air), there should be an arrow on the body of the fan indication the direction of airflow.
On our TT I believe the wires to the original fans were the same color, but a quick test with a multi-meter will tell you which is 12V+. If you don't have a meter to confirm once you have the right wires on the fan, there are only two combinations on the TT wiring and only one will work.
__________________
2017 Open Range - Light 297RLS, BX1 Gooseneck
2014 Ram 2500 4x4 CCSB 6.7L 68RFE
|

|

|
|
07-21-2015, 10:59 AM
|
#22
|
|
Senior Member
Join Date: Aug 2009
Location: Northern California
Posts: 147
|
Offroad- thanks for your quick response! I thought that I had tried all of the combinations but also have to believe that they will work... I will check the wires again...
__________________
2015 Rockwood 8329SS TT
2004 Chevy 2500HD D/A 4X4 CC SB
Andersen Weight Distribution hitch
|
|
|
|
|
01-12-2016, 07:20 PM
|
#23
|
|
Senior Member
Join Date: Feb 2015
Location: Florida
Posts: 250
|
I installed (2) 140mm fans with a switch that allows you to by pass the temperature switch. It was a cheap and easy job that made a difference in cool down time.
  
-R.Jones
Nitro 31FQSL
__________________
RJones
2016 Nitro 31FQSL
2017 2500 Denali Duramax
|
|
|
|
|
01-12-2016, 07:50 PM
|
#24
|
|
Senior Member
Join Date: Jun 2011
Location: Big brown desert
Posts: 3,003
|
I installed one fan at the lower vent blowing in and two at the top of the vent. All three are 120mm and just direct wired to 12v hot. I am in a really hot climate can't think of a time that I would need to turn them off. Amazing how much it changed the temp in the cabinet next to the fridge. Now it doesn't melt the s'mores chocolate!
2014 Evo 2850 "Woodstock"
2011 Toyota Tundra "Clifford"
__________________
2014 Stealth Evo 2850- "Woodstock"
2011 Toyota Tundra Rock Crawler TRD 5.7- "Clifford"
2013 Honda Accord Coupe V6 w/Track Pack- "Julia"
Just glad to get away 
|
|
|
|
|
01-14-2016, 10:54 PM
|
#25
|
|
Senior Member
Join Date: Mar 2012
Location: SC
Posts: 251
|
And if you want your fridge to cool faster and more evenly try these fans inside the fridge. 
|
|
|
|
|
01-14-2016, 11:22 PM
|
#26
|
|
Senior Member
Join Date: Dec 2014
Location: St Simons Island, GA
Posts: 1,234
|
I removed the noisy 80mm fan and installed two 120mm units side by side. What a difference!! Just can even hear them run. Mine are installed half way up the vent channel with still enough room for static air to cool if the fans fail. Cheap mod. Bought them from "The Cooler Guys" online. They have hundreds of different fans for every use.
__________________
 Aviator Wright Flyer #1919
Army Pathfinder Vietnam, 3 tours
DAV, MOPH, VFW, NRA, 1stCav. ABN
|
|
|
|
|
01-15-2016, 09:13 AM
|
#27
|
|
Senior Member
Join Date: Jul 2014
Location: SW Missouri
Posts: 357
|
Quote:
Originally Posted by the.wilsons
And if you want your fridge to cool faster and more evenly try these fans inside the fridge. Attachment 97840 |
I agree it makes a nice difference, used this low speed 120mm slim fan inside ours.
Have added an on/off switch in one of the lower mounting screw holes since this pic was taken though.

__________________
2017 Open Range - Light 297RLS, BX1 Gooseneck
2014 Ram 2500 4x4 CCSB 6.7L 68RFE
|
|
|
|
|
01-15-2016, 09:56 AM
|
#28
|
|
Pickin', Campin', Mason
Join Date: Aug 2015
Location: South Western PA
Posts: 19,143
|
Quote:
Originally Posted by the.wilsons
And if you want your fridge to cool faster and more evenly try these fans inside the fridge. 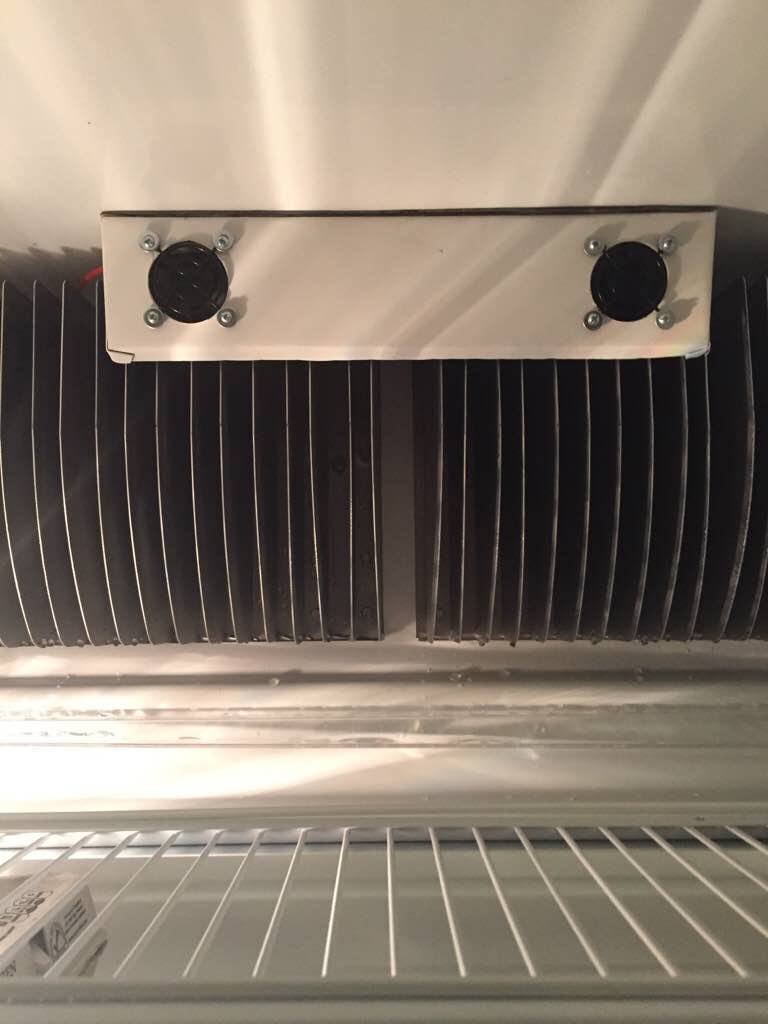 |
Was this something you built or purchased?
All of the 'for purchase' ones I've seen have larger fans.
I've been thinking of building one using smaller fans but this would be ideal if it can be bought somewhere.
__________________
2022 Cedar Creek 345IK 5th WheelSolar & Inverter2024 Ford F-Series SCREW7.3L4x4Factory PuckB&W CompanionTST Tire Monitor w/RepeaterSinemate 3500w Gen.
F&AM Lodge 358 Somerset, PA - JAFFA Shrine - Altoona, PA
Days Camped ☼ '19=118 ☼ '20=116 ☼ '21=123 ☼ '22=134 ☼ '23=118☼ '24=90
|
|
|
|
|
01-16-2016, 06:56 PM
|
#29
|
|
Member
Join Date: Apr 2015
Location: Canada
Posts: 93
|
offroad
Quote:
Originally Posted by offroad
I made a new baffle to increase airflow through the condenser of the Dometic Renaissance refrigerator in our TT. This will increase efficiency and make it easier on the fridge on hot days.
Here is the original Baffle from FR.
It helps, but a lot of air can still go around the Condenser instead of through it removing heat.

I've removed the original baffle here in preparation for the new one.

This is looking down at the two 120mm low speed fans I used to replace the noisy Dometic 92mm fans. These ball bearing fans move the same amount of air but are much quieter, go here if you want some.
Inside the RV when its quiet, you have to almost put your head against the fridge to hear these and they aren't running as much now either.

I fashioned the new Baffle from some sheet metal from HD, cost about $6.00.

This is the new Baffle installed, much more air will go through the Condenser now instead of around it increasing efficiency.
I used zip ties to mount it, the lower front edge of the baffle slips in between the fans and the outside of the slide wall.

This shows a closer view of the top of the new Baffle and the Condenser.

Larger pics available in my gallery. |
I can not get the plywood out to check fans how do I get to your gallery for larger pictures
|
|
|
|
|
01-16-2016, 08:36 PM
|
#30
|
|
Senior Member
Join Date: Jul 2014
Location: SW Missouri
Posts: 357
|
Quote:
Originally Posted by selkirk awards
I can not get the plywood out to check fans how do I get to your gallery for larger pictures
|
Larger pics are here
I took the three screws you can see from the top vent out, and removed the top section of the plywood. On the larger lower section, there were two screws at the top, one on each side accessed inside the top vent. (Inside the top vent looking down).
There was also one screw at the bottom, accessed right at the top edge of the lower vent in the middle. (Inside the lower vent looking up)
All of the three screws on the lower plywood section are screwed into the outer wall, and I used a square bit in a ratcheting bit driver as the room is very tight.
I had to cut the lower section in half to get it out, pretty sure it's installed from the inside prior the the fridge being put in place. Once all the plywood is out, the flange the fans are mounted to is easy to get to from the top vent opening.
Now that the plywood is out, I can get to the fans for servicing easily by cutting the zip ties mounting my condenser baffle and sliding it out.
__________________
2017 Open Range - Light 297RLS, BX1 Gooseneck
2014 Ram 2500 4x4 CCSB 6.7L 68RFE
|
|
|
|
|
01-17-2016, 06:24 PM
|
#31
|
|
Member
Join Date: Apr 2015
Location: Canada
Posts: 93
|
Quote:
Originally Posted by offroad
Larger pics are here
I took the three screws you can see from the top vent out, and removed the top section of the plywood. On the larger lower section, there were two screws at the top, one on each side accessed inside the top vent. (Inside the top vent looking down).
There was also one screw at the bottom, accessed right at the top edge of the lower vent in the middle. (Inside the lower vent looking up)
All of the three screws on the lower plywood section are screwed into the outer wall, and I used a square bit in a ratcheting bit driver as the room is very tight.
I had to cut the lower section in half to get it out, pretty sure it's installed from the inside prior the the fridge being put in place. Once all the plywood is out, the flange the fans are mounted to is easy to get to from the top vent opening.
Now that the plywood is out, I can get to the fans for servicing easily by cutting the zip ties mounting my condenser baffle and sliding it out. |
My plywood is one piece no screws showing anywhere.???
|
|
|
|
|
01-18-2016, 03:34 AM
|
#32
|
|
Senior Member
Join Date: Mar 2012
Location: SC
Posts: 251
|
5picker it is one I have made, I don't remember the fan size but got them from cooler guys also. I have them wired up to where they run anytime the fridge is turned on. It doesn't move much air but enough to keep the temp more even inside.
|
|
|
|
|
01-19-2016, 08:56 AM
|
#33
|
|
Senior Member
Join Date: Jul 2014
Location: SW Missouri
Posts: 357
|
Quote:
Originally Posted by selkirk awards
My plywood is one piece no screws showing anywhere.???
|
The plywood was likely put in from the inside before the fridge was slid in.
I would cut the plywood back to the edge of the opening in the upper vent, using a utility knife. That should give you enough room to see the mounting screws.
If you want to take the plywood out, you'll have to cut it into a couple of pieces. You could just leave it however, install your fans then make a new baffle out of sheet metal like I did. You'll have more room to install the fans with the plywood out though, and if you leave it in you may not have enough room for 120mm fans.
__________________
2017 Open Range - Light 297RLS, BX1 Gooseneck
2014 Ram 2500 4x4 CCSB 6.7L 68RFE
|
|
|
|
|
01-26-2016, 11:29 PM
|
#34
|
|
Senior Member
Join Date: Feb 2015
Posts: 138
|
Nice mod! had the dual fans in my last fridge and they worked great!
__________________
2015 Forest River Vibe 268RKS being pulled by a 2010 F150 Lariat 5.4l, 3.73 axle Super Cab, Max Tow with 11,300 lb tow capacity , Equalizer 4 point W/D hitch
|
|
|
|
|
01-27-2016, 11:18 AM
|
#35
|
|
Member
Join Date: Apr 2015
Location: Canada
Posts: 93
|
Quote:
Originally Posted by 5picker
Was this something you built or purchased?
All of the 'for purchase' ones I've seen have larger fans.
I've been thinking of building one using smaller fans but this would be ideal if it can be bought somewhere.
|
Can you tell me where to purchase that fan setup for in side the frig having big problems when the sun is at about 80* my frig sometimes goes as high as 48* for about 3 to 4 hours then slowly goes down to 34* later in the day. Thanks
|
|
|
|
|
01-27-2016, 11:28 AM
|
#36
|
|
Pickin', Campin', Mason
Join Date: Aug 2015
Location: South Western PA
Posts: 19,143
|
Quote:
Originally Posted by selkirk awards
Can you tell me where to purchase that fan setup for in side the frig having big problems when the sun is at about 80* my frig sometimes goes as high as 48* for about 3 to 4 hours then slowly goes down to 34* later in the day. Thanks
|
The OP indicated a few posts later that he built this particular double fan set-up himself.
There are other, larger fan models available for purchase.
HERE is one.
HERE is another.
A GOOGLE search of RV refrigerator evaporator fan brings up a bunch.
__________________
2022 Cedar Creek 345IK 5th WheelSolar & Inverter2024 Ford F-Series SCREW7.3L4x4Factory PuckB&W CompanionTST Tire Monitor w/RepeaterSinemate 3500w Gen.
F&AM Lodge 358 Somerset, PA - JAFFA Shrine - Altoona, PA
Days Camped ☼ '19=118 ☼ '20=116 ☼ '21=123 ☼ '22=134 ☼ '23=118☼ '24=90
|
|
|
|
|
01-29-2016, 09:15 PM
|
#37
|
|
Senior Member
Join Date: Mar 2012
Location: SC
Posts: 251
|
Silkirk they were Hans bought from cooler guys and I made the housing. I just took a small piece of aluminum and bent it and cut a couple of holes into it. Then it is just double sided tape used to holed it up.
|
|
|
|
|
05-16-2016, 02:28 PM
|
#38
|
|
Junior Member
Join Date: Aug 2013
Posts: 21
|
Good Mod
I actually did not feel quite comfortable with the amount of Texas heat that was building up inside the frig area, so I opted for the high speed fans instead of the low speed. But while the low speed fans were practically silent the heat build up did not allow me to have piece of mind, so I installed the high speed fans which are louder but still in my opinion about 50% to 60% quieter than the stock fans. Thanks for the great idea.
|
|
|
|
|
|
 Posting Rules
|
You may not post new threads
You may not post replies
You may not post attachments
You may not edit your posts
HTML code is Off
|
|
|
|
 » Recent Discussions
 |
|
|
|
|
|
|
|
|
|
|
|
|
|
|
|
|
|
|
|
|
|
|
|
|
|
|
|
|
|
|
|
|
|


 Linear Mode

