 |
 01-26-2020, 06:32 PM
|
#1
|
|
Good Ole Dad
Join Date: Jun 2018
Location: IE Calif
Posts: 69
|
Want to Install Shelves, Help Please
Well Shoot my Photo's are Laying on Their side, Don't know what went Wrong sorry. I want to Install Semi Permanent Shelves in the Hanging closet next to the Bed.
So I can Utilize the Whole closet .I picked up some (Shelve Holders) that I do not know how to attaché to the walls. What say You O Great Modifiers of the Forest River RV World. We have Used the Metal type Shelves' that you put to together then set in the Closet and we have Used the Cloth Hanging type.
__________________
2016 F150 Super Crew 4x4
V6 3.5 Turbo, Auto 6 Speed, Axle=3.55
Rear Air Shocks. Ride Rite. 10 PSI.
Hensley Arrow.
2021 262RL StarCraft.
|

|

|
|
01-26-2020, 07:03 PM
|
#2
|
|
Senior Member
Join Date: Nov 2012
Location: Mount Laurel, New Jersey
Posts: 9,230
|
Could you mount the shelf racks on the back of the face with caring size brackets facing the wall then cut shelves to fit.
__________________
2012 SunSeeker 3100SS Toad-1962 Futura Average 100 + days camping
|
|
|
|
|
01-26-2020, 08:54 PM
|
#3
|
|
Senior Member
Join Date: Oct 2015
Posts: 496
|
We replaced those plastic shelf brackets with metal standards similar to this:

The plastic ones have sharp points on the spring loaded rests, and when reaching in to place items in, or getting something out, the sharp points would scratch or snag clothing.
Here's a pic of ours with the metal standards, and the new shelves I built:
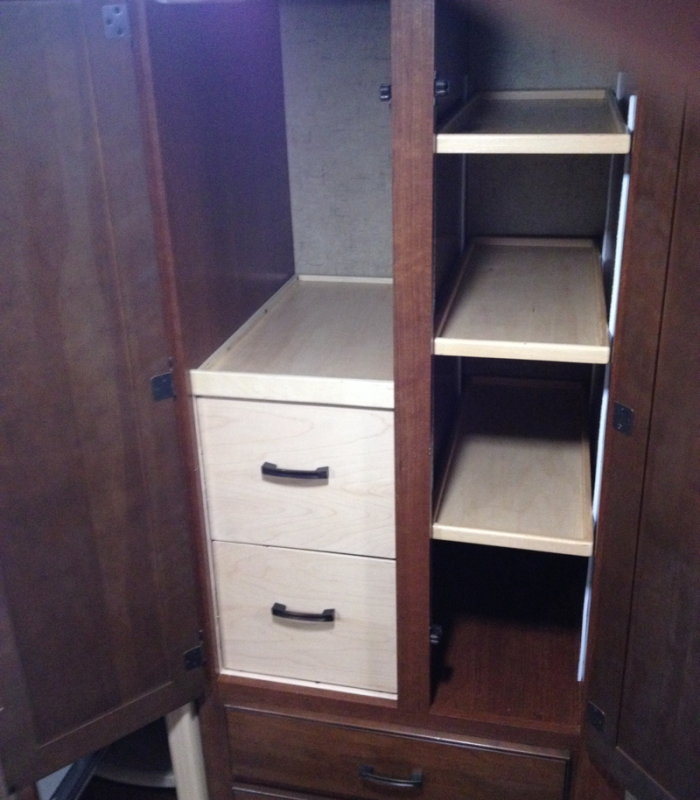
The original shelves were cut too narrow for the plastic standards, and were certainly too narrow for the new metal standards.
__________________
2016 Sunseeker 2250LE/Chevy
Formerly: 2000 Four Winds 26Q/Ford, '96 Kit Sportsmaster 22' 5th wheel, '91 Sunlite truck camper, Wildernest flip-top canopy
|
|
|
|
|
01-26-2020, 09:03 PM
|
#4
|
|
Good Ole Dad
Join Date: Jun 2018
Location: IE Calif
Posts: 69
|
How did you Attach them to the Wall ?
__________________
2016 F150 Super Crew 4x4
V6 3.5 Turbo, Auto 6 Speed, Axle=3.55
Rear Air Shocks. Ride Rite. 10 PSI.
Hensley Arrow.
2021 262RL StarCraft.
|
|
|
|
|
01-26-2020, 09:31 PM
|
#5
|
|
Senior Member
Join Date: Mar 2018
Location: Gulf Coast
Posts: 342
|
Quote:
Originally Posted by G.O.D.

How did you Attach them to the Wall ?
|
I used the same brackets as did brucemc and just cut the shelves to fit very snug.Nothing has moved in over 5000 miles of travel.
Please forgive the mess in the attached photo
__________________
Central Florida
2017 Nissan Pathfinder SL
2019 Shamrock 19
|
|
|
|
|
01-26-2020, 09:48 PM
|
#6
|
|
Good Ole Dad
Join Date: Jun 2018
Location: IE Calif
Posts: 69
|
So you did not Use Glue or Screws to Hold Them. My Problem is Attaching them to the Walls.
__________________
2016 F150 Super Crew 4x4
V6 3.5 Turbo, Auto 6 Speed, Axle=3.55
Rear Air Shocks. Ride Rite. 10 PSI.
Hensley Arrow.
2021 262RL StarCraft.
|
|
|
|
|
01-26-2020, 10:41 PM
|
#7
|
|
Senior Member
Join Date: Mar 2018
Location: Gulf Coast
Posts: 342
|
Quote:
Originally Posted by G.O.D.
So you did not Use Glue or Screws to Hold Them. My Problem is Attaching them to the Walls.
|
Nope, nothing.The metal brackets were cut to fit snug to to bottom and the shelves were cut to fit snug bracket to bracket and front to back. I can tell you though that can probably use screws as I have since removed the hanging bar and those bar holders were held in place with two screws on each side. I am sure that a stud was strategically place behind them, but a would imaging that each corner should have some kind of stud also.
__________________
Central Florida
2017 Nissan Pathfinder SL
2019 Shamrock 19
|
|
|
|
|
01-27-2020, 10:57 AM
|
#8
|
|
Senior Member
Join Date: Oct 2015
Posts: 496
|
Bruce here - As there is framing in the wall where the originals were located, I installed the new standards near those locations with small screws.
You can determine where yours are located by using a stud sensor, or even by looking at where the panels were tacked to the framing.
Else, you can use short screws in the paneling if you tighten them just enough to keep from stripping them out. All you need to do is hold the standards in place.
Coney's idea works well if things are snug.
__________________
2016 Sunseeker 2250LE/Chevy
Formerly: 2000 Four Winds 26Q/Ford, '96 Kit Sportsmaster 22' 5th wheel, '91 Sunlite truck camper, Wildernest flip-top canopy
|
|
|
|
|
01-27-2020, 02:04 PM
|
#9
|
|
Senior Member
Join Date: Jan 2018
Location: Raleigh, NC
Posts: 9,622
|
Quote:
Originally Posted by brucemc
We replaced those plastic shelf brackets with metal standards similar to this:
The plastic ones have sharp points on the spring loaded rests, and when reaching in to place items in, or getting something out, the sharp points would scratch or snag clothing.
Here's a pic of ours with the metal standards, and the new shelves I built:
The original shelves were cut too narrow for the plastic standards, and were certainly too narrow for the new metal standards.
|
I used the same kind. Got the standards and brackets at Lowe's. Used the screws that came with the into the plywood. Cut the standards with a hacksaw. Very easy project.
__________________
Larry
"Everybody's RV is not like your RV."
"Always take pictures with the button on the right."
"Always bypass the water heater before opening the low-point drains."
Sticks and Bricks: Raleigh, NC
2008 Cherokee 38P: at Ivor, VA permanently
|

|
|
|
01-27-2020, 11:18 PM
|
#10
|
|
Member
Join Date: Nov 2013
Posts: 37
|
Quote:
Originally Posted by Larry-NC
I used the same kind. Got the standards and brackets at Lowe's. Used the screws that came with the into the plywood. Cut the standards with a hacksaw. Very easy project.
|
X2. Just make sure the screws are not too long to go completely thru the wall
|
|
|
|
|
01-28-2020, 09:36 AM
|
#11
|
|
Member
Join Date: Jun 2017
Location: North Florida
Posts: 54
|
Dang that's clever!
I've used those rails for countless things but NEVER did it occur to me to use them in the TT wardrobe.. I did this with aluminum angle and plexi-glass. Rails would have been so much easier and the shelves adjustable to boot.
|
|
|
|
|
01-30-2020, 11:01 AM
|
#12
|
|
Senior Member
Join Date: May 2019
Posts: 1,016
|
Easily removable without any tools and no attaching to the walls, the shelves wedge in and lock everything together -


|
|
|
|
|
02-07-2020, 07:49 PM
|
#13
|
|
Good Ole Dad
Join Date: Jun 2018
Location: IE Calif
Posts: 69
|
UPDATE!
First off I want to Thank You all for your Postings and Ideals. I went with what Brucemc Posted. Here's Proof.


Also Installed a Bed Lift while we were at it.
[ATTACH]  [/ATTACH]
__________________
2016 F150 Super Crew 4x4
V6 3.5 Turbo, Auto 6 Speed, Axle=3.55
Rear Air Shocks. Ride Rite. 10 PSI.
Hensley Arrow.
2021 262RL StarCraft.
|
|
|
|
|
02-07-2020, 08:36 PM
|
#14
|
|
Senior Member
Join Date: Feb 2018
Location: TEXAS
Posts: 9,230
|
Looks good! 
__________________
2015 Dynamax REV 24TB class C
|
|
|
|
|
02-07-2020, 10:00 PM
|
#15
|
|
Senior Member
Join Date: Aug 2016
Posts: 188
|
Shelves added Mini Lite 2503S
We added shelves to our Mini Lite. No brackets or drilling.
|
|
|
|
|
02-08-2020, 12:23 PM
|
#16
|
|
Junior Member
Join Date: Oct 2017
Posts: 3
|
Quote:
Originally Posted by Gottaluvlife
We added shelves to our Mini Lite. No brackets or drilling.
|
How did you attach the side pieces?
|
|
|
|
|
02-08-2020, 12:54 PM
|
#17
|
|
Senior Member
Join Date: Aug 2016
Posts: 188
|
Not attached, used a paper template to cut thin piece of wood for the sides, attached brackets to the sides, then inserted side pieces, next cut shelves to fit. Each shelf measured before cutting.
Hope that makes sense.
We could totally remove if we wanted to.
|
|
|
|
|
02-16-2020, 12:55 PM
|
#18
|
|
Junior Member
Join Date: Jul 2019
Posts: 3
|
OldFixer here.
Has anyone ever removed the side tables from a 2016 Signature 8329SS
They are pretty useless. I would either remove or cut them down???
|
|
|
|
|
02-16-2020, 01:02 PM
|
#19
|
|
Senior Member
Join Date: Jan 2018
Location: Raleigh, NC
Posts: 9,622
|
Pictures?
Quote:
Originally Posted by karronN
OldFixer here.
Has anyone ever removed the side tables from a 2016 Signature 8329SS
They are pretty useless. I would either remove or cut them down???
|
Pictures would be helpful. Most of us don't know what the side tables in a 2016 Signature look like.
If you take the pictures with a phone, hold it with the button to the right. Otherwise the pictures will be rotated.
__________________
Larry
"Everybody's RV is not like your RV."
"Always take pictures with the button on the right."
"Always bypass the water heater before opening the low-point drains."
Sticks and Bricks: Raleigh, NC
2008 Cherokee 38P: at Ivor, VA permanently
|
|
|
|
|
02-16-2020, 01:31 PM
|
#20
|
|
Junior Member
Join Date: Jul 2019
Posts: 3
|
Quote:
Originally Posted by karronN
OldFixer here.
Has anyone ever removed the side tables from a 2016 Signature 8329SS
They are pretty useless. I would either remove or cut them down???
|
She's outback under cover and 6" of snow right now so no pictures Sorry.
If you pull up 2016 8329SS floor plan you will see the 2 items one each side of rear living area.
|
|
|
|
|
 Posting Rules
|
You may not post new threads
You may not post replies
You may not post attachments
You may not edit your posts
HTML code is Off
|
|
|
|
 » Recent Discussions
 |
|
|
|
|
|
|
|
|
|
|
|
|
|
|
|
|
|
|
|
|
|
|
|
|
|
|
|
|
|
|
|
|
|


 Linear Mode

