 |
 03-15-2022, 06:50 PM
|
#1
|
|
Member
Join Date: Mar 2022
Posts: 68
|
2005 Sunseeker side wall thickness.
I have some interior wall repair work to do. Before I start knocking nails or driving screws into any exterior wall, would be nice to know the thickness of the walls so as to not be using too long screws etc.
__________________
2005 Forest River Sunseeker 2900 LTD
|

|

|
|
03-15-2022, 07:00 PM
|
#2
|
|
Certified Curmudgeon
Join Date: Mar 2013
Location: Here
Posts: 3,999
|
Up North
There is a possibility that Canadian models are different however the original literature reads:
· 2" laminated filon sidewalls, vacuum bonded with aluminum frame structure, steel backers & block foam insulation
__________________
Mike Dropped
|
|
|
|
|
03-16-2022, 08:07 AM
|
#3
|
|
Kanadian Kamper
Join Date: Sep 2010
Location: Southern Ontario
Posts: 8,185
|
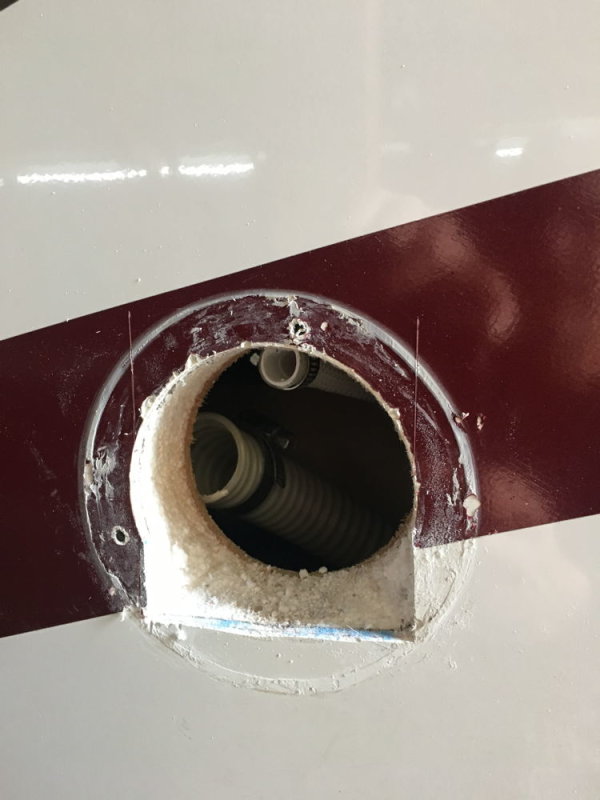
If you dont need the exact measurement using a caliper (see photo), just remove the screen from one of your windows to guesstimate the thickness of your exterior walls.
Not sure what kind of interior work youre planning, but I definitely would NOT use nails.
__________________

Ken and Terry
2018 Sunseeker 2430S-CD, nicely modified and carried by a 2017 Ford E450 Sport
Former Georgetown 330TS owner for 10 years with more mods than I can count, pushed by our 2017 GMC Terrain
|
|
|
|
|
03-16-2022, 08:37 AM
|
#4
|
|
Senior Member
Join Date: May 2015
Location: Novi, MI USA
Posts: 815
|
The walls are a significant part of the structure of your motorhome. They are built as a
"sandwich" (exterior fiberglass/frp, foam, struts/wood/aluminum & interior luan) all glued together to create rigid structure. A lot depends on how big an area you are repairing, foam safe glue might be the best choice (many glues will melt the foam, destroying the insulation and structure).
|
|
|
|
|
03-16-2022, 09:34 AM
|
#5
|
|
Senior Member
Join Date: Oct 2015
Posts: 496
|
2":
__________________
2016 Sunseeker 2250LE/Chevy
Formerly: 2000 Four Winds 26Q/Ford, '96 Kit Sportsmaster 22' 5th wheel, '91 Sunlite truck camper, Wildernest flip-top canopy
|
|
|
|
|
03-16-2022, 12:02 PM
|
#6
|
|
Member
Join Date: Mar 2022
Posts: 68
|
Thanks for for the input.
Just to clarify.
We bought the RV knowing there had, at one point in it's life, been water incursion in the cab bunk on the driver's side. The leak was repaired and she's dry, but there was come cosmetic damage done to the interior walls in that corner (wrinkling and delam). I plan on repairing it as best I can for this season, and doing a more substantial remodel job at the end of the upcoming season.
I was hoping to avoid using glues or epoxy for this interim patch job and just wanted to be sure of the nail/staples if I decide to use my small brad nailer. (It one of those little electric nailers used for furniture upholstering.
Also, the jacknife couch is very loose and I noticed that brackets holding the "Sideboards" have pulled loose and was thinking of moving those to tighten up teh side boards. (At least until I can build the under couch cabinet and remount the couch.
__________________
2005 Forest River Sunseeker 2900 LTD
|
|
|
|
|
03-16-2022, 06:05 PM
|
#7
|
|
Senior Member
Join Date: May 2015
Location: Novi, MI USA
Posts: 815
|
Quote:
Originally Posted by rwhitbread

Thanks for for the input.
Just to clarify.
We bought the RV knowing there had, at one point in it's life, been water incursion in the cab bunk on the driver's side. The leak was repaired and she's dry, but there was come cosmetic damage done to the interior walls in that corner (wrinkling and delam). I plan on repairing it as best I can for this season, and doing a more substantial remodel job at the end of the upcoming season.
I was hoping to avoid using glues or epoxy for this interim patch job and just wanted to be sure of the nail/staples if I decide to use my small brad nailer. (It one of those little electric nailers used for furniture upholstering.
Also, the jacknife couch is very loose and I noticed that brackets holding the "Sideboards" have pulled loose and was thinking of moving those to tighten up teh side boards. (At least until I can build the under couch cabinet and remount the couch.
|
My first thought for temporary cosmetic fix - textured wallpaper
It would hide the damage and wrinkles and would not require tear out of anything. Purely cosmetic
A long time ago I rebuilt the floor in our last camper. Same basic construction https://flickr.com/photos/17321100@N...57627084950665
Good luck
|
|
|
|
|
03-16-2022, 10:37 PM
|
#8
|
|
Member
Join Date: Mar 2022
Posts: 68
|
This is a few pictures (taken from a video I took for the repair tech) of some of the old water damage in the bunk.
I'm hoping to just roll out some of the delam, tack it back up, and re-attach the trim. This area is just for storage this season, and no one will be sleeping up there, so just want to get secured so moving the rig doesn't exacerbate the damage.


__________________
2005 Forest River Sunseeker 2900 LTD
|
|
|
|
|
03-17-2022, 08:38 AM
|
#9
|
|
Senior Member
Join Date: Jan 2018
Location: Raleigh, NC
Posts: 9,616
|
Tempted
If this were mine, I'd be tempted to start with a heat gun and a squeegee. Warm the affected area and use the squeegee to flatten the covering, working only from center toward the edges. You may be able to soften the original adhesive enough to get it to grab.
As always, start in an unobtrusive spot, work carefully, and don't overheat. Be especially alert in case the covering begins to shrink and shrivel up.
__________________
Larry
"Everybody's RV is not like your RV."
"Always take pictures with the button on the right."
"Always bypass the water heater before opening the low-point drains."
Sticks and Bricks: Raleigh, NC
2008 Cherokee 38P: at Ivor, VA permanently
|
|
|
|
|
03-17-2022, 08:45 AM
|
#10
|
|
Senior Member
Join Date: Mar 2014
Posts: 185
|
Quote:
Originally Posted by Larry-NC
If this were mine, I'd be tempted to start with a heat gun and a squeegee. Warm the affected area and use the squeegee to flatten the covering, working only from center toward the edges. You may be able to soften the original adhesive enough to get it to grab.
As always, start in an unobtrusive spot, work carefully, and don't overheat. Be especially alert in case the covering begins to shrink and shrivel up.
|
Careful with the heat gun. The foam in the SS will melt with the heat from the gun.
|
|
|
|
|
03-17-2022, 05:45 PM
|
#11
|
|
Member
Join Date: Mar 2022
Posts: 68
|
Don't have a squeegee, but I think this will do...

__________________
2005 Forest River Sunseeker 2900 LTD
|
|
|
|
|
03-17-2022, 05:54 PM
|
#12
|
|
Senior Member
Join Date: Jan 2018
Location: Raleigh, NC
Posts: 9,616
|
Be gentle!
Quote:
Originally Posted by rwhitbread
Don't have a squeegee, but I think this will do...
|
If the wall surface is just styrofoam with no plywood, you will crush it. You need to be gentle. Gently use a flexible one like this one.
__________________
Larry
"Everybody's RV is not like your RV."
"Always take pictures with the button on the right."
"Always bypass the water heater before opening the low-point drains."
Sticks and Bricks: Raleigh, NC
2008 Cherokee 38P: at Ivor, VA permanently
|
|
|
|
|
03-17-2022, 06:19 PM
|
#13
|
|
Member
Join Date: Mar 2022
Posts: 68
|
There's a layer of what looks like a single sheet of luan behind the textured wall paper.
Here's a shot of where the inner side wall has broken away.. You can see the backing behind the paper.

__________________
2005 Forest River Sunseeker 2900 LTD
|
|
|
|
|
03-17-2022, 08:31 PM
|
#14
|
|
Senior Member
Join Date: Jan 2018
Location: Raleigh, NC
Posts: 9,616
|
What I thought
Quote:
Originally Posted by rwhitbread
There's a layer of what looks like a single sheet of luan behind the textured wall paper.
Here's a shot of where the inner side wall has broken away.. You can see the backing behind the paper.
|
That's what I thought. You can't put vinyl or paper directly over foam.
Going under the assumptions that:
Heat will soften the adhesive on the vinyl, and
Heat will not penetrate the luan enough to damage the foam,
I'd still go with a heat gun and squeegee as a first attempt. The squeegee will drag the wrinkles out of the vinyl; the roller will just crimp them.
__________________
Larry
"Everybody's RV is not like your RV."
"Always take pictures with the button on the right."
"Always bypass the water heater before opening the low-point drains."
Sticks and Bricks: Raleigh, NC
2008 Cherokee 38P: at Ivor, VA permanently
|
|
|
|
|
03-18-2022, 01:08 AM
|
#15
|
|
Member
Join Date: Mar 2022
Posts: 68
|
Any ideas how I can identify the wall color number so I can maybe purchase some seal tape? From the 2005 brochure I have all teh color schemes seem to use the same wall paneling, so perhaps it's just a year class thing.
__________________
2005 Forest River Sunseeker 2900 LTD
|
|
|
|
|
03-20-2022, 07:39 AM
|
#16
|
|
Member
Join Date: Jul 2020
Posts: 95
|
FWIW, I like your idea of just retacking the existing vinyl. Your best bet for finding colour correct seal tape would be to contact Forest River. They could also specify the correct glue.
__________________
2017 Sunseeker 2650S CDW

|
|
|
|
|
 Posting Rules
|
You may not post new threads
You may not post replies
You may not post attachments
You may not edit your posts
HTML code is Off
|
|
|
|
 » Recent Discussions
 |
|
|
|
|
|
|
|
|
|
|
|
|
|
|
|
|
|
|
|
|
|
|
|
|
|
|
|
|
|
|
|
|
|


 Linear Mode

