 |
|
 07-31-2020, 02:29 PM
|
#41
|
|
Senior Member
Join Date: Oct 2017
Location: New Hampton, IA
Posts: 151
|
To the best of my memory my friend bought into the Unistrut Corporation, set up the patent and made his son President. No idea how long that lasted but it was a great product. My guess it was in the mid 60's.
__________________
Dan/n9hqg
|

|

|
|
08-13-2020, 10:26 AM
|
#42
|
|
Member
Join Date: Feb 2017
Posts: 59
|
Quote:
Originally Posted by TitanMike

I've noticed that my Fresh Water tank has grown a belly. Some parts of the tank bottom have sagged below the support braces. Not in danger of falling out as the supports are still holding the tank up well, just a sag between brackets which only run from front to rear. Bulging on the curb side and street side.
For several months I've been considering some form of bracing/support that would cure this and have seen several other approaches. I didn't want to weld anything to the frame and wasn't real excited about drilling holes in the lower flange of the frame as it's already lightened considerably and holes could lead to weakened points.
It then dawned on my what would work. Something that would be clamped to the frame flange, be fairly quick to install and even remove if necessary for future service. Taking a tip from an old Electrician friend I turned to "Kindorf" which is sold at Home Depot under the Super Strut name.

To attach it to the frame a pair of channel to beam strut clamps:
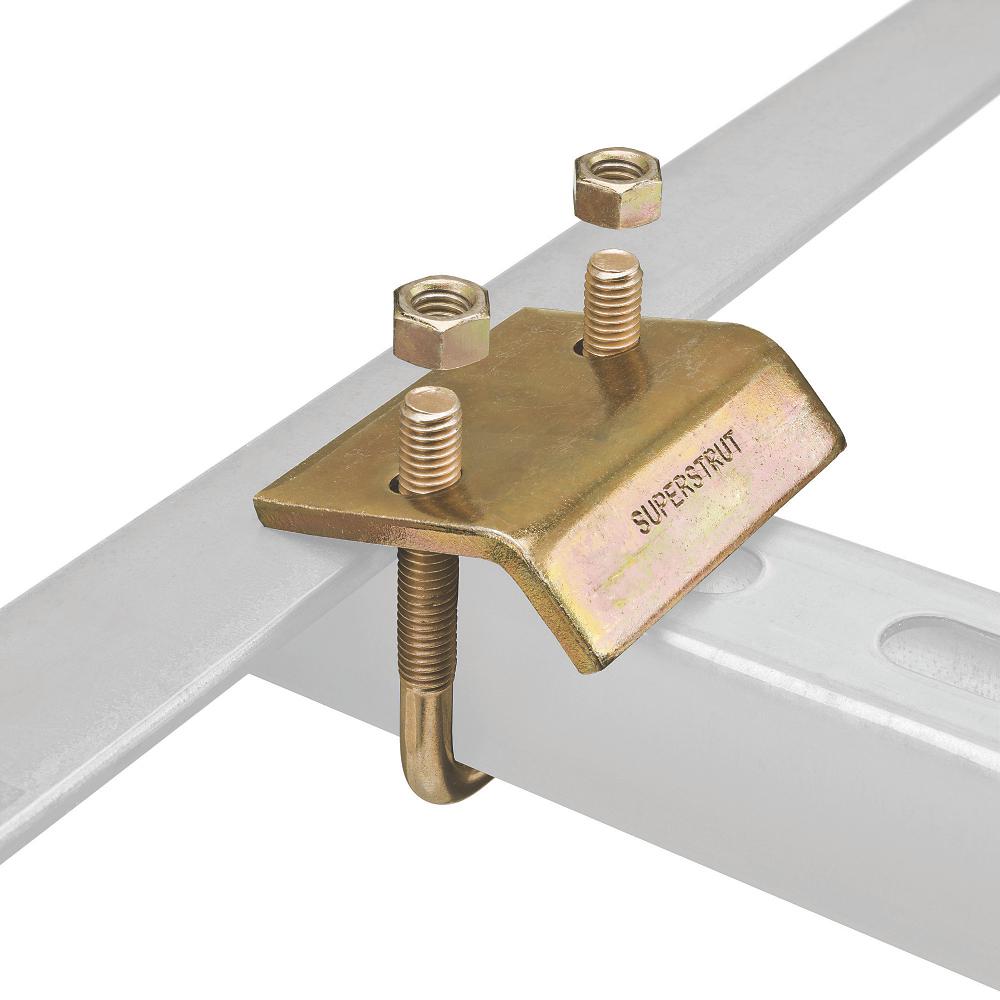
Edges of tank are supported by factory cross members and they are 27" apart. I installed two pieces of Superstrut from frame to frame, 9" apart and centered. This means that the bottom of the tank is supported essentially by a "grid" of supports 9" X 18".
Sag is now negligible across the bottom of the tank. I should be able to draw almost all of the water from the tank now.
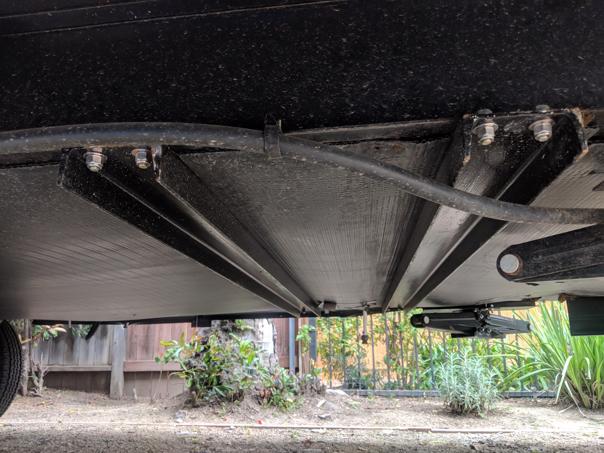
Here are a coupld pics after about an hour's work (most of which was cutting the strut to length. I extended the strut beyond the frame rails as I now have places to hang things. Things I'll think of later 


BTW, the channel only hangs down 1-5/8" from frame level. |
Thanks so much for posting this. I've been trying to find a solution to this without having to weld anything, so this should be perfect. My question is that on one side of the tank the frame is different than the other side, if that makes sense. It doesn't look like the u-bolt/bracket will work. Any ideas? 
|
|
|
|
|
08-13-2020, 10:51 AM
|
#43
|
|
Senior Member
Join Date: Jul 2018
Posts: 308
|
It appears your braces are attached front to rear to cross members going side to side. If your frame is I-beam then its best to place the strut from side to side with either the U bolt method or just drill holes in the outside of the I-beam and use 1/2 bolts. Its actually easy to just drill 4 holes.
__________________
2019 Freedom Express 248RBS
2012 F150 Supercrew 4x4
|
|
|
|
|
08-13-2020, 10:55 AM
|
#44
|
|
Senior Member
Join Date: Jun 2012
Location: Southern NM
Posts: 9,564
|
Quote:
Originally Posted by WFD473
Thanks so much for posting this. I've been trying to find a solution to this without having to weld anything, so this should be perfect. My question is that on one side of the tank the frame is different than the other side, if that makes sense. It doesn't look like the u-bolt/bracket will work. Any ideas? Attachment 236485 |
Well, TitanMike's great solution caused me to add a new project also  . I found the same thing on my frame. My tank is in the very rear of the trailer, and there is 1.5" square tubing welded there on the bottom of the frame beam for receiver/bumper support. So can't bolt the clips onto the beam adjacent to the tank. Both ends of the square tubing are open, so my solution was to buy some angle iron and either weld or bolt the angle iron on to the side of the square tubing to give the strut clamps something to bolt onto. Now the superstruts will be 1.5" below the frame, so I will make up the difference between the struts and bottom of the tank) with wood. I have bought and cut all the needed pieces, just waiting for the weather to cool off a bit to install.
Thanks TitanMike
__________________
Scott and Liz - Southern NM
2012 Wildcat Sterling 32RL - w/level up (best option ever)
2007 Chevy 2500HD Duramax
Reese Fifth Airborne Sidewinder

|
|
|
|
|
08-13-2020, 11:02 AM
|
#45
|
|
Senior Member
Join Date: Aug 2019
Posts: 1,054
|
F.R Wildcats are notorious for the tank straps to come loose. I put 2 pieces of aluminum rv awning arms under my tank. Just happened to have them laying around. Another rv, er spotted mine and told me his fell on his Wildcat .
|
|
|
|
|
08-13-2020, 11:49 AM
|
#46
|
|
Senior Member
Join Date: Jun 2012
Location: Southern NM
Posts: 9,564
|
Quote:
Originally Posted by Thomas ho
F.R Wildcats are notorious for the tank straps to come loose. I put 2 pieces of aluminum rv awning arms under my tank. Just happened to have them laying around. Another rv, er spotted mine and told me his fell on his Wildcat .
|
I wouldn't say they are notorious, I think that is more applicable to ultra lights.
The tank in my Wildcat is in no danger of falling out. It is held in by angle iron on four sides (OEM). But there are no straps across the middle, so after 9 years it has developed a 'belly', as is the subject of this thread. I probably wouldn't care, but it now holds 5 - 7 gallons of water I can't use or drain.
__________________
Scott and Liz - Southern NM
2012 Wildcat Sterling 32RL - w/level up (best option ever)
2007 Chevy 2500HD Duramax
Reese Fifth Airborne Sidewinder
|
|
|
|
|
08-13-2020, 02:32 PM
|
#47
|
|
Member
Join Date: Feb 2017
Posts: 59
|
Quote:
Originally Posted by NMWildcat
Well, TitanMike's great solution caused me to add a new project also . I found the same thing on my frame. My tank is in the very rear of the trailer, and there is 1.5" square tubing welded there on the bottom of the frame beam for receiver/bumper support. So can't bolt the clips onto the beam adjacent to the tank. Both ends of the square tubing are open, so my solution was to buy some angle iron and either weld or bolt the angle iron on to the side of the square tubing to give the strut clamps something to bolt onto. Now the superstruts will be 1.5" below the frame, so I will make up the difference between the struts and bottom of the tank) with wood. I have bought and cut all the needed pieces, just waiting for the weather to cool off a bit to install.
Thanks TitanMike |
Looking forward to the results! I may have to do the same thing. Thanks!
|
|
|
|
|
08-14-2020, 08:03 AM
|
#48
|
|
Senior Member
Join Date: Jun 2016
Location: Maurice, LA
Posts: 4,095
|
Quote:
Originally Posted by WFD473
Looking forward to the results! I may have to do the same thing. Thanks!
|
Mine is identical to NM Wildcat so Im going to look at it today to see what I have to do too. His solution sounds about right to me though.
__________________
2012 Wildcat Sterling 32RL, Gladiator Qr35 ST235/85R16 Load rating G, TST 507 TPMS w/ Flow-thru Sensors & Repeater, Reese Sidewinder 16K Pin Box, PI EMS HW50C
2009 Chevy Silverado 2500HD CCSB LTZ Diesel, Fumoto Oil Drain Valve, Turbo Brake activated, 39 gal Aux Tank W/ Fuel Pump transfer, Air Lift Loadlifter 5000 air bags.
|
|
|
|
|
08-14-2020, 08:29 AM
|
#49
|
|
Senior Member
Join Date: May 2018
Location: Western NY
Posts: 107
|
I've been thinking of adding some type of support since the 2 original C channel pieces of iron have had a nice curve to them since I bought the trailer which gives my FW tank a nice little belly on it. I just haven't gotten around to it yet but this looks like it would be a quick and easy solution to add some more support. Looks like I have another new project. Thanks.
|
|
|
|
|
08-14-2020, 10:10 AM
|
#50
|
|
Senior Member
Join Date: Jun 2012
Location: Southern NM
Posts: 9,564
|
Quote:
Originally Posted by DouglasReid
Mine is identical to NM Wildcat so Im going to look at it today to see what I have to do too. His solution sounds about right to me though.
|
Well Doug, I way overthought this . I was determining where to drill holes in the angle iron and the square tubing. If I just put the angle iron on the inside of tubing not only do I create a shelf to rest the superstruts on, but the superstruts are now right up against the cloroplast. No need for any wood to make up the gap as there would be if I put the strut under the square tubing. And you can also bolt the superstruts to the angle iron as well as use the clamps. And there is no overhang of the superstruts outside the frame. Much cleaner.
Will take pics when I get done. Now I have to cut the superstruts shorter .
__________________
Scott and Liz - Southern NM
2012 Wildcat Sterling 32RL - w/level up (best option ever)
2007 Chevy 2500HD Duramax
Reese Fifth Airborne Sidewinder
|
|
|
|
|
08-14-2020, 10:51 AM
|
#51
|
|
Senior Member
Join Date: Mar 2015
Location: N. Illinois
Posts: 2,371
|
Quote:
Originally Posted by TitanMike
I've noticed that my Fresh Water tank has grown a belly. Some parts of the tank bottom have sagged below the support braces. Not in danger of falling out as the supports are still holding the tank up well, just a sag between brackets which only run from front to rear. Bulging on the curb side and street side.
For several months I've been considering some form of bracing/support that would cure this and have seen several other approaches. I didn't want to weld anything to the frame and wasn't real excited about drilling holes in the lower flange of the frame as it's already lightened considerably and holes could lead to weakened points.
It then dawned on my what would work. Something that would be clamped to the frame flange, be fairly quick to install and even remove if necessary for future service. Taking a tip from an old Electrician friend I turned to "Kindorf" which is sold at Home Depot under the Super Strut name.
To attach it to the frame a pair of channel to beam strut clamps:
Edges of tank are supported by factory cross members and they are 27" apart. I installed two pieces of Superstrut from frame to frame, 9" apart and centered. This means that the bottom of the tank is supported essentially by a "grid" of supports 9" X 18".
Sag is now negligible across the bottom of the tank. I should be able to draw almost all of the water from the tank now.
Here are a coupld pics after about an hour's work (most of which was cutting the strut to length. I extended the strut beyond the frame rails as I now have places to hang things. Things I'll think of later
BTW, the channel only hangs down 1-5/8" from frame level. |
Maybe the best solution yet!
Quick, inexpensive, simple and outside the chloroplast. Kudos dude!
__________________
2016 Flagstaff 27VRL Emerald
14K Equalizer
2020 Silverado 2500HD CC 4X4 6.6L gas 3.73
|
|
|
|
|
08-14-2020, 02:53 PM
|
#52
|
|
Member
Join Date: Feb 2017
Posts: 59
|
Quote:
Originally Posted by DouglasReid
Mine is identical to NM Wildcat so Im going to look at it today to see what I have to do too. His solution sounds about right to me though.
|
Ok. So here is what I rigged up to get it to work. On one side, I used a longer u-bolt. It was the longest HD had, so I used threaded rod joined by couplers to make it longer. I then drilled holes in the frame and bolted it in. On the other side I used the super strut clamp, but used a piece of wood to make up the difference so it would be parallel to the super strut, if that makes sense. I never travel with water in the tank and only use it maybe 2-3 times per season. Otherwise we're at RV parks that have city hook ups. Any input is appreciated. Thanks  
|
|
|
|
|
08-15-2020, 03:10 PM
|
#53
|
|
Senior Member
Join Date: Jun 2016
Location: Maurice, LA
Posts: 4,095
|
Quote:
Originally Posted by NMWildcat
Well Doug, I way overthought this . I was determining where to drill holes in the angle iron and the square tubing. If I just put the angle iron on the inside of tubing not only do I create a shelf to rest the superstruts on, but the superstruts are now right up against the cloroplast. No need for any wood to make up the gap as there would be if I put the strut under the square tubing. And you can also bolt the superstruts to the angle iron as well as use the clamps. And there is no overhang of the superstruts outside the frame. Much cleaner.
Will take pics when I get done. Now I have to cut the superstruts shorter . |
We do not have a self leveling system so we still have the rear stabilizer. That spans the rear of the camper from one side to the other directly under the rear portion of the fresh water tank.
I see some waviness in front of that on both sides of the FW tank drain. It looks as if I can probably put two of those braces, side to side. One in front of the FW tank drain and one between the drain and the rear stabilizer. I think I can just screw up into the frame on both sides using a self drilling screw and large area washer. (After Carefully making sure Im not puncturing anything I cannot see on the other side of the Corplast, of course)
I was also thinking it may be possible just to slit the Corplast and use those U Bolts with the clips on the inside of the frame, assuming nothing is interfering.
Im not in a rush so i will be VERY happy to see what you came up with Scott.
Many Thanks!
__________________
2012 Wildcat Sterling 32RL, Gladiator Qr35 ST235/85R16 Load rating G, TST 507 TPMS w/ Flow-thru Sensors & Repeater, Reese Sidewinder 16K Pin Box, PI EMS HW50C
2009 Chevy Silverado 2500HD CCSB LTZ Diesel, Fumoto Oil Drain Valve, Turbo Brake activated, 39 gal Aux Tank W/ Fuel Pump transfer, Air Lift Loadlifter 5000 air bags.
|
|
|
|
|
08-15-2020, 03:39 PM
|
#54
|
|
Senior Member
Join Date: Jun 2012
Location: Southern NM
Posts: 9,564
|
__________________
Scott and Liz - Southern NM
2012 Wildcat Sterling 32RL - w/level up (best option ever)
2007 Chevy 2500HD Duramax
Reese Fifth Airborne Sidewinder
|
|
|
|
|
08-15-2020, 04:17 PM
|
#55
|
|
Senior Member
Join Date: Jun 2012
Location: Southern NM
Posts: 9,564
|
And again, MANY THANKS to TitanMike for coming up with this great solution and sharing it!
__________________
Scott and Liz - Southern NM
2012 Wildcat Sterling 32RL - w/level up (best option ever)
2007 Chevy 2500HD Duramax
Reese Fifth Airborne Sidewinder
|
|
|
|
|
08-17-2020, 10:59 AM
|
#56
|
|
Junior Member
Join Date: Dec 2015
Posts: 4
|
Failed water tank support
My 2016 Vibe had a large sag under its enclosed bottom. After trying to push it up with a floor jack and with great reluctance I opened the plastic membrane. What I found shocked me the cross support of the tank was 1/8 thick steel and had buckled. The piece measured 2 1/2 inches tall by 1 1/2 wide at the bottom. It had been cut from a wider piece of steel because the top edge had a sharp burred edge all the way across. I also found the heat duct had been draped across the top of the support and had been cut all the way through and was hanging by the steel wire that had formed its shape. I removed the damaged support and replaced it with 3/16 steel something the factory should have done in its manufacture. I reconnected and taped up the duct.
Another issue was the table in the slide out was made too small for the space between the seats to form a bed and who ever slept on it would find them selves on the floor during the night. Forrest Rivers fix was to add a piece of 3/4 material to each side very sloppy design here.
I could go on about the brakes that never worked but whats the use.
|
|
|
|
|
08-17-2020, 11:00 PM
|
#57
|
|
Senior Member
Join Date: Jul 2017
Location: California
Posts: 7,616
|
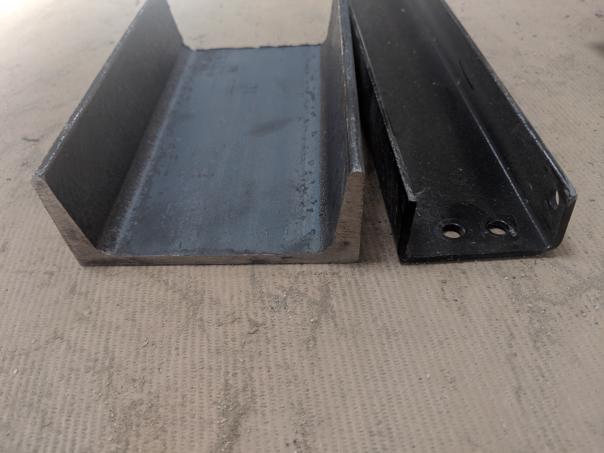
This is my overkill solution.
this is the difference in size of the metal I put in to what was on there.
|
|
|
|
|
08-17-2020, 11:21 PM
|
#58
|
|
Senior Member
Join Date: Jun 2012
Location: Southern NM
Posts: 9,564
|
Quote:
Originally Posted by babock
This is my overkill solution.
this is the difference in size of the metal I put in to what was on there.
|
I don't think that is overkill. Looks great and now you have no worries! Congrats!
__________________
Scott and Liz - Southern NM
2012 Wildcat Sterling 32RL - w/level up (best option ever)
2007 Chevy 2500HD Duramax
Reese Fifth Airborne Sidewinder
|
|
|
|
|
08-17-2020, 11:46 PM
|
#59
|
|
Senior Member
Join Date: Jul 2017
Location: California
Posts: 7,616
|
Quote:
Originally Posted by NMWildcat
I don't think that is overkill. Looks great and now you have no worries! Congrats!
|
I have a 40 gallon water tank. 4 of me could stand on one of those and it wouldn't move.
|
|
|
|
|
08-17-2020, 11:47 PM
|
#60
|
|
Senior Member
Join Date: Jul 2017
Location: California
Posts: 7,616
|
Quote:
Originally Posted by NMWildcat
I don't think that is overkill. Looks great and now you have no worries! Congrats!
|
I have a 40 gallon water tank. 4 of me could stand on one of those and it wouldn't move.
If I had a config that wasn't flat like mine, I would just get my MIG welder out and fab something up.
|
|
|
|
|
|
 Posting Rules
|
You may not post new threads
You may not post replies
You may not post attachments
You may not edit your posts
HTML code is Off
|
|
|
|
 » Recent Discussions
 |
|
|
|
|
|
|
|
|
|
|
|
|
|
|
|
|
|
|
|
|
|
|
|
|
|
|
|
|
|
|
|
|
|


 Linear Mode

