 |
|
 02-25-2019, 07:40 PM
|
#21
|
|
Senior Member
Join Date: Apr 2017
Location: 8300 Feet - Rocky Mountains
Posts: 2,475
|
For my PUP, I called Forrest River and asked about wiring. In my case, the tech person said that all wires run longitudinally along the road-side edge of the roof then are routed to the light fixtures and AC unit at a 90 degree angle to the side wall. I installed my panel straddling a light fixture and encountered no wires.
I don't know your rig, but if you have AC ducting in the Styrofoam, the tech person an help you avoid that space, too.
Reach out to Kathy and ask her to connect you to the right person:
KATHY SWOPE
ROCKWOOD and FLAGSTAFF TENT CAMPER PARTS
KSWOPE@FORESTRIVERINC.COM
PHONE # 574-642-8927
FAX # 574-970-7973
Just be clear that you are looking for an introduction to the right person. She has been VERY helpful.
My roof is very light weight. Very thin fiberglass, 1/16" to 1/8" plywood, 3/4" wood framing, light plywood, and ceiling finish. Total thickness 1". I used stainless 1/4" thru bolts and fender washers inside along with nylock nuts. To avoid compressing the roof sandwich, I selected bolts with a solid shank just the right length, and then I stacked the fender washer and one or two smaller washers so that I could tighten the nut all the way to the shank while just slightly squeezing the roof sandwich. Worked like a charm. Again, no problem with wiring.
I filled the screw hole hole and the joint between the panel bracket and the roof with silicone caulk/adhesive, then dabbed more on top of the screw/bolt head. That held up well...3 seasons so far with no additional sealant required.
With wood screws, I'd suggest first injecting the hole with Gorilla glue to hold the screw from backing out. Then add the silicone seal above the glue.
You might wish to consider using stainless "deep-thread" screws: https://www.fastenersuperstore.com/s...p+thread+screw
The roof plywood is likely to be plywood sheathing...a poor grade of plywood. The deep threads will get a slightly better bite into the material. And stainless is both compatible with aluminum (brackets) and won't rust and stain your roof.
Good luck with your project.
__________________
Jim & Renee
2020 Jayco Jay Feather X-213
previously 2014 Forest River/Rockwood HW 277
2006 Ram 1500 4WD Crew with Firestone Airbags
Every weekend boondocking in the National Forests or at Lake Vallecito.
|

|

|
|
02-25-2019, 08:55 PM
|
#22
|
|
Senior Member
Join Date: Jul 2017
Location: Almost Tijuana
Posts: 1,234
|
Thanks for the tips Jim - I had noticed a lot of the screws in our trailer were "different" than normal screws (not just the square drive but the threads) but I'd never heard of deep thread screws before. I'll look into those to see if they'd be better than what came with the mounting brackets.
__________________
I just want to be outside!!!
'17 Salem Cruise Lite 210RBXL
'11 F150 5.0
Only one shedding mutt now RIP Yoshi
|
|
|
|
|
02-26-2019, 09:54 AM
|
#23
|
|
Senior Member
Join Date: Sep 2016
Location: Colorado
Posts: 1,311
|
How did you route your wiring? How do you get from the roof down to the batteries? That, to me, seems like the most difficult part of any installation. Even once you get inside you have to get through the living space to the underside of the trailer, into the battery compartment.
__________________
2003 Duramax
2017 Crusader 315
2016 Boston Whaler Montauk 150
Former Montana owner
Colorado Cruiser, Over the Pass and Down the Hill
|
|
|
|
|
02-26-2019, 08:03 PM
|
#24
|
|
Senior Member
Join Date: Jul 2017
Location: Almost Tijuana
Posts: 1,234
|
Quote:
Originally Posted by Comanchecreek

How did you route your wiring? How do you get from the roof down to the batteries? That, to me, seems like the most difficult part of any installation. Even once you get inside you have to get through the living space to the underside of the trailer, into the battery compartment.
|
I will be posting some pics once I get it all done but here's the short story without pictures. The two 100W panels are aft of the AC unit and one on each side of the center line of the trailer. the wires run from the panels on top of the roof to the refrigerator vent corridor (don't know a better name for that). The base of the fridge sits on top of a void where the WFCO power panel is mounted so I pass the wires through that void and out the bottom of the trailer next to the outer side of the frame rail. The wires run along the frame rail to the front of the trailer and then back thru the floor at the front wall of the trailer which is in my pass thru. I created a panel with the charge controller, disconnect switch and fuse mounted to it which is then attached to the 1X at the front top of the pass thru. That's only 2 feet from may batteries so getting connected there was easy.
Like I mentioned, I'll do a write up with pictures when I'm done but if you have any questions in the meantime, let me know. People on this forum have helped me a lot so I am happy to give a little back!
__________________
I just want to be outside!!!
'17 Salem Cruise Lite 210RBXL
'11 F150 5.0
Only one shedding mutt now RIP Yoshi
|
|
|
|
|
02-26-2019, 08:07 PM
|
#25
|
|
Senior Member
Join Date: Jul 2017
Location: Almost Tijuana
Posts: 1,234
|
In the post above I mentioned that I will be routing the cables from the PV panels across the roof to the refrigerator vent corridor. I am thinking once I have everything stretched out properly, I could place a couple 6" lengths of Eternabond over the wires in a couple places to hold them from flapping around. Is that a good idea or?
__________________
I just want to be outside!!!
'17 Salem Cruise Lite 210RBXL
'11 F150 5.0
Only one shedding mutt now RIP Yoshi
|
|
|
|
|
02-26-2019, 08:33 PM
|
#26
|
|
Senior Member
Join Date: Jul 2017
Location: California
Posts: 7,616
|
Quote:
Originally Posted by larry2c
In the post above I mentioned that I will be routing the cables from the PV panels across the roof to the refrigerator vent corridor. I am thinking once I have everything stretched out properly, I could place a couple 6" lengths of Eternabond over the wires in a couple places to hold them from flapping around. Is that a good idea or?
|
Yes...or a blob of dicor. BTW, I personally like the non leveling dicor for this and the mounts. Tends to stay thicker covering the screws.I started with self leveling and switched it up by the end

|
|
|
|
|
02-26-2019, 09:07 PM
|
#27
|
|
Senior Member
Join Date: Apr 2017
Location: 8300 Feet - Rocky Mountains
Posts: 2,475
|
Quote:
Originally Posted by Comanchecreek
How did you route your wiring? How do you get from the roof down to the batteries? That, to me, seems like the most difficult part of any installation. Even once you get inside you have to get through the living space to the underside of the trailer, into the battery compartment.
|
The thing you're looking for is a " gland." It's possible to mount them on the roof and seal them well, but my preference is to run the wires to the very top of the side wall, mount the gland there...aligned with an interior cabinet to hide the wires and create a place to mount the solar charge controller. Water-proofing on the fiberglass side wall is easier than on the roof, and the wire entry points on the gland can point down at the ground further ensuring a dry fit.
Use the term "gland" to search for what you are looking for.
__________________
Jim & Renee
2020 Jayco Jay Feather X-213
previously 2014 Forest River/Rockwood HW 277
2006 Ram 1500 4WD Crew with Firestone Airbags
Every weekend boondocking in the National Forests or at Lake Vallecito.
|
|
|
|
|
02-26-2019, 09:15 PM
|
#28
|
|
Senior Member
Join Date: Jul 2017
Location: California
Posts: 7,616
|
Quote:
Originally Posted by jimmoore13
The thing you're looking for is a " gland." It's possible to mount them on the roof and seal them well, but my preference is to run the wires to the very top of the side wall, mount the gland there...aligned with an interior cabinet to hide the wires and create a place to mount the solar charge controller. Water-proofing on the fiberglass side wall is easier than on the roof, and the wire entry points on the gland can point down at the ground further ensuring a dry fit.
Use the term "gland" to search for what you are looking for. |
This is what I use. I went down an interior chamber that was right next to my entertainment center. For me, running it down the refrigerator vent would have doubled my wiring distance.
https://smile.amazon.com/gp/product/...?ie=UTF8&psc=1
|
|
|
|
|
02-26-2019, 09:32 PM
|
#29
|
|
Senior Member
Join Date: Jul 2017
Location: Almost Tijuana
Posts: 1,234
|
Quote:
Originally Posted by babock
Yes...or a blob of dicor. BTW, I personally like the non leveling dicor for this and the mounts. Tends to stay thicker covering the screws.I started with self leveling and switched it up by the end
|
Thanks for the tip and the pictures - your install looks great!
__________________
I just want to be outside!!!
'17 Salem Cruise Lite 210RBXL
'11 F150 5.0
Only one shedding mutt now RIP Yoshi
|
|
|
|
|
02-27-2019, 09:16 AM
|
#30
|
|
Senior Member
Join Date: Jul 2017
Location: SO-CAL
Posts: 503
|
Quote:
Originally Posted by A32Deuce
I didn't even try or kill for them. I read where someone else did how I did it. I try picking up on them anytime I'm on the roof and no movement. Dicor acts like a glue. I did drill a small starter hole first by wrapping tape around the bit leaving 3/4 showing.
|
Since I got a fiberglass roof, is there a need to pre-drill? Thanks
__________________
RETIRED U.S. NAVY
2017 FORESTER 3051S
IN SO-CAL
|
|
|
|
|
02-27-2019, 09:54 AM
|
#31
|
|
Senior Member
Join Date: Nov 2012
Location: Mount Laurel, New Jersey
Posts: 9,230
|
I have a fiberglass roof and did drill a small starter hole. Makes it easier to screw in and doesn't hurt anything.
__________________
2012 SunSeeker 3100SS Toad-1962 Futura Average 100 + days camping
|
|
|
|
|
02-27-2019, 09:56 AM
|
#32
|
|
Senior Member
Join Date: Jul 2017
Location: Almost Tijuana
Posts: 1,234
|
Quote:
Originally Posted by babock
Yes...or a blob of dicor. BTW, I personally like the non leveling dicor for this and the mounts. Tends to stay thicker covering the screws.I started with self leveling and switched it up by the end
|
One more question on the Dicor application. How did you get the back of the mounting brackets with the Dicor since it is under the panel?
__________________
I just want to be outside!!!
'17 Salem Cruise Lite 210RBXL
'11 F150 5.0
Only one shedding mutt now RIP Yoshi
|
|
|
|
|
02-27-2019, 11:37 AM
|
#33
|
|
Senior Member
Join Date: Jul 2017
Location: California
Posts: 7,616
|
Quote:
Originally Posted by larry2c
One more question on the Dicor application. How did you get the back of the mounting brackets with the Dicor since it is under the panel?
|
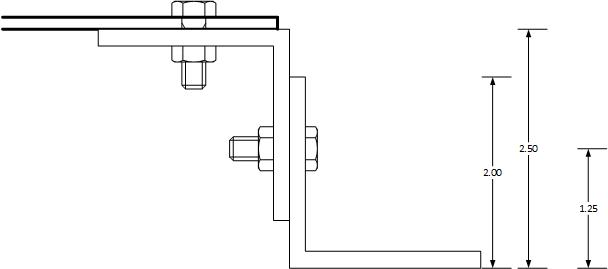
I first put a layer of Dicor down before I screwed down the brackets. Also, hard to tell but the brackets are pretty tall so I can apply Dicor after screwed down too. Bracket height is 2.5". back edge of the bracket is even with the side of the panel too.
|
|
|
|
|
02-28-2019, 06:03 PM
|
#34
|
|
Senior Member
Join Date: Jul 2017
Location: Almost Tijuana
Posts: 1,234
|
I see I'm not the only person that made custom brackets!
Thanks for the picture and info!
__________________
I just want to be outside!!!
'17 Salem Cruise Lite 210RBXL
'11 F150 5.0
Only one shedding mutt now RIP Yoshi
|
|
|
|
|
02-28-2019, 06:59 PM
|
#35
|
|
Member
Join Date: Oct 2016
Location: Varies!
Posts: 71
|
The panels will likely have a much higher voltage to the controller than from the controlor to the batteries. My four panels' wires operate at ~175 volts, while the battery wires operate at ~13-14 volts. Use much larger wires on the low voltage side, and minimize that distance to reduce voltage loss on the way to the battery.
__________________
-Richard
|
|
|
|
|
02-28-2019, 07:54 PM
|
#36
|
|
Senior Member
Join Date: Jul 2017
Location: Almost Tijuana
Posts: 1,234
|
Quote:
Originally Posted by Richard W Eason
The panels will likely have a much higher voltage to the controller than from the controlor to the batteries. My four panels' wires operate at ~175 volts, while the battery wires operate at ~13-14 volts. Use much larger wires on the low voltage side, and minimize that distance to reduce voltage loss on the way to the battery.
|
Thanks Richard - so far with my two 100W panels I've only seen about 16+ volts and if I remember right, my CC has a max input of 24V. My batteries are only about 2' from where the CC is located and I've run 8 AWG wire from the panels to the CC and from the CC to the batteries.
__________________
I just want to be outside!!!
'17 Salem Cruise Lite 210RBXL
'11 F150 5.0
Only one shedding mutt now RIP Yoshi
|
|
|
|
|
02-28-2019, 08:12 PM
|
#37
|
|
Senior Member
Join Date: Jul 2017
Location: California
Posts: 7,616
|
Quote:
Originally Posted by larry2c
Thanks Richard - so far with my two 100W panels I've only seen about 16+ volts and if I remember right, my CC has a max input of 24V. My batteries are only about 2' from where the CC is located and I've run 8 AWG wire from the panels to the CC and from the CC to the batteries.
|
Looks you bought those 100W Renogy low volt 100W panels. Not even sure they were still selling those. Hopefully, you are putting them in series if you are using an MPPT. If they are PWM, it doesn't matter since anything over 14.4V is pretty much waste energy anyway.
|
|
|
|
|
02-28-2019, 08:20 PM
|
#38
|
|
Senior Member
Join Date: Jul 2017
Location: Almost Tijuana
Posts: 1,234
|
Parallel and PWM. The panels are advertised as "new edition" and they have a slightly greater output than the previous model
__________________
I just want to be outside!!!
'17 Salem Cruise Lite 210RBXL
'11 F150 5.0
Only one shedding mutt now RIP Yoshi
|
|
|
|
|
02-28-2019, 09:01 PM
|
#39
|
|
Senior Member
Join Date: Jul 2017
Location: California
Posts: 7,616
|
Quote:
Originally Posted by larry2c
Parallel and PWM. The panels are advertised as "new edition" and they have a slightly greater output than the previous model
|
What are the specs? Have the link?
Since you have PWM, it doesn't matter what the voltage output is as long as its higher than battery voltage. For people with MPPT that put those lower 18V panels in parallel, they are fighting a losing battle. Of course putting panels only in parallel is a waste in an MPPT system. If you ever go MPPT in the future, put them in series.
EDIT: I see the specs now. Operating voltage is 16.4V. Like I said fine for PWM...not so great for MPPT.
|
|
|
|
|
02-28-2019, 09:15 PM
|
#40
|
|
Senior Member
Join Date: Jul 2017
Location: Almost Tijuana
Posts: 1,234
|
Yeah, this was a solar on a budget project. I think for the money spent it will do fine for what we need. I may add another panel and mount it with a pole mount that could go on the front A frame or back bumper. This would allow me to position the panels properly. As I was installing these panels I did an experiment where I tilted the panel up to roughly match my stick house panels. That bumped the output up about 25%...
__________________
I just want to be outside!!!
'17 Salem Cruise Lite 210RBXL
'11 F150 5.0
Only one shedding mutt now RIP Yoshi
|
|
|
|
|
|
 Posting Rules
|
You may not post new threads
You may not post replies
You may not post attachments
You may not edit your posts
HTML code is Off
|
|
|
|
 » Recent Discussions
 |
|
|
|
|
|
|
|
|
|
|
|
|
|
|
|
|
|
|
|
|
|
|
|
|
|
|
|
|
|
|
|
|
|


 Linear Mode

