 |
|
 09-12-2021, 08:37 PM
|
#21
|
|
Senior Member
Join Date: Jan 2015
Location: Granite Bay, Ca
Posts: 1,083
|
Quote:
Originally Posted by TitanMike

Marine wiring charts show the same numbers.
The big disconnect is that electricians working with high a/c voltages in residential and commercial as application look at 12-24 volt automotive, marine, and RV wire sizing through the same lens.
Those applications rarely involve wires in conduits where heating is an issue or in "free air" as you stated.
Voltage drop alone is the main consideration. Low voltage drop, minimal heating.
Back to the OP's installation, one may DESIRE larger wire but #2 wire is more than adequate for his application.
BTW "baking a potato in a microwave" is a very similar duty cycle to that of welding. 6 to 8 minutes of cook or same time between "stick changes" on welding cable.
|
Welding and microwave are entirely different. Just look at the waveform and current pattern some time. No similarity at all. RMS is very different between DC and a sine wave and an arc.
Suit yourself on the wire size, but as an electrical engineer with considerable experience in forensics on electrical fires, I'll stick with the NEC which does apply to our RVs as well as marine applications.
For the low voltage DC in our systems, the rules in the NEC differ somewhat from 120V ac, but by and large the NEC requirements are associated with current, not voltage. As such, the NEC is a proper guide. In particular, think overload and short-circuit currents. Voltage is not relevant here other than being part of the source that generates the short-circuit current.
Most people look at the ampacity tables and think "overload." But, there is another issue called short-circuit. In most cases a wire that is sufficient for a given load will also handle the possible short-circuit current based on conventional practice in removing short-circuits with circuit breakers. But, ideally, one always checks the short-circuit current and the protection (circuit breaker) opening time to be sure the wire will not melt or start an insulation fire before the breaker can open. This is a critical issue in a DC system supplied by lead-acid batteries which do not have a BMS. It's entirely possible for short-circuit considerations to dictate a larger wire than the expected load current!
Associated with short-circuit is the thermal time constant. How long it will take to melt or ignite the insulation. It's surprisingly short given that the heat is I square R where double the current means four times the heat and the resistance (R) is increasing during the short-circuit. I've presented this calculation here or on IRV2.com but don't recall when. It's definitely something to be concerned about.
And, what if a circuit breaker fails? Hopefully there's an upstream one that will clear the short-circuit. In fact, it's that one that is relevant in the determination of whether a wire will survive a short-circuit since breakers can and do fail.
Personally, out on the water in a boat, or in a highly flammable RV, I want wires that will survive and to have the proper protection in place. This is not a place to skimp.
Edit: BTW, I've seen a 12V car battery cause the insulation on a #2 battery cable to ignite in a few seconds. IIRC a 12V lead acid battery can generate up around 5000 amps of short-circuit current. An LiFePO4 can generate even more, but the BMS saves the day by disconnecting the battery in a fraction of a second.
|

|

|
|
09-12-2021, 09:17 PM
|
#22
|
|
Senior Member
Join Date: Jan 2019
Posts: 1,173
|
Your install turned at looking good. I'm still working on mine, it will probably be this winter when I tackle it or have it installed at the local stereo shop. I have the dc to dc charger and just built my 280ah lifepo4 cells into a battery with a bms.
I just hope mine turns out looking as nice as yours.
|
|
|
|
|
09-12-2021, 09:51 PM
|
#23
|
|
Senior Member
Join Date: Jan 2015
Location: Granite Bay, Ca
Posts: 1,083
|
Quote:
Originally Posted by corn18
It is 2ga wire. I will want to upgrade to 2/0 wire if I go to a 200A system. All the 200A paths are very short so I won't need a lot of wire.
|
Good plan. When I've run into needing 200 amps or more, I've doubled up on 1/0. I did this mostly because I had it on hand and it is easy to work with and it's good for 340 amps so lots of margin (2x170amp). I'd go directly to 2/0 in your case. Welding cable is very pricey so if you don't need the extreme flexibility, 2/0 stranded THHN at Home Depot is only about $5 per foot.
|
|
|
|
|
09-13-2021, 12:40 AM
|
#25
|
|
Senior Member
Join Date: Apr 2014
Location: Gainesville, FL
Posts: 4,556
|
Quote:
Originally Posted by TitanMike
In my TT I have three Inverters.
I have a 300 w TSW inverter that is dedicated to the TV, DVD player, and Sound bar.
A 1 kw TSW inverter dedicated to a freezer in my Outside Kitchen
and a 2 KW Inverter that I fire up to run Microwave and any other kitchen appliance I choose.
The 300 W and 1 KW inverters have overheads of <1 amp. The 2 Kw inverter is ~ 2 amp.
The freezer only runs when I choose to fill it for long off grid trips. The TV runs for hours vs microwave/kitchen appliances only minutes so no need for wasting the extra power to run items that in total consume less than 100w when running.
|
Where are the smaller inverters located? Proximate to the load or to the batteries?
__________________
TV: 2021 Ford F-150 4WD XLT Crew w/ 3.5L EB & HDPP, payload: 2,416#.
RV: 2020 Rockwood Mini-Lite 2507S, Propride 3P hitch w/ 1400# spring bars
Camping nights: 2021, 52; 2022, 99; 2023, 88; 2024, TBD (Est: 80+)

|
|
|
|
|
09-13-2021, 12:51 AM
|
#26
|
|
Senior Member
Join Date: Jan 2015
Location: Granite Bay, Ca
Posts: 1,083
|
Quote:
Originally Posted by nvs4602
|
I have not. But, I might next time (which isn't far off). This is a fraction of the cost of 1/0 welding cable and looks like it's probably nearly as flexible. The question is how tough is the insulation. Did the insulation seem durable?
|
|
|
|
|
09-13-2021, 09:18 AM
|
#27
|
|
Senior Member
Join Date: Jul 2017
Location: North of Seattle, WA
Posts: 17,362
|
Quote:
Originally Posted by Hclarkx
I have not. But, I might next time (which isn't far off). This is a fraction of the cost of 1/0 welding cable and looks like it's probably nearly as flexible. The question is how tough is the insulation. Did the insulation seem durable?
|
I've used some of this cable meant for car audio systems and found it to be far inferior to welding cable. Conductor package isn't as dense as welding cable and insulation is more form than function. Designed to be shown off at audiophile rallys.
There's a good reason it's cheaper than welding cable.
__________________
"A wise man can change his mind. A fool never will." (Japanese Proverb)
"You only grow old when you run out of new things to do"
2018 Flagstaff Micro Lite 25BDS
2023 f-150 SCREW XLT 3.5 Ecoboost (The result of a $68,000 oil change  )
|
|
|
|
|
09-13-2021, 02:28 PM
|
#28
|
|
Senior Member
Join Date: Aug 2021
Location: SE Florida
Posts: 444
|
NVS4602, in building your battery, did you custom build a box or find a battery box on the market in which the components would fit? I'm debating whether to build one big battery or two smaller ones for some redundancy should a cell fail.
__________________
2022 MiniLite 2109s
2018 F-150 XLT 4x4, 3.5L, Max tow pkg
2019 Ranger Lariat 4x4 (in reserve)
 (We're just getting started!)
|
|
|
|
|
09-13-2021, 04:22 PM
|
#29
|
|
Senior Member
Join Date: Jul 2017
Location: North of Seattle, WA
Posts: 17,362
|
Quote:
Originally Posted by JimM2109S
NVS4602, in building your battery, did you custom build a box or find a battery box on the market in which the components would fit? I'm debating whether to build one big battery or two smaller ones for some redundancy should a cell fail.
|
I had a friend explain once how "redundancy" isn't all it's cracked up to be.
I asked him if he ever considered upgrading his single engine plane to a twin engine. He said "no, just twice the chance of an engine failure".
Properly built a LiFePo4 battery pack shouldn't need any redundancy. Just size it for your needs and keep things simple.
Multiple batteries require a BMS for each "pack" so why increase the cost.
Buy large enough cells and a BMS that matches charge/discharge needs.
__________________
"A wise man can change his mind. A fool never will." (Japanese Proverb)
"You only grow old when you run out of new things to do"
2018 Flagstaff Micro Lite 25BDS
2023 f-150 SCREW XLT 3.5 Ecoboost (The result of a $68,000 oil change )
|
|
|
|
|
09-13-2021, 06:25 PM
|
#30
|
|
Senior Member
Join Date: Jan 2015
Location: Granite Bay, Ca
Posts: 1,083
|
Quote:
Originally Posted by JimM2109S
NVS4602, in building your battery, did you custom build a box or find a battery box on the market in which the components would fit? I'm debating whether to build one big battery or two smaller ones for some redundancy should a cell fail.
|
You specifically did not make this a general question to all comers, but I've been through the thought process and will share my IMHO on it.
Here I'm assuming a 12V system though with a 24V system most of the below applies (all but the BMS issues).
Weight. Four 280 Ah LiFePO4 cells in a "12V" pack will be over 50 lbs. If you parallel 280 Ah cells, then you are over 100 lbs in one pack. That's a bit unwieldly.
If you subscribe to some compression of the cells, building a box for four 280 Ah cells that will do this is a lot easier than for eight cells. Even without compression, I think boxes for four cells is easier to manage.
If you will power a sizeable inverter, and build one sizeable pack, you will need a BMS that can handle that inverter (plus 12V loads). That may mean a fairly costly BMS whereas a pair of 120 amp BMS is about $130 each.
And, if anything does go awry, a larger battery has more energy to dissipate and might create a bigger mess. Though I would put this at the bottom of the list of concerns.
Then there is the circuit breaker issue. 150 amp CB185 and CB285 circuit breakers are readily available and not very costly. You would put one on each battery. Higher rated circuit breakers are out there, but $$$$$.
And there's wiring. I use 1/0 welding cable, one per battery. That provides ample margin. With a larger battery you might need to go larger (think $$$$).
Most BMS have relatively modest balancing capability. With, say, eight cells in a 12V configuration, that balancing capability has to handle 560 Ah cells. It probably will, especially if it's a 200 or 300 amp BMS, but my preference is each cell getting it's own balancing circuit.
I agree with Mike, redundancy is a low priority consideration and not worth much cost or effort in the battery/cell department. On the other hand, given the other benefits, why not have some redundancy too.
I think the redundancy of two BMSs would rank higher than the cell question. I experienced a BMS failure though I don't think I've read of any others. Mine failed by running too hot and having too much voltage drop. It worked otherwise, but was clearly compromised in some way. The seller had a replacement to me in four days!
One downside of two or three 12V packs is that you can't just connect them in parallel at will. You must balance the two 12V packs to the same voltage before connecting the second one to your 12V bus. With luck you will do this just once, and will never separate them again.
My son has three 280 Ah 12V DIY packs. I have two 200 Ah 12V DIY packs and a 300 Ah Lifeblue. Neither of us would do it differently (well, I would have skipped the Lifeblue though when I got it, DIY was not big like it is now).
As for the boxes ...... the question is whether you want to compress the cells. If not, anything that fits and provides BMS mounting should work. I built plywood boxes for my son's 280 packs to get some compression. Sorry I don't have photos yet. The boxes were pretty simple, 3/4 plywood ends with two aluminum angle pieces running crosswise and with two threaded rods running down each side between the angle aluminum. The aluminum angles are mostly handles but resist any bowing of the 3/4 plywood ends. Some 1/4 luan stuff sits inside of the threaded rods and a piece spans the bottom. 1/4" plexiglass covers the top and supports the BMS. The threaded rods provide modest compression. I left some rod with the idea of adding springs at one end to provide constant compression and to allow expansion of the cells if need be rather than maybe burst them.
Keep in mind that the common blue 280 Ah cells are a relatively thin aluminum can with thin plastic film on the outside. The cans are connected to the negative terminal so are "hot" and you need to avoid puncturing or tearing that blue plastic film. In my case the plywood protects that film.
|
|
|
|
|
09-13-2021, 10:58 PM
|
#31
|
|
Senior Member
Join Date: Aug 2021
Location: SE Florida
Posts: 444
|
Quote:
Originally Posted by Hclarkx
One downside of two or three 12V packs is that you can't just connect them in parallel at will. You must balance the two 12V packs to the same voltage before connecting the second one to your 12V bus. With luck you will do this just once, and will never separate them again.
|
Many thanks for that specific information. I had not considered the above, quoted from your post. Good point! If you could post some pics of the battery box it would help as I'm not following how you used the aluminum cross pieces. I'll reread the post again tomorrow.
My 2109S just ordered will have a 12v fridge. I believe we'll have shore power in most of the locations where we plan to camp. That said, I want to make sure we have ample reserve power to keep the systems running wherever we are camping.
The camper comes with a 190w panel on the roof and I opted for a second panel on the order. I had planned on either two 100-150aH batteries or a single 280-320aH. Building my own would be quite easy, hampered only with the box to hold it all.
__________________
2022 MiniLite 2109s
2018 F-150 XLT 4x4, 3.5L, Max tow pkg
2019 Ranger Lariat 4x4 (in reserve)
(We're just getting started!)
|
|
|
|
|
09-14-2021, 01:39 AM
|
#32
|
|
Senior Member
Join Date: Jan 2015
Location: Granite Bay, Ca
Posts: 1,083
|
Quote:
Originally Posted by TitanMike
I've used some of this cable meant for car audio systems and found it to be far inferior to welding cable. Conductor package isn't as dense as welding cable and insulation is more form than function. Designed to be shown off at audiophile rallys.
There's a good reason it's cheaper than welding cable.
|
Good to know. Thanks. Early on I got some 1/0 welding cable (Amazon) that didn't impress me (jacket could be peeled off almost by hand). But all I've gotten since has been much better. I'm not sure I'd use it for welding (pretty tough duty) but for RV it's been quite good. My most recent purchase had a nice slippery and tough white plastic layer under the jacket that impressed me.
|
|
|
|
|
09-14-2021, 02:19 AM
|
#33
|
|
Senior Member
Join Date: Jan 2015
Location: Granite Bay, Ca
Posts: 1,083
|
Quote:
Originally Posted by JimM2109S
Many thanks for that specific information. I had not considered the above, quoted from your post. Good point! If you could post some pics of the battery box it would help as I'm not following how you used the aluminum cross pieces. I'll reread the post again tomorrow.
My 2109S just ordered will have a 12v fridge. I believe we'll have shore power in most of the locations where we plan to camp. That said, I want to make sure we have ample reserve power to keep the systems running wherever we are camping.
The camper comes with a 190w panel on the roof and I opted for a second panel on the order. I had planned on either two 100-150aH batteries or a single 280-320aH. Building my own would be quite easy, hampered only with the box to hold it all.
|
I wouldn't let the need to balance two batteries rank too high as a deterrent. If you just disconnect them and re-connect them without doing any charging or discharging, they will be at the same voltage or close enough. If you leave one in service and have the other one out for a time, say to rearrange something or replace a BMS (very unlikely) then you would need to re-balance the two before reconnecting them. It's just something to know about, not much of a hindrance.
Most 12V RV fridges are designed to run about a 50% duty cycle at 70F and about 100% at 100F (both with typical door opening counts). Many use a single Secor BD35F compressor which draws 5.2 amps when set to operate at maximum RPM (3500 RPM). Taking a worst case of 100F over 24 hours, that's 5.2 times 24 or about 125 Ah. Assuming half of that comes directly from solar during the day and half from battery overnight, that suggests about 60 Ah of battery for the fridge alone. Assuming you won't camp anywhere that is 100F overnight, you can likely reduce that 60 Ah considerably.
Unlike most RV electric energy eaters (except an A/C), the 12V fridge will be the big solar hours energy user. So you need to supply the fridge, potentially that 60 Ah noted above, and put that 60 Ah (or less) into the battery from the night before. So, somewhere around 120 Ah of solar for the fridge alone (sticking with that 100F number). 120 Ah is about 1560 Watthours. Using the commonly used rule of thumb that a solar panel will provide about 5 hours at full output over the solar day, that's 1560/5 or about 300W of solar dedicated to the fridge (at 100F). If, like DW and I, you avoid higher temps, you can round down considerably on both battery Ah and solar watts. If you have kids that will open the fridge door a lot, then don't round down too much.
The above is for normal mostly sunny days. If you want to ride through a day or two or three of less than good sun (i.e., some clouds), you need to factor that in. Maybe assume you will get half the solar and only half re-charge the battery each day. You can up the battery capacity to ride through some number of half solar days by, in the example above, assume that you will come up short about 30 Ah each day on the battery and so need about 90 Ah to ride through a long weekend with only modest sun.
BTW, if you have Excel or similar, I can send you a spreadsheet that uses solar and weather data to predict generator run events with a given load at given locations and any time of the year. It uses NREL's PVWatts solar data generator and does things like adjust 12V fridge run times and propane space heater motor run times based on the ambient temperature at the location that you specify. PM me if you'd like a copy. Or tell me where and when you will camp, and I can run it and post the results. I can do this for the fridge alone or for the fridge and all other loads that you expect to run when dry camping (e.g., propane heater motor).
I don't have the batteries here, but I think I have a sketch of the system I used on the 280 Ah batteries. I have a hunger cat bugging me now, but will dig up the sketch tomorrow.
|
|
|
|
|
09-14-2021, 12:56 PM
|
#34
|
|
Senior Member
Join Date: Jan 2015
Location: Granite Bay, Ca
Posts: 1,083
|
Couldn't find the sketch, but here's a rough one. Note:
sketch is not to scale.......
Aluminum angle pieces are probably overkill but make nice handles ... the unit is over 50 lbs with the wood. And you Do NOT want to drop it.
1/4" luan panels .... not shown ... slide down between the threaded rods and the cells. I used luan because I had it but if I were going to HD to buy I would use 1/8" masonite for the sides and top. The bottom is wider than the cells (1/4" on each side) to support the side pieces.
The top is 1/4" acrylic plastic that I had on hand. BMS sits on top. Double-stick foam tape (3M) works well and leaves some ventillation under the lower side of the heatsink if you double-up 1" squares.
The top and bottom are fastened with shallow head screws through slots to allow the ends to move in and out with battery swelling and shrinking.
I show the aluminum pieces only at the near end in the sketch. I think they are 1/8 x 3/4. Same width as the plywood.
The little vertical block at the top with label cut off is the bluetooth module. It's plenty good for a 50' radius, but I set it with the antenna at the top with hot melt glue to be sure.
There are fish paper insulator sheets between the cells. Others have used thin plastic chopping mat from Target. That's much cheaper than fish paper and it's tough stuff.
I used belleville washers, two, face to face at each end of the threaded rods to provide some spring loading of the threaded rods, but if I ever find some small stiff springs I'll substitute those. The belleville washers I had were 6mm and were a bit too stiff to act like springs. Some would say you don't want to allow swelling. I worry about internal pressures. The 280's will take a modest permanent swell if you exercise them without compression, so it's best to compress first (gently).
You can find jumpers that are made from layers of thin copper with a bow in the middle to allow cell movement. I didn't have those so made C shaped 1/0 jumpers about 4" long. You will want to re-torque the terminals once per year. Insulate the wrench handle (Will Prouse is going to make a trip to the hospital someday).
A few years ago Calb 200 Ah cells were considered the premium DIY build. They have thick plastic cases that allow pretty much no swelling. And at least one 280 cell maker suggests 1000 extra cycles if the cells are compressed.
Will Prouse tested a Battleborn battery near it's max current and said the top where the BMS sits got quite hot. I ran my Overkill BMS at 127 amps (max is 130 amps, rating is 120 amps) for 20 minutes and they got only mildly warm to the touch. Not "hot" at all.

|
|
|
|
|
09-14-2021, 01:11 PM
|
#35
|
|
Member
Join Date: Aug 2021
Posts: 77
|
Watching Will Prouse the other night I also thought one day he is going to hit the wrong stud with those uninsulated wrenches.
|
|
|
|
|
09-14-2021, 01:21 PM
|
#36
|
|
Senior Member
Join Date: Jan 2015
Location: Granite Bay, Ca
Posts: 1,083
|
Quote:
Originally Posted by SK ON THE ROAD
Watching Will Prouse the other night I also thought one day he is going to hit the wrong stud with those uninsulated wrenches.
|
He did have an electrolyte spill recently when he got over zealous with an oscillating cutter. He said having it cleaned up was costly. I think he now opens batteries outside on concrete. At least I hope so.
|
|
|
|
|
09-14-2021, 01:29 PM
|
#37
|
|
Senior Member
Join Date: Feb 2020
Location: Loveland, OH
Posts: 1,171
|
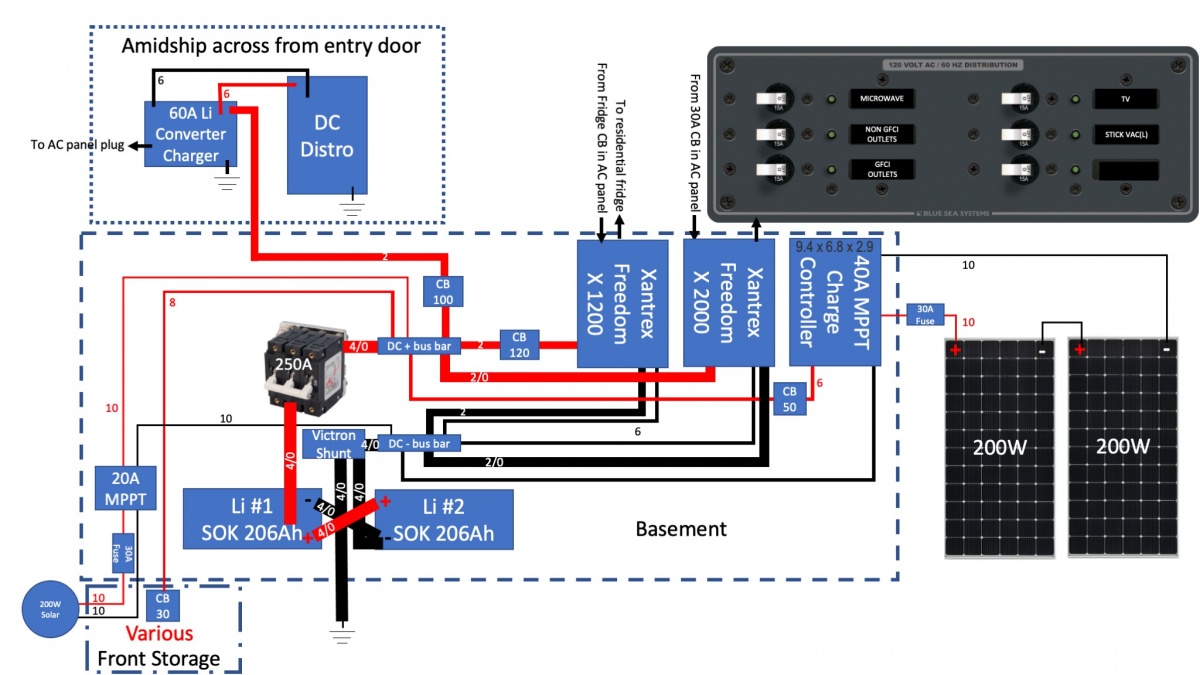
Here's an updated diagram. All parts are on the way. I replaced the Chinese circuit breakers with Bussman. The main breaker is now a Blue Sea.
__________________
2015 Chevy 2500HD 6.0 4x4 CC SB
2021 Salem Heritage Glen 290RL > GenY
1600W solar > 8400Wh LiFePO4 > Victron MultiPlus II > Cerbo GX
|

|
|
|
09-14-2021, 02:25 PM
|
#38
|
|
Senior Member
Join Date: Jul 2017
Location: North of Seattle, WA
Posts: 17,362
|
Quote:
Originally Posted by corn18
Here's an updated diagram. All parts are on the way. I replaced the Chinese circuit breakers with Bussman. The main breaker is now a Blue Sea.
|
When it comes ⁰to a "main breaker" in my LiFePo4 battery installation i chose to use a large fuse and separate disconnect switch.
Fuses tend to force one to find and remedy the problem that caused it blow rather than merely resetting and jolting the system a few more times by resetting. I also prefer an actual switch.
Circuit breakers often have delays before tripping. I chose my fuse size based on max calculated current draw for my system.
Also, a 250 amp fuse and dc switch rated for 250 amp is usually less expensive.
For fuse I used an ANL type rather than "T Class". For me availability of replacement fuses was more important than technical spec's. I can find ANL's in any auto parts stores. T Class fuses are at least 3 days or more away for me should I blow one.
FWIW the BMS in my batteries is also protecting my system should a catastrophic failure occur. A double layer of protection.
BTW, while Blue Seas is located just up the road from where I live in Belljngham, and their prodycts are shipped from there, their products are made all over the world, even China.
Ditto for Bussman
__________________
"A wise man can change his mind. A fool never will." (Japanese Proverb)
"You only grow old when you run out of new things to do"
2018 Flagstaff Micro Lite 25BDS
2023 f-150 SCREW XLT 3.5 Ecoboost (The result of a $68,000 oil change )
|
|
|
|
|
09-14-2021, 03:08 PM
|
#39
|
|
Senior Member
Join Date: Aug 2021
Location: SE Florida
Posts: 444
|
HClark, Now I understand the use of the aluminum. Much appreciate your providing that sketch.
Jim
__________________
2022 MiniLite 2109s
2018 F-150 XLT 4x4, 3.5L, Max tow pkg
2019 Ranger Lariat 4x4 (in reserve)
(We're just getting started!)
|
|
|
|
|
09-22-2021, 10:37 PM
|
#40
|
|
Senior Member
Join Date: Jan 2015
Location: Granite Bay, Ca
Posts: 1,083
|
Quote:
Originally Posted by JimM2109S
Many thanks for that specific information. I had not considered the above, quoted from your post. Good point! If you could post some pics of the battery box it would help as I'm not following how you used the aluminum cross pieces. I'll reread the post again tomorrow.
My 2109S just ordered will have a 12v fridge. I believe we'll have shore power in most of the locations where we plan to camp. That said, I want to make sure we have ample reserve power to keep the systems running wherever we are camping.
The camper comes with a 190w panel on the roof and I opted for a second panel on the order. I had planned on either two 100-150aH batteries or a single 280-320aH. Building my own would be quite easy, hampered only with the box to hold it all.
|
Jim,
I got started on another 280 Ah build today ... see photo. went with masonite and half inch plywood. Narrower plywood but plenty stiff enough it turns out. I usually make the plywood ends wider with holes in them for the threaded rods. I didn't do that this time and the aluminum handles slip up/down and will need to be anchored to the plywood.
It takes very little torque on the 10/24 rod nuts to take the bulge out of bulged batteries so that should not be overdone.

|
|
|
|
|
|
 Posting Rules
|
You may not post new threads
You may not post replies
You may not post attachments
You may not edit your posts
HTML code is Off
|
|
|
|
 » Recent Discussions
 |
|
|
|
|
|
|
|
|
|
|
|
|
|
|
|
|
|
|
|
|
|
|
|
|
|
|
|
|
|
|
|
|
|


 Linear Mode

