 |
|
 07-18-2018, 11:59 AM
|
#21
|
|
Senior Member
Join Date: Oct 2015
Location: Hoffman Estates Il.
Posts: 239
|
MiniLite mods
I've performed about 40 mods to our 2016 2304KS. The most important being the fold away shelf between the couch and Murphy Bed and the fold down headboard. I've e-mailed pictures and instructions to about 35 FROG members so far. My most recent is a , VERY useful, shoe rack at the bottom of the knee wall/bench seat back. As a retired carpenter, I am enjoying all the things we can do to both upgrade our portable home and to fix some of the bugs and shoddy workmanship from the manufacturer.
We will be at the FROG rally in Goshen and I am looking forward to seeing all the mods that my fellow FROGS have created (and I can plagerize), as well as sharing what I've come up with.
|

|

|
|
07-18-2018, 08:17 PM
|
#22
|
|
learning new tricks
Join Date: Jun 2018
Location: fayetteville, arkansas
Posts: 25
|
mini-lite mods
i replaced our thermostat with a coleman-mach digital direct replacement. wire for wire it was the same. it doesnot light up but it was around $58.00 so i can handle shining a flashlight on it in the middle of the night. one of the best mods so far. we have only owned our 2011 mini-lite 2502s since november. days camping in 2017- 46, 2018-38, ready to go again.
|
|
|
|
|
07-22-2018, 09:38 AM
|
#23
|
|
Now Camping Year-Round!!
Join Date: Jan 2008
Location: GTA, Ontario
Posts: 377
|
If youre wanting a programmable backlit thermostat with the option for dual speed for your AC this one works great.However if you want the dual speed fan you have to add a separate toggle switch. We did not add the toggle switch but this is the model thermostat we installed.  
__________________
Cathy & Fraser - Ontario, Canada
2020 RW Signature 8291RK 5er (...May 2021) & 2017 Dodge Ram Laramie 6.7L Cummins Turbo Diesel 4X4
Still missing my beautiful Columbus 2013 Columbus 325RL__2019 Rockwood 2511S__2017 Rockwood ML 2507S__Rockwood Roo 21RS__2009 Wildcat 29RLBS 2013 Columbus 325RL__2019 Rockwood 2511S__2017 Rockwood ML 2507S__Rockwood Roo 21RS__2009 Wildcat 29RLBS
|
|
|
|
|
07-22-2018, 10:05 AM
|
#24
|
|
Senior Member
Join Date: Jun 2012
Posts: 10,907
|
Here's the RV style switch I put in my attachment in Post 20 that you can use to chose speeds. Just mount it in the wall next to the T-stat.
https://www.amazon.com/JR-Products-1.../dp/B002UC4RFK
Here's the switch plate:
https://www.amazon.com/JR-Products-1...101XS0N5N3J91Z
You can get them in white, also.
__________________
1988 Coleman Sequoia - popup (1987-2009) - outlasted 3 Dodge Grand Caravans!
2012 Roo19 - hybrid (2012-2015)
2016 Mini Lite 2503S - tt (2015 - ???)
2011 Traverse LT, 3.6L, FWD
2009 Silverado 1500 Ext Cab, 5.3L, 4x4, 3.73
2016 Silverado 2500HD Dbl Cab, 6.0L 4x4, 4.10
|
|
|
|
|
07-22-2018, 11:27 AM
|
#25
|
|
Senior Member
Join Date: Jan 2018
Posts: 102
|
Thanks for the info and wiring instructions all! We are going on a 2 week trip to FL next month, and DW doesn't want me messing with the AC before that....but sounds like an easy enough switch to add a new t-stat.
|
|
|
|
|
07-22-2018, 07:31 PM
|
#26
|
|
Senior Member
Join Date: Jul 2015
Location: Texas Coastal Bend
Posts: 844
|
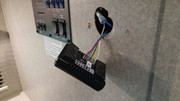
My 2018 Rockwood Mini Lite came with the usual crapola analog thermostat. I did a part number cross-reference and this was what was recommended:
https://www.amazon.com/gp/product/B0...?ie=UTF8&psc=1
A bit unusual but I gave it a shot. It was an easy swap, pretty much wire for wire and I kept all the controls, including fan speed. It's even backlit, not many like this are.
The only caveat is the profile. It's much narrower than the other unit, so the original mount holes aren't covered as you can see. It works like a champ, I'll just have to figure out how to cover up those holes.

|
|
|
|
|
07-22-2018, 08:13 PM
|
#27
|
|
Kasual Kamper
Join Date: Jul 2017
Location: Fairfield County CT
Posts: 1,297
|
When we purchased our used 2013 MicroLite 21DS, those "dead space" panels in the overhead cabinets irked me. So I contacted Forest River and found out that I could order additional matching doors and hardware to cover the spaces. So that's what I did, and I am very pleased with the outcome.
I didn't think to take "before" pictures, so those are stock photos from the internet, but my setup is the same.
Attached Thumbnails    
BTW, WannaB, my far left and far right cabinet doors both swing to the side instead of up, so I'm constantly pulling them the wrong way! At least with yours, it's obvious, lol!
__________________
Current: 2013 Flagstaff MicroLite 21DS
Past: 2000 Fleetwood Mallard 19N
TV: 2013 Nissan Pathfinder SL 4x4
|
|
|
|
|
07-22-2018, 08:27 PM
|
#28
|
|
Junior Member
Join Date: Aug 2017
Posts: 18
|
Could you send me a picture and/or any instructions on how to make a fold down shelf between the Murphy bed and sofa
Thanks
|
|
|
|
|
07-22-2018, 09:37 PM
|
#29
|
|
Senior Member
Join Date: Jul 2015
Location: Texas Coastal Bend
Posts: 844
|
Quote:
Originally Posted by JayArras

When we purchased our used 2013 MicroLite 21DS, those "dead space" panels in the overhead cabinets irked me. So I contacted Forest River and found out that I could order additional matching doors and hardware to cover the spaces. So that's what I did, and I am very pleased with the outcome.
I didn't think to take "before" pictures, so those are stock photos from the internet, but my setup is the same.
Attached Thumbnails
BTW, WannaB, my far left and far right cabinet doors both swing to the side instead of up, so I'm constantly pulling them the wrong way! At least with yours, it's obvious, lol! |
Murphy bed owner's need not apply. 
|
|
|
|
|
07-22-2018, 09:56 PM
|
#30
|
|
Kasual Kamper
Join Date: Jul 2017
Location: Fairfield County CT
Posts: 1,297
|
Quote:
Originally Posted by DavidBo
Murphy bed owner's need not apply. |
...except for the dinette cabinets. 
__________________
Current: 2013 Flagstaff MicroLite 21DS
Past: 2000 Fleetwood Mallard 19N
TV: 2013 Nissan Pathfinder SL 4x4
|
|
|
|
|
07-23-2018, 08:42 AM
|
#31
|
|
Senior Member
Join Date: Jul 2015
Location: Texas Coastal Bend
Posts: 844
|
Quote:
Originally Posted by JayArras
...except for the dinette cabinets. |
Yep, that is definitely something I'll be looking in to. I like the extra access.
|
|
|
|
|
07-27-2018, 10:47 AM
|
#32
|
|
Now Camping Year-Round!!
Join Date: Jan 2008
Location: GTA, Ontario
Posts: 377
|
Quote:
Originally Posted by Denny B
I've performed about 40 mods to our 2016 2304KS...
We will be at the FROG rally in Goshen and I am looking forward to seeing all the mods that my fellow FROGS have created (and I can plagerize), as well as sharing what I've come up with.
|
We will also be at the rally. Hubby is hoping to meet up so he can see in person the flip up shelf behind the murphy bed if you wouldn't mind that. You sent us the instructions/pics and drawings last summer but he is confused about what you did. It is not that he is not handy as he does a lot of wood working and has all different/multitudes of tools.
So anyway, if you're ok with this, maybe I'll pm you and give you my email or tel number so we can meet up while there.
__________________
Cathy & Fraser - Ontario, Canada
2020 RW Signature 8291RK 5er (...May 2021) & 2017 Dodge Ram Laramie 6.7L Cummins Turbo Diesel 4X4
Still missing my beautiful Columbus2013 Columbus 325RL__2019 Rockwood 2511S__2017 Rockwood ML 2507S__Rockwood Roo 21RS__2009 Wildcat 29RLBS
|
|
|
|
|
07-27-2018, 01:37 PM
|
#33
|
|
Senior Member
Join Date: Jun 2018
Posts: 161
|
Quote:
Originally Posted by Burnking
Like your shelves in the front cabinets. What type/length of screws/fasteners did you use?
Thanks
|
I forgot to mention that I didn't screw the shelf brackets directly into the wall. I first cut off the tip of a self drilling drywall anchor leaving just the threads. This way it is not very long. I pre-drilled a small hole in the thin wall and inserted the modified drywall anchor. Then I was able to insert a small screw (aprox 1") and the shelf bracket is tightly affixed to the wall.
-Rich
|
|
|
|
|
07-30-2018, 11:35 PM
|
#34
|
|
Senior Member
Join Date: Apr 2014
Location: Gainesville, FL
Posts: 4,553
|
Quote:
Originally Posted by 45RPM
I forgot to mention that I didn't screw the shelf brackets directly into the wall. I first cut off the tip of a self drilling drywall anchor leaving just the threads. This way it is not very long. I pre-drilled a small hole in the thin wall and inserted the modified drywall anchor. Then I was able to insert a small screw (aprox 1") and the shelf bracket is tightly affixed to the wall.
-Rich
|
I've had success using E-Z Ancor hollow core door anchors. (<- link) The anchors are metal and the aggressive self-drilling thread cuts through the standard luan plywood like butter without going too far. They seat flush and firmly on the wall surface with no cutting or pre-drilling required. They're shorter than the wall is thick, so they don't penetrate the wall on the other side.
HOWEVER !!! WARNING !!! THE SCREWS THAT COME IN THE PACKAGE ARE TOO LONG.
You need them to screw far enough into the anchor to snap off the leading drill tip of the anchor, but DO NOT allow them to screw in all the way to the head of the screw. That WILL penetrate the opposite wall, including the exterior wall.
The alternative is to use the long screw just enough to snap the tip off the front, then back it out and substitute a shorter screw. That works very well, is very secure and doesn't risk damaging the opposite wall.
Yes, I learned this the hard way, but I still recommend them with appropriate precautions.
__________________
TV: 2021 Ford F-150 4WD XLT Crew w/ 3.5L EB & HDPP, payload: 2,416#.
RV: 2020 Rockwood Mini-Lite 2507S, Propride 3P hitch w/ 1400# spring bars
Camping nights: 2021, 52; 2022, 99; 2023, 88; 2024, TBD (Est: 80+)

|
|
|
|
|
08-04-2018, 01:04 PM
|
#35
|
|
Senior Member
Join Date: May 2017
Location: Millcreek UT
Posts: 341
|
45RPM,
Where did you get the hinges for the counter extension and what does it look like? The pictures show a vertical bracket but I can't see what you did. We don't take the extension because there is no good place to store it in travel. Nice pics. Will wait for your answer.
__________________
2018 Rockwood 2509S Mini Lite
Past: 1984 Road Ranger 20', 1988 Kit Companion
1984 Starcraft 24 foot popup
TV: 1999 Dodge 2500 Cummins 4x4
Honda EU2200i Generator, 300 Watts Solar
Ham Callsign KD7UM
|
|
|
|
|
08-05-2018, 10:16 AM
|
#36
|
|
Senior Member
Join Date: Jun 2018
Posts: 161
|
Hi UT Grandpa,
I ordered "Sumnacon Sturdy Folding Shelf Brackets" (16") from Amazon. I'll attach a picture from underneath.
I cut a piece of 1"x4" for each bracket because the wood underneath the counter extension seems too thin to support the brackets. Then I cut a piece of 1"x4" and stained it dark brown and screwed it into the wall of the cabinet for support of the bracket. My wife wanted the counter extension to meet the counter edge both on top and on the kitchen side. Now that it's done, she doesn't like the counter sticking out into the kitchen when folded and would have preferred that the extension be set back - the way it would have protruded when using the original brackets. She loves having the counter extension flush on top!
BONUS
I then took the original FR shelf brackets and used them to make the steps sturdier! I drilled 2 holes in each bracket and then drilled matching holes in both the TT frame and the step frame. The steps are MUCH more stable! If I had a welder, I would have welded them. I don't have a before picture, but you can see where the 2 new bolts are. That's where the former counter extension brackets are bolted. It makes such a difference that I.m surprised FR doesn't have it done at the factory.
-Rich
|
|
|
|
|
08-05-2018, 11:03 AM
|
#37
|
|
GOODBYE SUIT - HELLO RV!!
Join Date: Mar 2018
Posts: 432
|
steps mod
The Fall 2019 Rockwoods have the new aluminum 3-step ladder type steps that fold up and behind the door for towing - a great improvement to the flexible 3-step on current models - you did a great mod for that! Simple and effective.
__________________
LIVE-LOVE-CAMP
2019 Rockwood 2104s w/Equalizer 4-point WDH
2017 Ford Expedition 4WD 3.5L TwinTurbo V6 w/Heavy Duty Tow Pkg (Artemis)
2017 Ford Mustang GT Premium California Special Convertible (The Beast)
2006 Ford Mustang 3.0 V6 Convertible (Lil' Blue)
|
|
|
|
|
08-05-2018, 03:02 PM
|
#38
|
|
Senior Member
Join Date: May 2017
Location: Millcreek UT
Posts: 341
|
Thanks for the reply - pics help a lot
Thanks for the quick reply. Now it makes sense what you did - nice work. I see this happening soon in our trailer as we just kept the extension under the lower bunk and seldom dug it out.
You got to love the folks on this forum.
__________________
2018 Rockwood 2509S Mini Lite
Past: 1984 Road Ranger 20', 1988 Kit Companion
1984 Starcraft 24 foot popup
TV: 1999 Dodge 2500 Cummins 4x4
Honda EU2200i Generator, 300 Watts Solar
Ham Callsign KD7UM
|
|
|
|
|
08-05-2018, 03:06 PM
|
#39
|
|
Senior Member
Join Date: Jun 2018
Posts: 161
|
Also use a bungee cord to keep the extension from bouncing during travel.
-Rich
|
|
|
|
|
08-06-2018, 09:23 PM
|
#40
|
|
Senior Member
Join Date: Apr 2014
Location: Gainesville, FL
Posts: 4,553
|
Quote:
Originally Posted by 45RPM
Hi UT Grandpa,
I ordered "Sumnacon Sturdy Folding Shelf Brackets" (16") from Amazon. I'll attach a picture from underneath.
|
Considering the width of the shelf relative to the length of the vertical part of the hinge, it looks like you shouldn't put anything heavy on the far edge. The leverage on the cabinet wall would be pretty high.
I do like the fact it's flush to the main cabinet and will attempt something similar when we get our future trailer.
__________________
TV: 2021 Ford F-150 4WD XLT Crew w/ 3.5L EB & HDPP, payload: 2,416#.
RV: 2020 Rockwood Mini-Lite 2507S, Propride 3P hitch w/ 1400# spring bars
Camping nights: 2021, 52; 2022, 99; 2023, 88; 2024, TBD (Est: 80+)
|
|
|
|
|
|
 Posting Rules
|
You may not post new threads
You may not post replies
You may not post attachments
You may not edit your posts
HTML code is Off
|
|
|
|
 » Recent Discussions
 |
|
|
|
|
|
|
|
|
|
|
|
|
|
|
|
|
|
|
|
|
|
|
|
|
|
|
|
|
|
|
|
|
|


 Linear Mode

