These are the instructions for the murphy bed flip up couch shelf and headboardNote... placing some masking tape on the bed where you need to make location marks will help you to see your marks and eliminate actually marking the bed. Also, I used a speed square to locate and mark where the top edge of the couch squared to the bed. This will be the bottom of your shelf. Also the top of the 2X4 set up blocks, referred to in the instructions below,
1) Make sure that you fold up and lock the bed in place. Rip the shelf board to a width which will be from the bed to top of the couch. Behind the cushins that project up over the top ot the couch back.(see drawing)
I'm not sure of the width of your model, but it will be from the bed to those cushions less about 1/4 to 1/2 inch. Measure both ends and cut the shelf to the shorter width. Mine differed by 3/8"
our shelf is 60" long, by 7 1/2" wide by 3/4" thick. solid cherry wood to match our cabinets. Because of it's inherent stability, I used Baltic Birch plywood for the headboard. It would also be fine for the shelf.
2) cut the shelf to length, which will be the width of the bed. In our model, the 2304KS the dimension is 60 inches. Hold the back edge of the shelf against the bed bottom (behind the couch when folded and locked in the upright position) and scribe the locations of the plastic edge molding at the edges of the bed, onto the shelf. Then, using a jig, coping or bandsaw, cut reliefs in the shelf so it fits snug against the bed. Note, I cut a couple of 2X4 blocks the height of the small knee wall/ledge that the bed is hinged to the height that I determine for the shelf.( by squaring from the bed to the couch back ) I rested my shelf on these blocks to make it easier to scribe the marks for cutting the reliefs. For better visibility, you might want to add a strip of masking tape to the ends of your shelf and scribe your lines on the masking tape
4) stain and varnish your shelf.
I mixed a red and a brown mahogany stain to match the cherry finish of our cabinets. After staining I applied 4 coats of a water-based semi-gloss finish. General finishes brand.
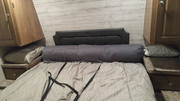
5) I used a large plastic carpenters speed square to determine the height of the hinge location on the bed in relation to the couch back. (See drawing and photo) Using a sharpie, ( again applying some masking tape first will make your marks more visible) Make a mark on the bed about 18 inches in from both sides. This will be the height of the underside of the shelf. Using masking tape, tape your 2X4 spacer blocks to the the bed on your marks. You will be resting the hinge on these when you are attaching the hinge to the bed.
6) Using the vix (self centering) bit, drill the pilot holes into the back edge of the shelf. Center the 48 inch long piano hinge on the shelf edge and fold it over the BOTTOM of the shelf, one hinge leaf on the edge the other hanging down the BOTTOM of the shelf. I used 2 strips of masking tape to hold the hinge in place while drilling the pilot holes. using an apropriate sized vix bit, drill the pilot holes into the back edge of the shelf.
7) use a sharpie to mark the center of the hinge and the center of the bed at the hinge height.
8) open the hinge (into an L shape), set it on the spacer blocks and match up your center marks. (Hinge is centered on the bed) pilot drill only 1 hole near the center and drive one screw in by hand at that point to anchor the hinge in place. Be careful NOT to overdrive and strip the screw hole. NOTE...The cheap panel they use for the bed bottom is very thin. Maybe 1/8 inch? So it's easy to strip out the screw holes.
Do the same for 2 another hole and screw at either end. Now, if you are so equipped, use a SLOW SPEED battery, drill/driver. and if your drill is so equipped, set the torque very low, and carefully drive in all the rest of those tiny screws. DO NOT pilot drill them because the wood is just too damn thin. Or, just, carefully, use a screwdriver. Don't worry, there are enough screws to safely anchor the hinge and your shelf.
9) remove the 2X4 supports and attach the shelf to the hinge by lining up the pilot holes and driving the screws. It helps if you have the wife, or a couple of friends hold the shelf in place while you screw it up,or should I say in . LOL.
10) The shelf is now free hanging. Lift it up into the horizontal position while setting the couch in the upright position.
11) I cut 2- 6 inch pieces off the ends of the strapping thats used to secure the mattress for travel, melted all the cut ends using a torch, then looped and attached one to the center under the shelf (the other is for the headboard) It will make a convenient handle to hold the shelf up while raising the couch.
I know it sounds like it might be difficult to operate, but it's quite easy. And, when you open the couch to open the bed the shelf simply drops down and away.
VIOLA.
YOU NOW HAVE A SHELF WHERE THERE ONCE WAS A DEEP VOID.
A great place for your drinks and snacks, Though one of our chauaua's loves to sit there, I wouldn't recommend supporting children and larger dogs.
THE HEADBOARD
I used 3/4" baltic birch plywood. I stained and varnished the pieces before mounting. and another 4 foot long piano hinge
1) Pull the mattress about 6" away from the head of the bed.
2) measure the height from the bed platform to the top of the mattress. In our case, this included the 2" memory foam topper.
3) deduct the height of the existing headboard and cut a board this dimension wide by the length of the existing headboard. Rip a 20-degree angle on the top edge of the board. This angle will face the front of the trailer. The mounting pocket holes will be on the opposing, widest, side of the board.
4) mount this board to the top. I used pocket holes and screws on 12" centers, using a Kreg pocket hole jig. If you don't have access to a pocket hole jig you can also use 4 angle brackets to mount the board.
5) Measure, diagonally, the distance from the top of this board to the top of the nightstand shelves on either side of the bed. Rip the board to this width or, if you prefer, you can make it taller. Cut to length 1/2" shorter than the shelf edge to shelf edge distance.
6) Making sure that the face of the board was on the wide side of the cut, I ripped a 20-degree angle on the bottom, where the hinge mounts and the board pivots, and a sharp angle to the top edge. do get the sharper angle, I determined the angle and ran the board upright against the table saw fence with the blade set at the appropriate angle. I did use some scrap to do a trial and error fitting.
7) Place the folding board on top of the newly installed lower headboard. Check for fit, then mark the centers.
Mark the center of the hinge. open and drape the hinge, over the lower headboard (hinge knuckle up) and align the center marks. Using masking tape, temporarily tape the hinge in place then pre-drill pilot holes using vi x bit. Using the same technique center the hinge on the upper headboard (on the 20 degrees angled side) pilot drill and mount the hinge to this board, then mount this assembly to the lower board using the pilot holes to perfectly locate it.
8) Add a strap handle centered on the underside like you did for the shelf, and you are done.
I sincerely hope my instructions are adequate? Feel free to message me at
guitarmechanic@att.net for photos of the finished product and/or any clarification, if needed.
I would, very much, love to see photos of your finished product. And, of course, any improvements to my design and fabrication that you might come up with.
I would LOVE any feedback and to see photos of your finished project.
I must add that you really should cut access holes to the hidden underside of the bed. You will find that the good people at F R cheaped out by only installing screws in every other hole in large piano hinge that the bed pivots on. And, like ours, at the ends of the hinge the screws will strip out and the hinge will pull away from the knee wall. I added through bolts to pull the bending ends back into place. Then added screws to the empty holes.
I created removable access panels on both ends. allowing me to vacuum out the construction debris left by F R, and the dust bunnies that seem to gather after every trip. Also twice to retrieve glasses a phone and a box of kleenex.
Good luck and happy camping
Denny


 Linear Mode


