 |
|
 06-13-2011, 09:32 PM
|
#21
|
|
Member
Join Date: Nov 2010
Location: Alberta
Posts: 74
|
Thanks all for the ideas ... here's my modes
I put in a small butcher block stand that was purchased from Rona (Canada), but have seen them at Bed, Bath and Beyond. Used 2 "L" brackets on back legs (without casters) to hold unit solid and used 2 - 4" bed legs in front to level. It holds our toaster oven etc. as trailer is short of counter space. 1st shelf down pulls out, so put a couple of hooks to hold it in place while travelling.


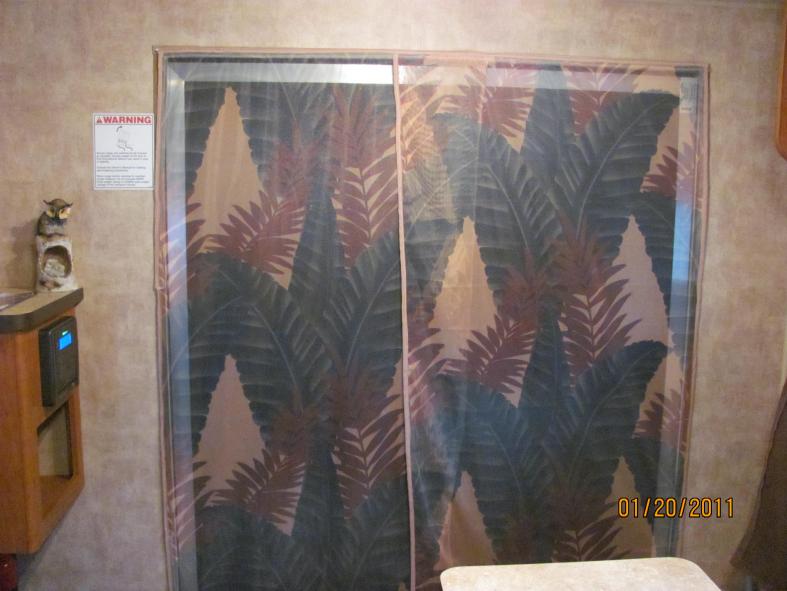
The screen was purchased from Lowes. Cut to overlap and all edge were sewn with bias tape to keep from fraying. In the bottom edge we added long fishing weights to keep it down and in place. The whole thing is held in place with velcro. This makes it easy to open from the middle and hang to the side. doug
|

|

|
|
06-14-2011, 04:45 AM
|
#22
|
|
Phat Phrog Phlunky
Join Date: Jun 2011
Location: Near Lake Geneva Wisconsin
Posts: 979
|
This is very cool  Thanks Retiredguy!
__________________
Scot, I am "that guy"
2014 Raptor 27FS
2014 Ram 1500 Laramie
Days camped in 2013 = 30 final.
Days camped in 2014 = 27 final.  igkra.com
|
|
|
|
|
06-14-2011, 07:20 AM
|
#23
|
|
Senior Member
Join Date: Mar 2011
Posts: 151
|
Campnqueen - yes we were sad to see the folding bunk and the optional faux wood plank floor go. I guess I understand on the bunk if FR had to make it stronger. Actually we have tons of storage up there since it doesn't fold, but not very pretty since there is no door covering up what you store. I was thinking about taking the bunk out, or taking it out and cutting it half the width so there was still some storage and use the half I cut off to make doors, but then my mother put a bug in Lucille's ear saying "well someday if you have grandkids, where will they sleep?" and now Lucille says I can't modify the bunk!
__________________

HeyTomGrayWolf
2012 Grey Wolf 19RR
2012 Toyota Tundra Crewmax 5.7l
2006 Road Star Warrior
|
|
|
|
|
06-14-2011, 07:33 AM
|
#24
|
|
Senior Member
Join Date: Mar 2011
Posts: 151
|
Doug (Retired Guy) - I too feel that area between the couch and closet is kind of wasted space. I like your idea of making more counter space for the coffee maker or toaster oven.
Lucille likes your decorative screen not only for it being a screen, but she thinks it is much prettier to look at than the big black flooring of the ramp. We live in Florida and our first camping trips (at least relaxing ones since camping on the way home from Indiana doesn't count) will be in Florida and it will be too hot to have the ramp or windows open, but that sounds like another project I need to have ready for this fall when we can hopefully camp in cooler weather.
__________________
HeyTomGrayWolf
2012 Grey Wolf 19RR
2012 Toyota Tundra Crewmax 5.7l
2006 Road Star Warrior
|
|
|
|
|
06-14-2011, 06:20 PM
|
#25
|
|
Member
Join Date: Mar 2011
Posts: 68
|
Quote:
Originally Posted by retiredguy

Thanks all for the ideas ... here's my modes
I put in a small butcher block stand that was purchased from Rona (Canada), but have seen them at Bed, Bath and Beyond. Used 2 "L" brackets on back legs (without casters) to hold unit solid and used 2 - 4" bed legs in front to level. It holds our toaster oven etc. as trailer is short of counter space. 1st shelf down pulls out, so put a couple of hooks to hold it in place while travelling.
Attachment 6322
Attachment 6323
Attachment 6324
The screen was purchased from Lowes. Cut to overlap and all edge were sewn with bias tape to keep from fraying. In the bottom edge we added long fishing weights to keep it down and in place. The whole thing is held in place with velcro. This makes it easy to open from the middle and hang to the side. doug |
Great mods, Doug (retired guy)!!
I am so glad for this forum!! Great ideas and great pics along with instructions makes for better use of wasted spaces!! Thank you all!!
|
|
|
|
|
06-14-2011, 07:13 PM
|
#26
|
|
Phat Phrog Phlunky
Join Date: Jun 2011
Location: Near Lake Geneva Wisconsin
Posts: 979
|
Quote:
Originally Posted by Stargazerandu
Great mods, Doug (retired guy)!!
I am so glad for this forum!! Great ideas and great pics along with instructions makes for better use of wasted spaces!! Thank you all!!
|
Agreed
__________________
Scot, I am "that guy"
2014 Raptor 27FS
2014 Ram 1500 Laramie
Days camped in 2013 = 30 final.
Days camped in 2014 = 27 final.
igkra.com
|
|
|
|
|
06-15-2011, 08:14 PM
|
#27
|
|
Senior Member
Join Date: Mar 2011
Posts: 151
|
More work on the Motorcycle Wheel Chock tonight. The wheel chock I bought off Ebay came in today. There seems to be two guys selling this chock. One seller in Florida lists it for $50.99 in an auction format with free shipping, the other seller is from California and sells it as a "Buy it Now" for $59.99, again with free shipping. We went with the auction guy from Florida since the shipping would be faster and won it for $53.01. This chock allows you to roll into it and with the "flapper" in the track, it flips up and holds the bike in place. It holds it well enough to get off and one person can install the tie-downs, but I certainly would not trust just this flapper to hold the bike in place.
I bought two 1-1/2" long x 1/2-13 Carriage Bolts to mount this chock to the plywood. I wanted to use carriage bolts so that a minimum of hardware would be on the bottom side of the plywood against the vinyl floor of the trailer. After drilling the two holes for the carriage bolts, I cut away the carpeting around the hole, so that the carriage bolt could sink into the plywood as far as possible. I then cut two new squares of carpeting and using more contact cement, put carpeting over the heads of the carriage bolts so that the floor is once again protected completely by carpeting.
It's ready for loading tomorrow night when we pack up the trailer (and bike) to head off Friday morning on our 4 day, long weekend trip to Atlantic Beach, FL (near Jacksonville). Knowing me, I will post a few more pics tomorrow night showing the bike loaded and where it sits in the kitchen (trailer). When placing the chock on the plywood, I tried to put the chock (bike) as far forward as possible to keep most the weight over the axles, but still allow the front eyelets to stay well forward of the handlebars so that I have plenty of tension pulling the bike into the chock (forward). I also "think" I have left the chock far enough back that we can still open the refrigerator door. I guess we will see how accurate my measurements are tomorrow when I actually load the bike into this chock in the trailer!
Bottom side of Plywood with Carriage Bolts installed but not covered:

Bottom side of Plywood after Carriage Bolts were covered with more carpeting:

Top view of chock mounted to the plywood:

__________________
HeyTomGrayWolf
2012 Grey Wolf 19RR
2012 Toyota Tundra Crewmax 5.7l
2006 Road Star Warrior
|
|
|
|
|
06-18-2011, 06:23 AM
|
#28
|
|
Senior Member
Join Date: Mar 2011
Posts: 151
|
Greetings - below are some pictures of the wheel chock when I loaded the motorcycle in the trailer Friday morning.
Here is one with the plywood base in the trailer with the wheel chock mounted:

This one shows how once the bike can be loaded with one person and the chock holds the bike in place until you can put the straps on:

Another view from back of trailer with bike loaded:

And then with the bike all strapped down:

The bike rode very well and stayed in place for the ride to Jacksonville! - Tom
__________________
HeyTomGrayWolf
2012 Grey Wolf 19RR
2012 Toyota Tundra Crewmax 5.7l
2006 Road Star Warrior
|
|
|
|
|
06-19-2011, 08:33 PM
|
#29
|
|
Member
Join Date: Apr 2011
Posts: 81
|
All this is great stuff!
Can you think of the pandemonium we'd cause if we all met in a Walmart parking lot for a DIY, overnight!  
Sportster
...can you imagine 
|
|
|
|
|
06-20-2011, 07:30 AM
|
#30
|
|
Senior Member
Join Date: Mar 2011
Posts: 151
|
Yeah, that would be fun!
I would have to put "Generator" on my list before overnighting at a Wal-Mart... (or wait for cool enough weather not to want to run the A/C)
Next up for pimping my 19RR is a 26" LED Flat Screen TV in the corner by the rear ramp and side door. TV was $199 on eCost.com and arrives Tuesday.
Factory side in bracket that holds the 19" TV is going to the front of the trailer so the 19" can be watched from bed (or on the outdoor bracket)
Tom
|
|
|
|
|
06-20-2011, 03:21 PM
|
#31
|
|
Phat Phrog Phlunky
Join Date: Jun 2011
Location: Near Lake Geneva Wisconsin
Posts: 979
|
Quote:
Originally Posted by heytomgraywolf
Yeah, that would be fun!
I would have to put "Generator" on my list before overnighting at a Wal-Mart... (or wait for cool enough weather not to want to run the A/C)
Next up for pimping my 19RR is a 26" LED Flat Screen TV in the corner by the rear ramp and side door. TV was $199 on eCost.com and arrives Tuesday.
Factory side in bracket that holds the 19" TV is going to the front of the trailer so the 19" can be watched from bed (or on the outdoor bracket)
Tom
|
Tom,
Let me know how the 26" fits in that corner. I have one already but am afraid to change the mounting until I have time to measure it all out.
I have the 19" there now.
__________________
Scot, I am "that guy"
2014 Raptor 27FS
2014 Ram 1500 Laramie
Days camped in 2013 = 30 final.
Days camped in 2014 = 27 final.
igkra.com
|
|
|
|
|
06-21-2011, 05:59 PM
|
#32
|
|
itch'n to road trip
Join Date: Jun 2010
Location: North Georgia Mountains-Jasper GA.
Posts: 957
|
Hey Tom Gray Wolf,
I showed your photos of your plywood/chock motorcycle ties down thingy... he is VERY jealous! This is just what we wanted to do... you description and photos have helped us see how its done... can't wait to do this "pimp" to our trailer too. THANKS for sharing!
__________________

2012 Ford F-250 King Ranch Super Crew Cab 4x4
2014 Work & Play 25ULA
Paula Drake, Ken Cooksey, Sunny Delight, Valor & Scarlet Begonia
Jasper Ga.
|
|
|
|
|
06-21-2011, 10:08 PM
|
#33
|
|
Member
Join Date: Mar 2011
Posts: 68
|
Okay, here are my mods... And thank you all for all the tips! I don't think I could have done it without them....
I am not finished with the mods but this is what I've done so far...
|
|
|
|
|
06-23-2011, 09:12 PM
|
#34
|
|
Senior Member
Join Date: Mar 2011
Posts: 151
|
Nice Pimpin' Stargazerandu (Olga). I sure like how you and Essness (Scot) reinforced your drawers versus my method. Those vertial supports seem like the way to go. I guess as long as mine holds I will leave it alone for now, but if I have to redo it, I am glad you "showed me the way".
I am trying to see what mods (pimpin') you did under the sink near the oven. What is the wood you added on that shelf near the oven do? I noticed your oven seems to be wrapped in silver insulation. I am going to have to look at mine this weekend, because I think mine is dark metal or just the outside of the oven's metal. I was thinking mine would get very hot (Lucille did use the oven last weekend to make me some French Fries!) and I made sure nothing that would melt would get next to the oven wall since when you stomp on the brakes, that is the direction everything shifts in the cabinet. If anyone else has this silver insulation around their oven, then I guess I caught another Forest River Quality Control Check, because my oven isn't insulated.
Now that I wrote all that, maybe that is what Olga is showing us is they added some insulation to the side of their oven to prevent what I was just saying.... If so, excellent mod Olga!
Tom
__________________
HeyTomGrayWolf
2012 Grey Wolf 19RR
2012 Toyota Tundra Crewmax 5.7l
2006 Road Star Warrior
|
|
|
|
|
06-23-2011, 09:43 PM
|
#35
|
|
Member
Join Date: Mar 2011
Posts: 68
|
Quote:
Originally Posted by heytomgraywolf
Nice Pimpin' Stargazerandu (Olga). I sure like how you and Essness (Scot) reinforced your drawers versus my method. Those vertial supports seem like the way to go. I guess as long as mine holds I will leave it alone for now, but if I have to redo it, I am glad you "showed me the way".
I am trying to see what mods (pimpin') you did under the sink near the oven. What is the wood you added on that shelf near the oven do? I noticed your oven seems to be wrapped in silver insulation. I am going to have to look at mine this weekend, because I think mine is dark metal or just the outside of the oven's metal. I was thinking mine would get very hot (Lucille did use the oven last weekend to make me some French Fries!) and I made sure nothing that would melt would get next to the oven wall since when you stomp on the brakes, that is the direction everything shifts in the cabinet. If anyone else has this silver insulation around their oven, then I guess I caught another Forest River Quality Control Check, because my oven isn't insulated.
Now that I wrote all that, maybe that is what Olga is showing us is they added some insulation to the side of their oven to prevent what I was just saying.... If so, excellent mod Olga!
Tom
|
I did just that!! I noticed there was no insulation around the oven and thought that would be dangerous when using it so I wrapped it with the insulation. I wrapped it loosely as I did not want to cause a heating hazard and the reason I did it that way is the water lines were laying right on the backside of the oven....not good. I also put a piece of wood across the bottom to keep things from sliding under the oven....
Olga.
|
|
|
|
|
06-24-2011, 05:38 AM
|
#36
|
|
Phat Phrog Phlunky
Join Date: Jun 2011
Location: Near Lake Geneva Wisconsin
Posts: 979
|
Olga,
I guess I missed a couple days  Well done on the mods
__________________
Scot, I am "that guy"
2014 Raptor 27FS
2014 Ram 1500 Laramie
Days camped in 2013 = 30 final.
Days camped in 2014 = 27 final.
igkra.com
|
|
|
|
|
06-25-2011, 07:32 AM
|
#37
|
|
Senior Member
Join Date: Mar 2011
Posts: 151
|
Quote:
Originally Posted by heytomgraywolf
Today I added a shelf in the bedroom. There is a nice outlet up by your head when laying in bed that would be good for charging cell phones, but there is no place to put your phone. I found some finished shelving material at Home Depot (it is not good Formica, just vinyl coated particle board that is made by Rubbermaid). It is in the window and flooring section of the Depot and it is really for building your own shelving and bookcases. I cut the board down to 5" wide because I did not want to hit it getting out of bed and I made the length 28" (There is room for about 36", but again, I did not want to be hitting the corner of the shelf getting in and out of bed).
Now Lucille and I have a place to lay our cell phones and charge them at night and Lucille also says her coffee cup will rest up there once I get up in the morning and fix the coffee and bring her coffee in bed!??! Sound like someone is awfully spoiled for camping!
Here is what it looks like.
 |
UPDATE ON BEDROOM SHELF:
While I mounted this shelf as high as possible to keep from hitting it while in bed, I did make it high enough to still hold Lucille's insulated coffee mug, but I should have mounted it about 1.5" lower so you could also put a water bottle up there.

So, last night when Lucille wanted to leave a water bottle up there and it wouldn't fit she laid it down on it's side. Guess who got bonked with a water bottle in the middle of the night last night when it rolled off?!? The "guy who mounted the shelf too high"!
__________________
HeyTomGrayWolf
2012 Grey Wolf 19RR
2012 Toyota Tundra Crewmax 5.7l
2006 Road Star Warrior
|
|
|
|
|
06-27-2011, 11:20 AM
|
#38
|
|
Member
Join Date: Mar 2011
Posts: 68
|
Hi everyone!!
Well I did some more mods this past weekend.
I decided to tackle the outside storage compartment. It scared me to see copper tubing unprotected and a wide open space for things to move around, possibly causing damage.
As you can see by the pics, I built a wall around the tubing and sectioned off the space to protect the water heater from loose objects. It's not my neatest work but the space was very confining.
By the way, the water heater is insulated. It comes neatly wrapped in styrofoam.
Olga.
|
|
|
|
|
06-27-2011, 12:39 PM
|
#39
|
|
Senior Member
Join Date: Mar 2011
Posts: 151
|
Nice job! I see you are using good quality plywood for your mods, something that FR's cost/weight cutting doesn't allow. Now you are up two mods on me. I have been gone the last two weekends camping, now next weekend flying up to my sister's for the 4th and then I have to work the weekend of the 9th, so I am falling behind on my projects!
I want to take the plywood covers off the bed and see if I can mount some fabric between the decking and the supports. I think the bed makes too much noise climbing in and moving around in the night.
Thanks for the post!
__________________
HeyTomGrayWolf
2012 Grey Wolf 19RR
2012 Toyota Tundra Crewmax 5.7l
2006 Road Star Warrior
|
|
|
|
|
06-28-2011, 07:26 AM
|
#40
|
|
Senior Member
Join Date: Mar 2011
Posts: 151
|
Last night I installed the 26" LED Vizio TV I purchased. I removed the slide in bracket in the rear of the trailer to re-use up by the bedroom. I purchased a flat panel mount on Ebay for $16.99 free shipping that looks like this:

I mounted this bracket in the same location as the original bracket both vertically and horizontally. This bracket gives you lots of variation horizontally since I am going to have to mount the 26" in the corner. It also has a "tilt" adjustment that I used to make sure the two bottom edges of the TV are resting against the walls of the trailer:

While this bracket is plenty strong to hold a 26" TV in a "stationery" home, I am going to brace and lock down the TV with some "L" brackets or wood before taking off on my first trip. Without anchoring it to the walls, I would be afraid it would swing around and bounce too much when traveling. Since it mounts in the corner and is tilted for good viewing while sitting on the couch, I don't see an issue bracing it and locking it down since we would not plan on moving it:

Then I took the original slide mount and screwed it into the wall just to the right of the front bunk. We can now view this TV from anywhere on the queen bed and we will probably leave this TV here except if we would want to slide it out and use the outdoor bracket that comes with the 19RR:

I will add a few more close up pictures of the 26" TV once I figure out how I am going to brace it. - Tom
TV: http://www.ecost.com/p/Vizio-Consume...99~pdp.gibeeea
Bracket: http://cgi.ebay.com/LCD-TV-Monitor-F...QQcmdZViewItem
__________________
HeyTomGrayWolf
2012 Grey Wolf 19RR
2012 Toyota Tundra Crewmax 5.7l
2006 Road Star Warrior
|
|
|
|
|
|
 Posting Rules
|
You may not post new threads
You may not post replies
You may not post attachments
You may not edit your posts
HTML code is Off
|
|
|
|
 » Recent Discussions
 |
|
|
|
|
|
|
|
|
|
|
|
|
|
|
|
|
|
|
|
|
|
|
|
|
|
|
|
|
|
|
|
|
|


 Linear Mode

