 |
|
 03-13-2019, 06:32 PM
|
#21
|
|
Senior Member
Join Date: Oct 2018
Location: Indiana
Posts: 553
|
Quote:
Originally Posted by Hoglou

I bet it is 1/2" pex. a 8" piece and a couple of shark bits and its done. come by the house and we can swap it out in 20 minute, but I only have red and blue (not a plumber but I see no spec differences). but we may have to make a parts run to lowes (and roadhouse for a rib eye)....
|
Haha bro I live in indy, I'm just curious if a sharkbite will work on the white hose
|

|

|
|
03-30-2019, 02:08 PM
|
#22
|
|
Senior Member
Join Date: Jun 2018
Posts: 191
|
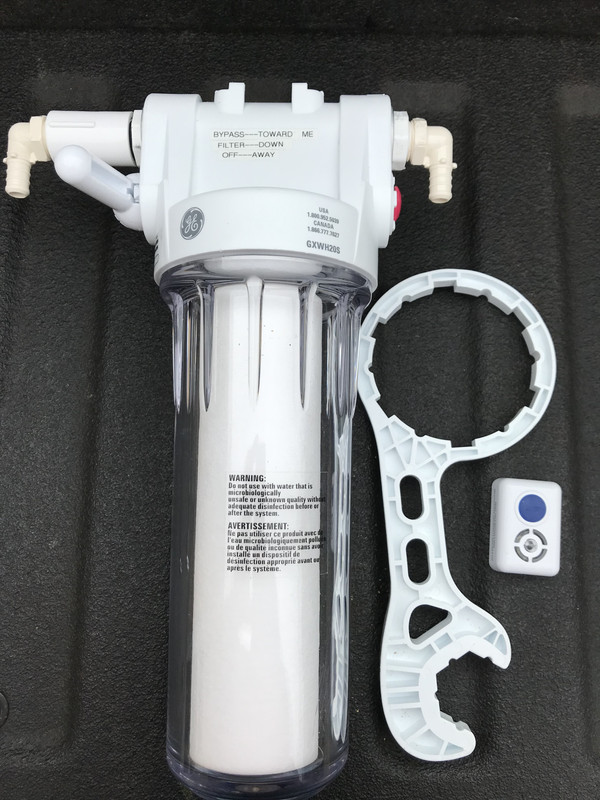
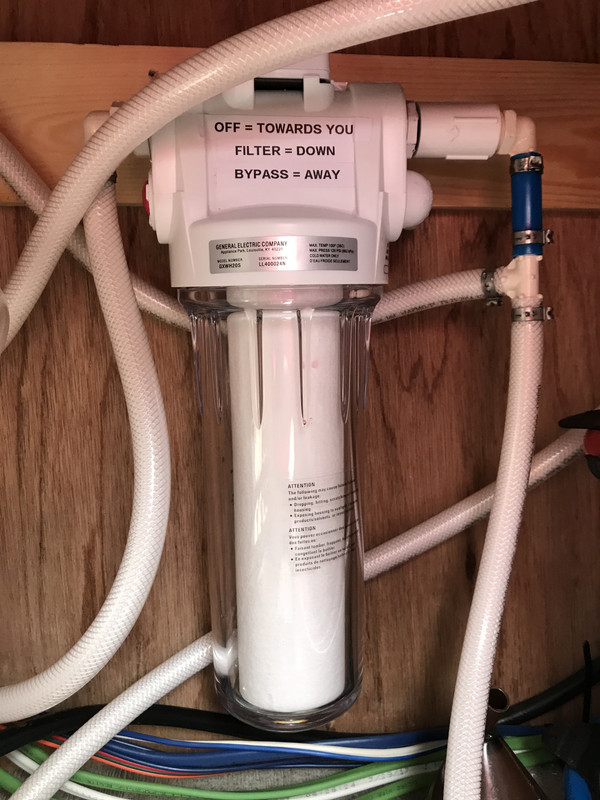
I just finished installing the GE GXWH20S filter in mine. I like the fact that it has a built in bypass valve.
I was surprised that it included a 90 day battery operated timer that can fit on the top of the filter or it can easily attached to and magnetic surface.
Bob
|
|
|
|
|
03-30-2019, 09:17 PM
|
#23
|
|
CathMo
Join Date: Jan 2019
Location: AZ and the road
Posts: 23
|
Bypassing Water Filter on Roo 233s
We just did ours too. Use an inline filter at the spigot.
|
|
|
|
|
04-01-2019, 05:38 PM
|
#24
|
|
Senior Member
Join Date: Oct 2018
Location: Indiana
Posts: 553
|
Quote:
Originally Posted by HappyTrav
I just finished installing the GE GXWH20S filter in mine. I like the fact that it has a built in bypass valve.
I was surprised that it included a 90 day battery operated timer that can fit on the top of the filter or it can easily attached to and magnetic surface.
Bob
|
Nice job
|
|
|
|
|
04-01-2019, 05:42 PM
|
#25
|
|
Senior Member
Join Date: Oct 2018
Location: Indiana
Posts: 553
|
Quote:
Originally Posted by clandsie
We just did ours too. Use an inline filter at the spigot.
|
I did the same thing, the inline is the cheapest filter ,and the thought of the glass housing breaking at the worst time ,, just scares me. I can find my new filter anywhere I go . Walmart is always on your way home
|
|
|
|
|
04-02-2019, 09:51 PM
|
#26
|
|
Senior Member
Join Date: Oct 2018
Posts: 161
|
I also removed the water filter and housing. It was a tough job as they used about 1 1/4" screws to hold on a 1/4" thick bracket in 4 places. This was apparently done before the sink was in as it took me lots of time to get out 3 of the 4 screws. Then I found that I could not get at the 4th screw and broke the housing up after removing the clear housing. I do not have the sediment filter fastened down as I ran out of the needed tools. This housing is about the same that is on the water pump. THIS IS ALL POSSIBLE ONLY WITH THE USE OF AN EXTERNAL FILTER AT THE CITY WATER HOOK UP. You could use the same sediment filter at both places to make easier maintenance by only needing 1 spare.
|
|
|
|
|
04-03-2019, 06:39 AM
|
#27
|
|
Senior Member
Join Date: Feb 2019
Posts: 146
|
Soooo, been reading this thread and was wondering about all the fuss as mine ('18 21SS) is fairly easy to access and seemed solid enough.
Well we just bought ours and haven't used it yet and hadn't even de-winterized it from the dealer...until last night. Let me say I agree, she's gonna come out.
Even if it works perfectly when I took the housing off after flushing and sanitizing the lines I realized this is gonna leave a mess. I found no way to drain it down a few inches to keep it from spilling as I turned the housing and removed it to add the filter. The other concern I have is that the side of the housing at the base where it turns to form the bottom is resting on a piece of 2x4 the use as a brace. Hmm....bouncing trailer plastic container full of water hitting something over and over..she gotta go.
Using an external filter is to easy and we are used to it after years of pup camping.
__________________
'18 Rockwood ROO 21SS
600# Fastway E2 WDH
'14 F-150 FX4 SuperCab
|
|
|
|
|
04-03-2019, 06:49 AM
|
#28
|
|
Senior Member
Join Date: Jun 2018
Posts: 191
|
Quote:
Originally Posted by Hawkester
Even if it works perfectly when I took the housing off after flushing and sanitizing the lines I realized this is gonna leave a mess. I found no way to drain it down a few inches to keep it from spilling as I turned the housing and removed it to add the filter.
|
When you want to take it off all you need to do is loosen the housing so you can spin it off by hand and put a grocery bag around it. The grocery bag will catch all the water that would be spilled.
Bob
|
|
|
|
|
04-03-2019, 07:20 AM
|
#29
|
|
Senior Member
Join Date: Feb 2019
Posts: 146
|
Quote:
Originally Posted by HappyTrav
When you want to take it off all you need to do is loosen the housing so you can spin it off by hand and put a grocery bag around it. The grocery bag will catch all the water that would be spilled.
Bob
|
Face palm to forehead....thanks. sure beats the shove a towel underneath first method...
__________________
'18 Rockwood ROO 21SS
600# Fastway E2 WDH
'14 F-150 FX4 SuperCab
|
|
|
|
|
04-03-2019, 09:31 AM
|
#30
|
|
Senior Member
Join Date: Jun 2018
Posts: 191
|
Quote:
Originally Posted by Hawkester
Face palm to forehead....thanks. sure beats the shove a towel underneath first method...
|
Me too. The mechanic doing the PDI told me that it was the best way to do it.
Bob
|
|
|
|
|
06-06-2019, 12:17 PM
|
#31
|
|
Senior Member
Join Date: Jun 2011
Posts: 244
|
Quote:
Originally Posted by wanderer44
*** I do not have the sediment filter fastened down as I ran out of the needed tools. This housing is about the same that is on the water pump.***
|
http://www.forestriverforums.com/for...0&d=1554259396
So I have this as well as my normal filter and housing. Am I hearing correctly that this is an additional sediment filter? Should I be cleaning this out from time to time? Is there a replaceable filter inside that I should be replacing? I never really paid it much attention before!
__________________
2017 Shamrock 23WS (Sold)
2020 Lance 2375 behind a 2017 RAM 2500 Cummins 6.7L i6
|
|
|
|
|
06-06-2019, 02:42 PM
|
#32
|
|
Senior Member
Join Date: Jun 2018
Posts: 191
|
Just a screen. I wouldnt bother with it until it collects some debris.
Bob
|
|
|
|
|
06-13-2019, 07:30 PM
|
#33
|
|
Senior Member
Join Date: Dec 2012
Location: Central Florida
Posts: 317
|
JUST in case...
Hey there marine3038.....
JUST IN CASE, my guess is no issue/problem for you BUT I did notice that the Shark Bite you used had one end brown and the other end grey (the little plastic parts that stick out)..... has anyone ever shared what those mean with you??
I don't remember which one is which but i THINK I seem to recall that the colors were for the TYPE of pipes you are joining...so PEX gets one color while copper or CPVC get's their own color's too. Most of your Home Depot/Lowes type folks won't be able to answer that, but a plumbing supply or most ACE hardware folks can in my experience.
Like I said I don't think you have an issue as those things are pretty bullet proof, but IF you do notice a leak or separation ask someone if those grey/brown ends might be the reason....heck maybe someone on these boards even knows!
P.S. -GREAT LOOKING JOB!! (I wasted the money to rent a crimper and used the fittings to rejoin my pet together when I did mine 7 years ago...still hasn't leaked a drip!
__________________

Ed & Chris, Empty Nesters (missing Josh & Jaclyn)
along with Blue & Tessa, Cat Explorers!
2020 Rockwood Roo 235s
2019 F-250 Diesel 4x4 Super Duty
|
|
|
|
|
06-13-2019, 08:33 PM
|
#34
|
|
Senior Member
Join Date: Jun 2018
Posts: 191
|
Quote:
Originally Posted by Marine3038
We had to lower the front end of the camper (stabilizers) so the water would properly drain out.
!
|
Good thing you werent gone for the day.
FWIW:
Whenever we leave the camper we turn off the hot water heater and the water supply and turn both back on when we get back.
It only takes a second and is an easy habit to develop.
Bob
|
|
|
|
|
06-14-2019, 09:26 AM
|
#35
|
|
Retired Panpsychist
Join Date: Jul 2016
Location: Western Massachusetts
Posts: 1,043
|
Quote:
Originally Posted by HappyTrav
{snip}...Whenever we leave the camper we turn off the hot water heater and the water supply and turn both back on when we get back...{snip}
|
Great idea! Would it also make sense to turn off the water pump as well to lessen the pressure in the system?
__________________
Theo & Carol
2007 GoldenDoodle ("Cooper") R.I.P.
2020 Rockwood Roo 23IKSS
2015 F-150 4WD XLT SCab, 5.0L, 3.73, 36gal, HD Towing Pkg (53A), 1,980lb Payload
|
|
|
|
|
06-14-2019, 02:07 PM
|
#36
|
|
Senior Member
Join Date: Jun 2018
Posts: 191
|
Quote:
Originally Posted by Theo
Great idea! Would it also make sense to turn off the water pump as well to lessen the pressure in the system?
|
If you are in a park with WES all you need to do is turn off the water. The pump comes into play when you arent connected to city water and are running off of the onboard tank.
I always turn off the pump as well when traveling or boondocking and leaving for the day.
Bob
|
|
|
|
|
06-16-2019, 08:18 PM
|
#37
|
|
Member
Join Date: Jan 2019
Posts: 43
|
thanks for the write up. I replaced mine the next day after we brought our 2019 233S home. followed your steps and bypassing went very smoothly. much appreciated!
|
|
|
|
|
06-17-2019, 02:33 PM
|
#38
|
|
Senior Member
Join Date: Dec 2014
Posts: 432
|
I slide a cool whip style plastic container under the filter housing to remove.
__________________
2023 Coachman Apex UL 243FKS, 2016 F150
|
|
|
|
|
06-22-2019, 08:24 PM
|
#39
|
|
Senior Member
Join Date: Apr 2018
Location: Granite Bay California
Posts: 111
|
Quote:
Originally Posted by wanderer44
I also removed the water filter and housing. It was a tough job as they used about 1 1/4" screws to hold on a 1/4" thick bracket in 4 places. This was apparently done before the sink was in as it took me lots of time to get out 3 of the 4 screws. Then I found that I could not get at the 4th screw and broke the housing up after removing the clear housing. I do not have the sediment filter fastened down as I ran out of the needed tools. This housing is about the same that is on the water pump. THIS IS ALL POSSIBLE ONLY WITH THE USE OF AN EXTERNAL FILTER AT THE CITY WATER HOOK UP. You could use the same sediment filter at both places to make easier maintenance by only needing 1 spare.
|
Where is this filter located? I have a 2018 233s and have never seen this. I have looked lots of places and cannot find it. Not sure my unit has one.
__________________
------------------------------
2018 Rockwood Roo 233S
2003 Chevy 3/4T Suburban
TST Tire Monitor Tow/Trailer

|
|
|
|
|
06-22-2019, 10:22 PM
|
#40
|
|
Site Team
Join Date: Jan 2007
Location: Goodyear, Arizona
Posts: 33,849
|
Quote:
Originally Posted by Wprather
Where is this filter located? I have a 2018 233s and have never seen this. I have looked lots of places and cannot find it. Not sure my unit has one.
|
It came from the factory with one. Unless a previous owner removed it.
__________________
Dan-Retired California Firefighter/EMT
Shawn-Musician/Entrepreneur/Wine Expert
and Zoe the Wonder Dog(R.I.P.) 
2016 PrimeTime TracerAIR 255, pushing a 2014 Ford F150 SCREW XTR 4x4 3.5 Ecoboost w/Max Tow Package
4pt Equal-i-zer WDH and 1828lbs of payload capacity
|

|
|
|
|
 Posting Rules
|
You may not post new threads
You may not post replies
You may not post attachments
You may not edit your posts
HTML code is Off
|
|
|
|
 » Recent Discussions
 |
|
|
|
|
|
|
|
|
|
|
|
|
|
|
|
|
|
|
|
|
|
|
|
|
|
|
|
|
|
|
|
|
|


 Linear Mode

